14
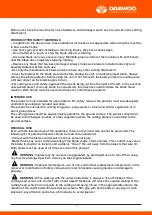
Fig.6A
Fig.6B
WARNING:
Never use your trimmer without the guard properly installed. Failure to adhere to
this warning can cause serious personal injury.
2. RULES FOR SAFE OPERATION
WARNING:
Never allow children, persons with reduced physical, sensory or mental capabili-
ties or lack of experience and knowledge or people unfamiliar with these instructions to use the
machine!
Children should be supervised to ensure that they do not play with the appliance.
Cleaning and user maintenance shall not be made by children.
General Power Tool Safety Warnings
Warning:
Read all safety warnings and all instructions. Failure to follow the warnings
and instructions may result in electric shock, fire and/or serious injury.
Save all warnings and instructions for future reference.
The term "power tool" in the warnings refers to your mains-operated (corded) power tool or
battery-operated (cordless) power tool.
1) Work area safety
a) Keep work area clean and well lit. Cluttered or dark areas invite accidents.
b) Do not operate power tools in explosive atmospheres, such as in the presence of
flammable liquids, gases or dust. Power tools create sparks which may ignite the dust or fumes.
c) Keep children and bystanders away while operating a power tool. Distractions can cause you to
lose control.
2) Electrical safety
a) Power tool plugs must match the outlet. Never modify the plug in any way. Do not use any adapter
plugs with earthed (grounded) power tools. Unmodified plugs and matching outlets will reduce risk
of electric shock.
b) Avoid body contact with earthed or grounded surfaces, such as pipes, radiators,
ranges and refrigerators. There is an increased risk of electric shock if your body is
earthed or grounded.
c) Do not expose power tools to rain or wet conditions. Water entering a power tool
will increase the risk of electric shock.
d) Do not abuse the cord. Never use the cord for carrying, pulling or unplugging the
power tool. Keep cord away from heat, oil, sharp edges or moving parts. Damaged
or entangled cords increase the risk of electric shock.
e) When operating a power tool outdoors, use an extension cord suitable for
outdoor use. Use of a cord suitable for outdoor use reduces the risk of electric shock.
f) If operating a power tool in a damp location is unavoidable, use a residual current
device (RCD) protected supply. Use of an RCD reduces the risk of electric shock.
3) Personal safety
a) Stay alert, watch what you are doing and use common sense when operating a power tool. Do not
use a power tool while you are tired or under the influence of drugs, alcohol or medication. A
moment of inattention while operating power tools may result in serious personal injury.
b) Use personal protective equipment. Always wear eye protection. Protective equipment such as
dust mask, non-skid safety shoes, hard hat, or hearing protection used for appropriate conditions
will reduce personal injuries.
c) Prevent unintentional starting. Ensure the switch is in the off-position before connecting to power
source and/or battery pack, picking up or carrying the tool.Carrying power tools with your finger on
the switch or energising power tools that have the switch on invites accidents.
d) Remove any adjusting key or wrench before turning the power tool on. A wrench or a key left
attached to a rotating part of the power tool may result in personal injury.
e) Do not overreach. Keep proper footing and balance at all times. This enables better control of the
power tool in unexpected situations.
f) Dress properly. Do not wear loose clothing or jewellery. Keep your hair, clothing and gloves away
from moving parts. Loose clothes, jewellery or long hair can be caught in moving parts.
g) If devices are provided for the connection of dust extraction and collection facilities, ensure these
are connected and properly used. Use of dust collection can reduce dust-related hazards.
4) Power tool use and care
a) Do not force the power tool. Use the correct power tool for your application. The correct power
tool will do the job better and safer at the rate for which it was designed.
b) Do not use the power tool if the switch does not turn it on and off. Any power tool that cannot be
controlled with the switch is dangerous and must be repaired.
c) Disconnect the plug from the power source and/or the battery pack from the power tool before
making any adjustments, changing accessories, or storing power tools. Such preventive safety
measures reduce the risk of starting the power tool accidentally.
d) Store idle power tools out of the reach of children and do not allow persons unfamiliar with the
power tool or these instructions to operate the power tool. Power tools are dangerous in the hands
of untrained users.
e) Maintain power tools. Check for misalignment or binding of moving parts, breakage of parts and
any other condition that may affect the power tool’s operation. If damaged, have the power tool
repaired before use. Many accidents are caused by poorly maintained power tools.
f) Keep cutting tools sharp and clean. Properly maintained cutting tools with sharp cutting edges
are less likely to bind and are easier to control.
g) Use the power tool, accessories and tool bits etc. in accordance with these instructions, taking
into account the working conditions and the work to be performed. Use of the power tool for opera-
tions different from those intended could result in a hazardous situation.
5) Battery tool use and care
a) Recharge only with the charger specified by the manufacturer. A charger that is suitable for one
type of battery pack may create a risk of fire when used with another battery pack.
b) Use power tools only with specifically designated battery packs. Use of any other battery packs
may create a risk of injury and fire.
c) When battery pack is not in use, keep it away from other metal objects, like paper clips, coins,
keys, nails, screws or other small metal objects, which can make a connection from one terminal to
another. Shorting the battery terminals together may cause bums or a fire.
d) Under abusive conditions, liquid may be ejected from the battery; avoid contact. If contact acci-
dentally occurs, flush with water. If liquid contacts eyes, additionally seek medical help Liquid
ejected from the battery may cause irritation or bums.
6) Service
a) Have your power tool serviced by a qualified repair person using only identical replacement parts.
This will ensure that the safety of the power tool is maintained.
LAWN TRIMMER SAFETY WARNINGS
IMPORTANT
READ CAREFULLY BEFORE USE
KEEP FOR FUTURE REFERENCE
Training
a) Read the instructions carefully. Be familiar with the controls and the correct use of the machine.
b) Never allow children or people unfamiliar with these instructions to use the machine. Local regu-
lations can restrict the age of the operator.
c) Keep in mind that the operator or user is responsible for accidents or hazards occurring to other
people or their property.
Preparation
a) Before use, always visually inspect the machine for damaged, missing or misplaced guards or
shields.
b) Never operate the machine while people, especially children, or pets are nearby.
Operation
a) Wear eye protection and stout shoes at all times while operating the machine.
b) Avoid using the machine in bad weather conditions especially when there is a risk of lightning.
c) Use the machine only in daylight or good artificial light.
d) Never operate the machine with damaged guards or shields or without guards or shields in place.
e) Switch on the motor only when the hands and feet are away from the cutting means.
f) Always stop the machine and remove the battery pack.
1) Whenever the machine is left unattended;
2) Before clearing a blockage;
3) Before checking, cleaning or working on the machine;
4) After striking a foreign object. Inspect the machine for damage and make repairs before restarting
and operating the machine;
5) If the machine starts to vibrate abnormally, for immediately check:
- inspect for damage;
- replace or repair any damaged parts;
- check for and tighten any loose parts.
g) Take care against injury to feet and hands from the cutting means.
h) Always ensure that the ventilation openings are kept clear of debris.
Maintenance and storage
a) Stop the machine and remove the battery pack before carrying out maintenance or cleaning
work.
b) Use only the manufacturer’s recommended replacement parts and accessories.
c) Inspect and maintain the machine regularly. Have the machine repaired only by an authorized
repairer.
d) When not in use, store the machine out of the reach of children.
Recommendation (For mains powered machines and those with an integral charger)
The machine should be supplied via a residual current device (RCD) with a tripping current of not
more than 30mA.
Avoid using on wet grass.
Keep proper footing and balance at all times.
Do not walk backwards when using the product.
Walk, never run.
Keep the head attachment below waist level.
Do not cut on surface other than grass on ground.
Never use the product with damaged guards or without guards in place.
Never fit a metal replacement line.
Keep hands and feet away from the cutting means at all times and especially when switching on the
motor.
Beware, the cutting elements continue to rotate after the motor is switched off.
Beware of objects thrown by the cutting line.
Wear protective glasses or goggles.
Take care against injury from any device fitted for trimming the filament line length.
Always ensure that ventilation openings are kept clear of debris.
Never replace non-metallic the cutting means with metallic cutting means.
Never overreach. Keep the balance at all times, to always be sure of the footing on slopes.
Warning! Never touch moving hazardous parts before the machine is stopped, the battery pack is
removed and the moving hazardous parts have come to a complete stop.
Always wear substantial footwear and long trousers while operating the machine;
National regulation can restrict the use of the machine,
It is necessary to check the machine before use and after dropping or other impacts to identify any
significant defects.
Use slip-resistant foot protection, as well as protective clothing.
It is necessary for rest periods and changing working positions regularly.
Keep firm footing and balance during operation.
Always use the harness provided during operation.
Keep the machine in good working condition.
Before use check the machine for loose fasteners, and damaged parts, such as cracks in the cutting
attachment.
BRUSHCUTTER SAFETY WARNINGS
– In addition to the above rules, these additional instructions are appreciate when using the machine
in brush cutter mode.
– Use heavy gloves while installing or removing blades, they have sharp edges.
– Do not attempt to touch or stop the blade when it is rotating.
– A moving blade can cause severe injury. Maintain proper control of the machine with both hands
until the blade has completely stopping rotating.
– Replace any blade that has been damaged. Always make sure blade is installed correctly and
securely fastened before each use.
–Use only the manufacturer’s blade and do not use any other cutting attachment.
–Cover the blade with the blade protector before storing the unit, or during transportation. Always
remove the blade protector before using the unit. If not removed, the blade protector could become
a thrown object as the blade begins to turn.
–For cutting ease and safety, approach the weeds being cut from the right to the left. In the event an
unexpected object or woody stock is encountered, this practice could minimize the blade thrust
reaction. Both hands must be used at all times to control these products.
INTENDED USE
The product is only intended for use outdoors. For safety reasons the product must be adequately
controlled by using two handed operation.
The product is intended for cutting long grass, pulpy weed, or brush and similar vegetation at or
about ground level.
The cutting plane should be approximately parallel to the ground surface. The product should not
be used to trim hedges, bushes or other vegetation where the cutting plane is not parallel to the
ground surface.
RESIDUAL RISK
Even with the intended use of the appliance, there is other risk which cannot be prevented. The
following list of potential hazards should be read and understood.
-Contact with the blade could result in serious personal injury.
-Blade thrust may occur without warning if the blade snags
,
stalls or binds. This contact may cause
the blade to stop for an instant, and suddenly “thrust” the unit away from the objects that was hit.
Both hands must be used at all times to control this product.
WARNING:
Injuries may be caused, or aggravated, by prolonged use of a tool. When using
any tool for prolonged periods, ensure you take regular breaks.
WARNING:
Improper maintenance, use of non-conformant replacement components, or the
removal or modification of safety components lead to hazards causing injuries and damage to
property.
WARNING:
When working with the cutter blade there is always a risk of kickback if the
cutting head comes into contact with a hard object! Kickback will cause the sudden stalling of the
cutting head, which in turn results in the cutting head being forced in the opposite direction to the
rotation of the cutter blade! Ensure that you retain a firm grip with both hands at any sign of such
kickback, pay attention and retain a firm stance to avoid injuries!
WARNING!
Prolonged exposure to vibration can cause injuries and neurovascular disorder
(also called "Renauds syndrom" or "white finger"), especially to people suffering from circulation
disorders. The symptoms can regard the hands, wrists and fingers and are shown through of sensi-
tivity, torpor, itching, pain and discolouring of or structural changes to the skin. These effects can be
worsened by low ambient temperatures and/or by gripping the handgrips excessively tightly. If the
symptoms occur, the length of time the machine is used must be reduced and a doctor consulted.
Not all factors that lead to white finger disease are known, but concern cold weather, smoking and
diseases, blood vessels and blood circulation as well as large or long-lasting exposure to vibration
are mentioned as factors in the emergence of white finger disease.
Take the following points into account to minimize the vibration and noise exposure risks:
- Wear gloves and keep your hands warm.
- Only use the product as intended by its design and these instructions.
- Ensure that the products is in good condition and well maintained.
- Use correct application tools for the product and ensure they are in good condition.
- Keep tight grip on the handles/grip surface.
- Maintain this product in accordance with these instructions and keep it well lubricated (where
appropriate).
- Plan your work schedule to spread any high vibration tool use across a number of days.
WARNING!
When working with the device, a certain level of noise cannot be avoided. Noisy
work should be scheduled for hours, during which it is allowed by statute of other local regulations.
Adhere to any applicable rest times and limit your working time to the necessary minimum time. For
your personal protection and the protection of people nearby, suitable hearing protection must be
worn.
3. GENERAL IDENTIFICATION
Fig.1
1. Battery pack
2. Safety lock button
3. Switch trigger
4. “U” type handle
5.Locking knob
6.Lower tube
7. Brush cutter safety guard
8. Gear case
9. Blade
10. Grass trimmer head
11. Grass trimmer safety guard
4. TECHNICAL DATA
-The declared vibration total value has been measured in accordance with a standard test method
and may be used for comparing one tool with another.
-The declared vibration total value may also be used in a preliminary assessment of exposure.
WARNING!
-The vibration emission during actual use of the power tool can differ from the declared total value
depending on the ways in which the tool is used.
-It is necessary to identify safety measured to protect the operator that are based on an estimation
of exposure in the actual conditions of use (taking account of all parts of the operating cycle such
as the times when the tool is switched off and when it is running idle in addition to the trigger time).
5. ASSEMBLY INSTRUCTION
The machine is supplied with some components not assembled. To assemble these, proceed as
follows:
WARNING:
Always be sure that the tool is switched off and battery pack is removed before
carrying out any work on the tool. Failure to switch off and remove the battery pack may result in
serious personal injury from accidental start-up.
WARNING:
Never start the tool unless it is completely assembled. Operation of the tool in a
partially assembled state may result in serious personal injury from accidental start-up.
FOR BRUSH CUTTER
CAUTION:
1. The cutter blade must be well polished, free of cracks or breakage. Polish or replace the cutter
blade every three hours of operation.
2. Always wear gloves when handling the cutter blade.
3. Always attach the blade cover when the tool is not in use or is being transported.
5.1 ASSEMBLE BRUSH CUTTER HEAD
1. Fix the brush cutter safety guard into gear case with three bolts by using hex wrench
(
1
)
. Fig.2A
NOTE: To avoid of reverse assembling. Please follow Fig.2G
2. Install the lower blade retainer(2) on safety guard and insert the hex wrench into the hole of lower
blade retainer to fix the machine Fig.2B
Note: The hex wrench should be inserted inside the hole till whole assembling done.
3. Install the blade onto lower blade retainer Fig.2C
NOTE: Remember the marks on blade should be faced to the lower blade retainer.
4. Install the upper blade retainer
(
3
)
on the blade. Fig.2D
5. Install the protection cup
(
4
)
to cover the upper blade retainer. Fig.2E
6 Tighten the nut (turn anticlockwise) by using a socket hex wrench. Fig.2F
NOTE: Remove the hex wrench after installation is finished.
CAUTION:
If worn nut and cup for blade are used, there is a danger of blade getting loose.
Replace them with new ones.
CAUTION:
Fasten output shaft using locking tool securely in order to avoid the possibility of
output shaft rotating when mounting cutting blade which will prevent the cutting blade fastening nut
from being tightened sufficiently.
CAUTION:
Wear gloves to reduce the risk of injury caused by unintentional contact with the
blade.
FOR GRASS TRIMMER
5.2 ASSEMBLE GRASS TRIMMER HEAD
1. Dismount the brush cutter head if the machine under this brush cutter mode.
Note: To dismount the blade, insert the hex wrench through the hole on lower blade retainer and
gear case. Loosen the nut (turn clockwise) by using a socket hex wrench to disassemble nut,
protection cup, upper blade retainer, blade and lower blade retainer.
2. Tighten four bolts to install the grass trimmer safety guard and brush cutter safety guard by using
the screwdriver.Fig.3A and Fig.3B
3. Fix the grass trimmer safety guard into gear case with three bolts by using hex wrench. Same as
fig 2A
4. Insert the hex wrench to hole of lower blade retainer to fix the machine. Same as Fig. 2B
Note: The hex wrench should be inserted inside the hole till whole assembling done.
5. Install the trimmer head by turning anticlockwise. Fig.3C
6. To remove the trimmer head, turn the nylon cutting head clockwise while holding the lower blade
retainer with the hex wrench.
NOTE: Remove the hex wrench after installation is finished
CAUTION:
Only use the nylon trimmer head with the guard and guard extension in place.
Failure to do so can cause serious personal injury.
NOTICE:
Be sure to use genuine nylon trimmer head. Turn the tool upside down so that you
can replace the nylon cutting head easily.
WARNING:
Never use the tool unless the guard is properly fitted.
WARNING:
Take care against injury from the safety guard for trimming the line to length.
After extending new line, always return the trimmer to its normal operating position before switching
on.
WARNING:
Never fit metal cutting elements.
WARNING:
Never use it without the safety guard properly installed. Failure to adhere to this
warning can cause serious personal injury.
5.3 ASSEMBLE “U” TYPE HANDLE
1. Insert the left and right handles into the shaft to make “U” type handle as shown Fig .4A
2. Align the four bolts(1) to the handle fixation upper plate(2) and through four screw holes to secu-
rely tighten four bolts using hex wrench(3) so that the grip cannot move or rotate on the shaft pipe
as shown Fig .4B
5.4. ASSEMBLE SHAFT TUBE
1. Pull out the positioning pin (1) and insert the lower tube to the slot of “U” type handle (Fig.5A/
Fig.5B/ Fig.5C)
Note
:
Remove the lower tube protection cap (2) before installation. Remember the installation hole
(3) of lower tube should be faced to positioning pin in order to fix securely.
2. Rotate the locking knob(4)
(
turn clockwise
)
to fix the tube firmly.(Fig.5D/ Fig.5E)
Fig.5D
Fig.5E
5.5. ASSEMBLE SHOULDER STRAP (FIG.6A/ FIG.6B)
Press the locking button to clip shoulder strap hose and you can use shoulder strap for your com-
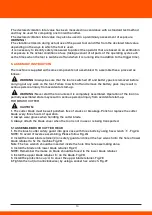
fortable operation.
Detachment: This belt provided quick-release mechanism. Press the both side of the release button
with one hand, the machine can be released quickly from the operator in the event of emergency
(e.g. occur spark, smoking or vibrate abnormally). (Fig.7A/Fig.7B).
Fig.7A
Fig.7B
5.6 ASSEMBLY THE BATTERY
1. Insert the battery pack into battery holder. (Fig.8A)
2. Make sure the latch on bottom of battery pack snaps in place and that battery pack is fully
seated. (Fig.8B).
5.5 REMOVE THE BATTERY (Fig.9)
1. Press and hold the battery latch button (1) at the bottom of the battery pack.
2. Remove battery pack from the product.
CAUTION:
Always switch off the tool before installing or removing of the battery pack. Hold
the tool and the battery pack firmly when installing or removing battery pack. Failure to hold the tool
and the battery pack firmly may cause them to slip off your hands and result in damage to the tool
and battery pack and a personal injury.
6. OPERATION
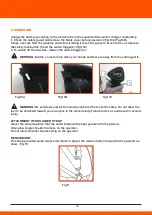
Charge the battery according to the instructions in the separated manual for charger and battery.
1. Check the safety guard and remove the blade cover before operation (Fig.10A/ Fig.10B)
2.Take a secure hold the machine and without letting it touch the grass or brush to be cut, depress
the safety lock button (1)and the switch trigger(2).(Fig.10C)
3. To switch off the machine, release the switch trigger (2).
WARNING:
Switch on motor only when your hands and feet are away from the cutting parts.
WARNING:
Be extremely careful to maintain control of the tool at this time. Do not allow the
tool to be deflected toward you or anyone in the work vicinity. Failure to do so could result in serious
injury.
ATTACHMENT OF SHOULDER STRAP
Adjust the strap length so that the cutter blade will be kept parallel with the ground.
Only allow single shoulder harness on the operator.
Do not allow shoulder harness sling on the operator.
DETACHMENT
This strap provided quick-release mechanism. Adjust the release button forward to the operator as
show.
(
Fig.11
).
- Press the both side of the release button with one hand, the machine can be released quickly from
the operator in the event of emergency (e.g. occur spark, smoking or vibrate abnormally). (Fig.12A/-
Fig.12B).
Be extremely careful to maintain control of the machine at this time.
Do not allow the machine to be deflected toward you or anyone in the work vicinity.
WARNING:
Failure to maintain complete control of the machine at all could result in serious
bodily injury or death.
6.1 For brush cutter
WARNING:
Always position the tool on your right-hand side so that the shaft of the left
handle is always in front of your body. Correct positioning of the tool allows for maximum control
and will reduce the risk of serious personal injury caused by kickback.
(
Fig.13
).
6.2 For grass trimmer
WARNING:
Always position the tool on your right-hand side so that the barrier is always in
front of your body. Correct positioning of the tool allows for maximum control and will reduce the
risk of serious personal injury caused by kickback. (Fig.14).
WARNING:
Be extremely careful to maintain control of the tool at all times. Do not allow the
tool to be deflected toward you or anyone in the work vicinity. Failure to keep control of the tool
could result in serious injury to the bystander and the operator.
7. CUTTING LINE ADVANCE
(
FOR GRASS TRIMMER MODE
)
Short or worn lines cut less efficiently. To improve its operation on subsequent occasions, tap the
spool button lightly on the ground while the trimmer is running at fully speed. This will automatically
feed extra cutting line. The cutting line blade situated under the guard will automatically trim the
cutting line to the correct length during operation.
NOTE: Hitting hard and abrasive objects; such as fences, concrete and rocks within and around
long grass may cause the cutting line to disappear and easily be withdrawn from within the cartrid-
ge by following these simple instructions.
8. REPLACEMENT OF THE CUTTING LINE CARTRIDGE
Warning of the danger of moving hazardous parts;
Your machine is supplied with a fully disposable cutting line cartridge which overcomes troubleso-
me rewinding of the cutting line.
1. To replace an empty cutting line cartridge, press both of the cap release latch on the spool holder
and boost up it out of the spool holder (Fig.15A).
2. Then remove the cap and spool out (Fig.15B).
3. Put the spring into the spool holder and feed the two cutting lines through the eyelets of the spool
holder and put the spool into the box (Fig.15C/ Fig.15D).
4. Install the cap into the spool holder and lock into place by cap release latch. (Fig.15E).
9. INSTRUCTION FOR USE
Start the brush cutter or grass trimmer before getting close to the brush or grass to be cut.
Cut the brush or grass by moving the machine from right to left and proceed slowly, keeping machi-
ne inclined about 30°.High grass should be cut in layers; always beginning from the top .The cuts
should be short.
FOR GRASS TRIMMER:
Do not cut damp or wet grass. Avoid wearing the line out quickly by knocking against hard objects
(stone, walls, fences etc) .Use the edge of the guard in order to keep the trimmer at the right distan-
ce.
WARNING:
Do not use Excessive Force or bash the Trimmer Bump Head on the ground to
advance the trimming line .If the trimming line will not advance after tapping the bump head on the
ground while the trimmer is running, the cutting line may have tangled or have disappeared within
the cartridge or the cutting line may have been used up.
NOTE: Excessive Force or Bashing the Trimmer Bump Head on the ground to advance the cutting
line will damage the bump head.
WARNING:
The cutting head continues to rotate after motor is switched off for a few
seconds.
The product is intended for cutting long grass, pulpy weed, brush and similar vegetation at or about
ground level.
The product is not allowed to be used for cutting or chopping hedges
,
shrubs
,
bushes
,
flowers and
compost.
FOR BRUSH CUTTER:
WARNING:
Always turn off the machine and make sure the cutting attachment has stopped
before putting a brush cutter down. When transporting your brush cutter in a vehicle, properly
secure it to prevent turnover, and damage to the brush cutter. Keep metal cutting tools covered with
the transport guard (optional accessory)
WARNING: Adjust carrying harness and hand grip to suit your size before starting work. The machi-
ne should be properly balanced as specified in your owner’s manual for proper control and less
fatigue in operation.
WARNING:
Always check your brush cutter for proper condition and operation before star-
ting, particularly the switch trigger, safety lock button, cutting blade, safety guard.
WARNING: The switch trigger must move freely and always spring back to the idle position. The
cutting tool must be properly tightened and in safe operating condition. Inspect for loose parts
(nuts, screws, etc.) and for cracked, bent, warped or damaged blades.
10. MAINTENANCE
WARNING:
Always be sure that the tool is switched off and battery pack is removed before
attempting to perform inspection or maintenance on the tool. Failure to switch off and remove the
battery pack may result in serious personal injury from accidental start-up.
Warning of the danger of moving hazardous parts;
NOTICE:
Never use gasoline, benzine, thinner, alcohol or the like. Discoloration, deformation
or cracks may result.
NOTICE:
Use only manufacturer’s recommended replacement parts and accessories.
1. After each use, remove battery pack from the battery holder and check for damage and clean
with a soft dry cloth.
2. When not in use, the product should be stored in a cool dry place and locked up out of the reach
of children. Do not store outdoors. Cleaning and maintenance works should be done before storage.
3. Check all nuts, bolts and screws at frequent intervals for proper tightness to ensure the product is
in safe working condition. Any part that is damaged should be properly repaired or replaced by an
authorized service center.
4. Use only manufacturer’s recommended replacement parts and accessories.
11. TROUBLESHOOTING
The following chart lists problem symptoms, possible causes and corrective action, if your garden
product does not operate properly. If these do not identify and correct the problem, contact your
service agent.
WARNING:
Switch off and remove the battery prior to any troubleshooting.
12. ENVIRONMENTALLY FRIENDLY DISPOSAL
According to EU directive 2012/19/EU on electric and electronic equipment and its implementation
into national law, all electric tools must be separately collected and environmentally friendly recy-
cled. Alternative disposal: If the owner of the power tool does not return the tool to the manufactu-
rer, he is responsible for proper disposal at a designated collection point that prepares the device
for recycling according to national recycling laws and regulations. This does not include accessories
and tools without electric or electronic components.
Accumulator Disposal:
Old Accumulators and batteries must not be added to household waste, but should be disposed of
in accordance with the applicable legislation.
Take unusable rechargeable batteries to the dealer’s or community’s battery collection point.
Disposing of the packaging:
The packaging is made of cardboard and separately labeled foil which is also recyclable.
Take these materials to a recycling centre.
Battery packs/batteries:
Li-lon
Do not dispose of batteries into household waste, water or fire. Battery packs/batteries must be
removed from the tool before disposal. Battery packs/batteries must be collected, recycled or
disposed of in an environmentally -friendly way.
Only for EC countries:
Defective or dead batteries must be recycled according to the directive 91/157/EC
13. EC DECLARATION OF CONFORMITY


