background image

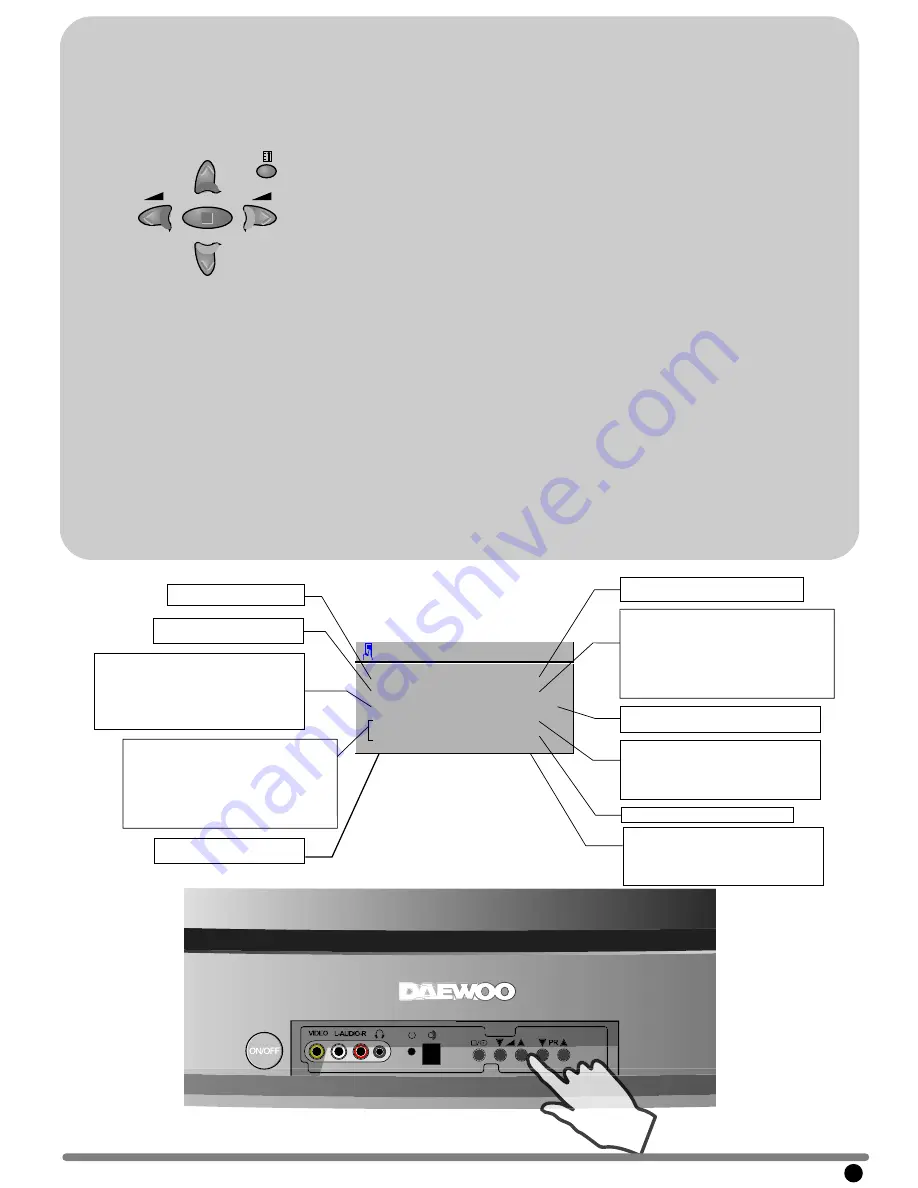
Manual Channel Tuning

Choose a starting point

- Select with "Program" the program from which    
you want to start manual tuning. Then the channel 
number, the frequency, the name and the program 
number of this program are displayed in the Install 
menu.

TV system modification

If necessary, you can modify the TV system :
- Select "system" function.

Adjust

 choosing between FRANCE (L/L'), GB (I), 

EURO (B/G), E/ EURO (D/K) systems.

Then, the program displayed on the screen is 
changed to the chosen system.

Channel searching

- Select the "Frequency" function.
- Press, and hold for more than 2 seconds, the 
remote control CURSOR RIGHT (A20) [LEFT 
(A7)] buttons to start up [down] manual tuning.
- Searching will stop automatically at the next 
channel found (to stop tuning, press the remote 
control MENU button (A19)).

Note: You can directly locate a program by 
entering the data into the "channel" or the 
"frequency" function.

Perform fine tuning

- If you are unable to get a good picture or 
reasonable quality sound due to poor reception, it 
is possible to perform fine tuning.
- Select the "frequency" function.
- Press, for less than 2 seconds, the remote 
control CURSOR RIGHT(A20) [LEFT(A7)] buttons 
to perform up [down] fine tuning in steps of 0.05 
MHz (50 kHz).

Enter station name

It is possible to enter your own choice of name for 
each program. You can change an existing name, 
or enter a name where none exists. If none exists 
"- - - - -" will be shown in the Install menu, and 
program status display ( see the section 
PROGRAM STATUS DISPLAY on page 10).
- Select the "name" function.
- Select one of the 5 character positions by using 
the remote control CURSOR RIGHT (A20) / LEFT 
(A7) buttons to move the cursor.
- Then use the CURSOR UP (A6) /DOWN (A21) 
buttons to select the desired character for that 
position.
- Repeat the last two instructions for other 
positions, as desired.
- Once the name has been entered, press the OK 
button (A18) to store it. The name will be 
memorised to the program number currently 
shown on the "Store To" line. The "Store To" 
program number will highlight in red briefly.

Store program in memory

- Select the "store to" function 
- Enter the program number you want to store to 
either by using the remote control CURSOR 
RIGHT (A20) / LEFT (A7) buttons, or directly by 
using the remote control NUMBER 0...9 buttons 
(A3).
- Press the OK button (A18) to confirm.
Remarks:  this function can also be used if you 
want to copy a program already memorised to 
another program number.

PR

PR

OK

MENU

FEATURES MENU

10

When switched to ON: 

-

POWER button.

Adjust to be ON or OFF:
-When ON, the NR feature is active 
 for all programs (0 to 99).
-When OFF, the function is inactive.

6

-Switch the "wake up" function ON/OFF 
with the remote control CURSOR LEFT 
(A7) /RIGHT (A20) buttons 
- Enter the wake up time with the remote 
control 0...9 NUMBER (A3) buttons 

4. 

NR is a picture noise reduction
feature.

6

.

FEATURES

LANGUAGE

CHILD LOCK

CLOCK

WAKE TIME
WAKE PR

GB

OFF

00 : 00

OFF
01

Wake up function

This function is only available when
the clock is set. The TV set turns on
from stand-by at the WAKE time
with the program entered on the
WAKE PR line. Put the 

TV set

 on

stand-by with the remote control

TV clock setting
This function allows user to enter the time 
manually.
(

N

ote that if you turn off the set with the main 

power button, the clock setting is lost but it is 
automatically set again at power on if 
prog.n

°

1 is a channel with teletext). 

Prevents the use of the TV set 
without remote control

1. Menus Language selection

2.

3.

4.

Select the desired language from the 
available country codes.

Adjust this value ON or OFF

.

- I

n stand-by mode,

 the stand-by indicator

 flash

es red and green to indicate the

child lock is set

.

T

he front panel TV

 buttons (B7, B8, B9)  

become inactive

 and

 the TV will only 

respond

to the remote

 control.

Adjust TV clock. Clock will start upon 
entry of the 4th figure.

-Switch the "wake up" function ON/OFF 
with the remote control CURSOR LEFT 
(A7) /RIGHT (A20) buttons 
- Enter the wake up time with the remote 
control 0...9 NUMBER (A3) buttons 

Adjust TV turn-on 

program

 number

2.

3.

4. 

5. 

1. 

(For operating instructions see " HOW TO USE THE SUB-MENUS ")

Summary of Contents for D W X -28W, D W F -28W, D T F -29, D T P -25, D T P...

Page 1: ... M A N U A L C o l o u r Te l e v i s i o n DW X 28W DW F 28W DT F 29 DT P 25 DT P 28 H E L P L I N E N U M B E R 0 11 8 9 2 5 2 6 2 7 W ith querie please quote the page number reference number and model number ...

Page 2: ...removed and the cut off plug disposed of safely to prevent the hazard of electric shock There is a danger of electric shock if the cut off plug is inserted into any socket outlet If a replacement plug is to be fitted please observe the wiring code shown below The wires in the mains lead are are coloured in the accordance with the following code Blue neutral Brown live As the colours of the wires i...

Page 3: ...REMOTE CONTROL TV CONNECTIONS 3 IMPORTANT SAFEGUARDS 4 START UP 5 CONNECTING EXTERNAL EQUIPMENT 5 DAILY USE 6 MENUS DESCRIPTION 8 TELETEXT 11 INSTALLATION 4 CONTENT 2 ...

Page 4: ...TV CONNECTIONS POWER SOUND MUTE NUMBER 0 9 SLEEP TV AV PROGRAM UP CURSOR UP VOLUME DOWN CURSOR LEFT SKIP MOVE 3D SOUND EFFECT MODE ZOOM RECALL NORMAL OK MENU VOLUME UP CURSOR RIGHT PROGRAM DOWN CURSOR DOWN TV TELETEXT DELETE A1 POWER A2 SOUND MUTE A3 NUMBER 0 9 A4 A5 A6 PAGE UP A7 VOLUME DOWN BRIGHT DOWN A8 CANCEL A9 PAGE HOLD A10 SUBPAGE A11 RED A12 GREEN A13 A14 A15 A16 A17 A18 INDEX A19 MENU VO...

Page 5: ...se or built in cabinet unless proper ventilation is provided Leave a minimum 10 cm gap all around the unit LIGHTNING STRIKING You should disconnect the set from the mains and the aerial system during thunderstorms SWITCHING ON AND OFF Batteries CLEANING Unplug the set from the mains during cleaning IN STALLAT IO N Power on the TV set using front panel MAIN POWER button B1 Select your preferred lan...

Page 6: ...ed to this socket In most cases when connecting powered equipment to this socket the TV set switches automatically to AV mode If not then use the TV AV buttons A5 or B7 to select AV2 You can also receive an S VHS signal with REAR SCART2 socket by selecting SVHS2 with the TV AV buttons A5 or B7 REAR SCART 1 SOCKET AV1 FRONT S VIDEO JACK OPTION REAR SCART 2 SOCKET AV2 Option for real flat TVs DWF 28...

Page 7: ...NU SOUND CONTROL Volume adjustment Use the remote control VOLUME UP A20 DOWN A7 buttons or the TV set front panel VOLUME UP DOWN buttons B8 Mono forcing dual language If you are unable to get good sound quality for a program due to poor reception you can force a change from stereo to mono transmission by pressing the remote control MODE button A14 Then the program status display indicates MONO in ...

Page 8: ...e preferred mode of the user can be forced by repeated pressing of the remote control ZOOM button A15 Television Format 16 9 Television models DWX 28W DWF 28W The following picture formats are available AUTO 4 3 14 9 ZOOM 14 9 ZOOM 16 9 FULL SCREEN PANORAMA AUTO When viewing an external signal in RGB mode via SCART 1 socket C1 the following picture formats are available AUTO ZOOM 14 9 ZOOM 16 9 FU...

Page 9: ...d balance between the left and right speakers If the indicator is highlighted in red then the central balance position has been found Select preset function to adjust sound properties Using the remote control CURSOR LEFT A7 or RIGHT A20 buttons you can choose between 2 user definable set ups favourite 1 favourite 2 and 3 pre defined equalizer set ups music speech normal Selecting favourite 1 allow...

Page 10: ...d 3 following programs are always displayed Any program from 00 to 99 can be selected by using the remote control CURSOR UP A6 DOWN A21 buttons The memorised programs can be modified as follows Channel skipping You can select skip YES or NO using the remote control RED Skip button A11 A program with skip YES doesn t appear on screen when changing channels with the PROGRAM UP A6 DOWN A21 buttons Ch...

Page 11: ...ly shown on the Store To line The Store To program number will highlight in red briefly Store program in memory Select the store to function Enter the program number you want to store to either by using the remote control CURSOR RIGHT A20 LEFT A7 buttons or directly by using the remote control NUMBER 0 9 buttons A3 Press the OK button A18 to confirm Remarks this function can also be used if you wa...

Page 12: ...te inside this chart The list of the themes blocks appears on left side of the screen A list of the sub subjects groups appears on right side of the screen relating to the left menu theme selection To select the block or group you want use the remote control PAGE UP A6 PAGE DOWN A21 keys and CURSOR RIGHT A20 LEFT A7 keys Alternatively the YELLOW Up A26 GREEN Down A12 and CYAN Left Right A25 keys a...

Page 13: ...he volume level will cancel the volume mute If volume mute is active the volume bargraph indicator will flash Mute can be reactivated in teletext mode at any time by pressing the SOUND MUTE button A2 Doubling character height Repeatedly pressing the HEIGHT button A23 doubles the character height in the following order Upper half of the page UP Lower half of the page DOWN Return to normal height WA...

Page 14: ......

Reviews: