background image

10

COOKING IN TWO STAGES

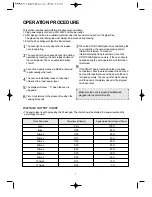
All recipes require frozen foods to be defrosted fully before cooking.
This oven can be programmed to automatically defrost foods before cooking.

When you touch START pad, the DEF and M/W indicators come on to confirm the power levels selected.
The DEF indicator starts blinking to show you that the oven is in DEFROST mode. The display counts down
the time remaining in DEFROST mode. When the oven beeps, turn over, break apart and/or redistribute the
food. At the end of DEFROST mode, the oven will beep and start M/W cook. The DEF indicator goes off and
the M/W indicator starts blinking. The display counts down the time remaining in M/W mode. When M/W
cook ends, you will hear 3 beeps.

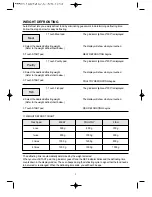
1. Touch Defrost pad.

2. Touch the time set pads for the defrosting time you

want.

4. Touch the time set pads for the desired cooking time.

5. Touch START pad.

The DEF indicator lights and “ : 0” is displayed.

The display will show what you touched.

The M/W indicator lights and “ P-HI” is displayed.
The display will show what you touched.
This example shows power level 5.

The display will show what you touched.

COOKING IN ONE STAGE

When you touch START pad, the M/W indicator starts blinking to show the oven is cooking. 
The display counts down the time to show how much cooking time is left. When the cooking time ends, you
will hear 3 beeps.

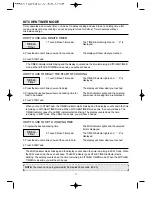
1. Touch Power pad.

(Select the desired power
level.)

X 6

2. Touch the time set pads for the cooking time.

3. Touch START pad.

The M/W indicator lights.
The display will show what you touched.
This example shows power level 5.

The display will show what you touched.

NOTE: Using lower power levels increases the cooking time which is recommended for foods such as

cheese, milk and slow cooking of meats.

NOTE: If steps 1 and 2 are omitted, the

oven will cook at full power.

NOTE: Your oven can be programmed for

59 minutes 90 seconds.(59:90)

Power

Defrost

Power

3.Touch Power pad.

(Select the desired power
level.)

X 6

Summary of Contents for AFMW200E

Page 1: ...Before operating this oven please read these instructions completely OPERATING INSTRUCTIONS MICROWA VE OVEN AFMW200E ...

Page 2: ...nt not to defeat or tamper with the safety interlocks b Do not place any object between the oven front face and the door or allow soil or cleaner residue to accumulate on sealing surfaces c WARNING If the door or door seals are damaged the oven must not be operated until it has been repaired by a competent person 1 door bent 2 hinges and latches broken or loosened 3 door seals and sealing surfaces...

Page 3: ...sed must be the same as specified on this oven Using a higher voltage may result in a fire or other accident causing oven damage Using low voltage will cause slow cooking We are not responsible for damage resulting from use of this oven with a voltage of ampere fuse other than those specified If the supply cord is damaged it must be replaced by the manufacturer or its service agent or a similarly ...

Page 4: ... be connected to the terminal in the plug which is marked with the letter E or by the earth symbol or green and yellow The letter N or coloured black The wire which is coloured brown must be connected to the terminal which is marked with the letter L or coloured red Specifications are subject to change without notice POWER SUPPLY 220 240V AC 50 Hz SINGLE PHASE WITH EARTHING POWER CONSUMPTION 1200 ...

Page 5: ...and fire Also the cooking tray can become too hot to handle or may break 11 If smoke is observed switch off or unplug the appliance and keep the door closed in order to stifle any flames 12 When heating food in plastic or paper containers keep an eye on the oven due to the possibility of ignition 13 The contents of feeding bottles and baby food jars shall be stirred or shaken and the temperature c...

Page 6: ...hes of cooking foods 5 Safety interlock system Prevents the oven from operating while the door is opened 6 Door release button Pushing this button stops oven operation and opens the door 7 Glass cooking tray Made of special heat resistant glass The tray must always be in proper position before operating Do not cook food directly on the tray 8 Roller guide Supports the glass cooking tray 9 Door scr...

Page 7: ... to defrost foods for time 19 Kitchen Timer Used as a minute timer to delay the start of cooking or to set a holding time after cooking 20 Clock Used to set clock 21 Stop Clear Used to stop the oven operation or to delete the cooking data 22 Start Speedy cook Used to start the oven and also used to set a reheat time FEATURES DIAGRAM continued M W DEF TIMER LOCK g Dish Warmer Pasta Frozen Pizza Aut...

Page 8: ...rea between the door and door seal for obstructions and make sure the door is closed securely The oven will not start cooking until the door is completely closed or the program has been reset OPERATION PROCEDURE This section includes useful information about oven operation 1 Plug power supply cord into a 220 240V 50Hz power outlet 2 After placing the food in a suitable container open the oven door...

Page 9: ... clock system this digital clock allows you to set from 0 00 to 23 59 TIME DEFROSTING When Defrost is selected the automatic cycle divides the defrosting time into periods of alternating defrost and stand times by cycling on and off When you touch START pad the DEF indicator starts blinking to show the oven is in the DEFROST mode The display counts down the time to show you how much defrosting tim...

Page 10: ...lay window The oven beeps during the defrosting cycle to signal that the food needs to be turned or rearranged When the defrosting time ends you will hear 3 beeps Meat 1 Touch Poultry pad 2 Select the desired defrosting weight Refer to the weight defrost chart below 3 Touch START pad The g indicator light and 800 is displayed The display will show what you touched POULTRY DEFROSTING begins Poultry...

Page 11: ... DEF indicator lights and 0 is displayed The display will show what you touched The M W indicator lights and P HI is displayed The display will show what you touched This example shows power level 5 The display will show what you touched COOKING IN ONE STAGE When you touch START pad the M W indicator starts blinking to show the oven is cooking The display counts down the time to show how much cook...

Page 12: ...hear 3 beeps The TIMER indicator lights and 0 is displayed The display will show what you touched The M W indicator lights and the selected power level cooking time are displayed NOTE Your oven can be programmed for 59 minutes 90 seconds 59 90 Kitchen Timer KITCHEN TIMER MODE Timer operates as a minute timer can be set to delay cooking and used to set a holding time after cooking However delay coo...

Page 13: ...5 seconds the display is changed into cooking time and the oven starts cooking Frozen Pizza 1 Touch Frozen Pizza pad once for 200g or twice for 400g When you touch Frozen Pizza pad once 200 is displayed After 1 5 seconds the display is changed into the cooking time and the oven starts cooking FROZEN PIZZA 200g Touch Frozen Pizza once 400g Touch Frozen Pizza twice within 1 5 seconds NOTE 1 Use only...

Page 14: ...ce AC 2 SOUP 350g Touch Auto Cook twice AC 3 BAKED POTATO 3potatoes 200 250g each Touch Auto Cook three times AC 4 FRESH VEGETABLE 200g Touch Auto Cook four times AC 5 FROZEN VEGETABLE 200g package Touch Auto Cook five times Auto Cook When you touch Auto Cook pad once AC 1 is displayed By repeatedly touching this pad you can select other food category as shown in the chart below DISH WARMER 350 g ...

Page 15: ...to a maximum of 59 minutes CHILD SAFETY LOCK The safety lock prevents unwanted oven operation such as by small children To set press and hold STOP CLEAR for 3 seconds a beep sounds and LOCK indicator lights To cancel press and hold STOP CLEAR for 3 seconds a beep sounds and LOCK indicator goes off TO STOP THE OVEN WHILE THE OVEN IS OPERATING 1 Press STOP CLEAR pad You can restart the oven by touch...

Page 16: ...se as a cover to avoid spatters 8 Metal in general metal utensils should not be used in microwave oven CARE AND CLEANING Although your oven is provided with safety features it is important to observe the following 1 It is important not to defeat or tamper with safety interlocks 2 Do not place any object between the oven front face and the door or allow residue to accumulate on sealing surfaces Wip...

Page 17: ... for a short time will not damage the oven However it is not recommended Q Can the oven be used with the glass tray or roller guide removed A No Both the glass tray and roller guide must always be used in the oven before cooking Q Can I open the door when the oven is operating A The door can be opened anytime during the cooking operation Then microwave energy will be instantly switched off and the...

Reviews: