Dacor Epicure ER30GISCH Use And Care Manual Download Page 13

11

Operating Your Range

To Convection Broil:

Set the oven to broil according to the 

1. 

Broil


instructions at the left. 
Immediately place the food inside the oven and 

2. 

close the door completely.
Turn the 

3. 

CONVECTION FAN

 switch on the right 

side of the control panel to the 

“ON”

 position.

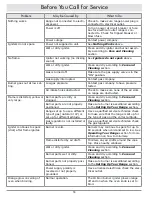
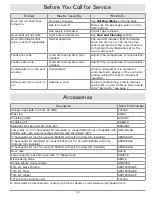
COMMON PROBLEMS WHEN USING STANDARD BAKE MODE

Problem

May Be Caused By

What to Do

Cookies burn on the 

bottom.

Oven door opened too often.

Set timer to shortest recommended 

cooking time and check food when timer 

beeps. Use door window to check food.

Incorrect rack position used.

Change rack position.

Dark, heat absorbing cookie 

sheets used.

Use shiny, reflective cookie sheets.

Cookies are too brown on 

top.

Rack position being used is too 

high.

Change rack position.

Food placed in oven during 

preheat.

Wait until oven is preheated.

Cakes burn on the sides or 

are not done in the center.

Oven temperature too high.

Reduce oven temperature.

Dark, heat absorbing cake pans 

used.

Use shiny, reflective cake pans.

Cakes crack on top.

Oven temperature too high.

Reduce oven temperature.

Cakes are not level.

Oven and/or oven rack not 

level.

Level oven and rack as needed.

Pies burn around the edges 

or are not done in the 

center.

Oven temperature too high.

Reduce oven temperature.

Dark, heat absorbing pans 

used.

Use shiny, reflective pans.

Oven and/or rack over-

crowded.

Reduce number of pans.

Tips for All Baking Modes

Do not open the oven door frequently during 

• 

baking. Look through the door window to check 

the progress of baking whenever possible.
Use a timer to time baking functions.

• 

Baking Tips

Wait until the shortest recommended baking 

• 

time before checking food. For cakes, a wooden 

pick placed in the center should come clean 

when the food is done.
Measure ingredients carefully and follow tested 

• 

recipes for best baking results.
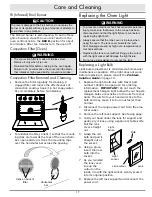
To Broil:

Adjust the rack position based on the food thick-

1. 

ness. Dacor recommends rack levels 4 or 5.
Turn the oven control (center) knob on the con-

2. 

trol panel to the 

BROIL

 setting. The oven ON 

indicator light will illuminate to indicate the oven 

is on. Within 60 seconds, the burner (on the ceil-

ing) will ignite. While the broil burner is on, the 

bake burner is off.
Immediately place the food inside the oven and 

3. 

close the door completely.

IMPORTANT:

Always use a broiler pan and grill to provide 

• 

drainage for excess fat and grease. Doing so will 

reduce spatter, smoke, and flare-ups.
The igniter for the IR broil burner on the ceiling 

• 

of the oven will glow orange periodically during 

normal broil operation.

Summary of Contents for Epicure ER30GISCH

Page 1: ...t e n t s Important Safety Instructions 1 3 Getting to Know Your Range 4 5 Setting Up Your Range 6 7 Operating Your Range 8 13 Care and Cleaning 14 17 Before You Call For Service 18 19 Accessories 19...

Page 2: ...2008 Dacor all rights reserved...

Page 3: ...CAUTION Hazards or unsafe practices that COULD result in minor personal injury or property damage DANGER IMPORTANT If you smell gas Do not use or light any appliance Do not touch any electrical switch...

Page 4: ...nsitive objects over the range Do not cover the burners and grates with anything except properly selected utensils Decorative covers may cause a fire hazard or damage to the cooktop if a burner is acc...

Page 5: ...on against possible electric shock hazards If only a two prong outlet is available it is the customer s responsibility to have it replaced with a dedicated grounded three prong electrical outlet by a...

Page 6: ...s on The center knob operates the oven TRIM RINGS Located behind each knob they pre vent liquids from getting into the internal parts Parts of the Cooktop Burner Locations and Features Getting to Know...

Page 7: ...ight stops flashing DOOR GASKET The door gasket prevents heat from escaping when the door is closed TEMPERATURE PROBE The temperature probe monitors the temperature inside the oven for the oven s burn...

Page 8: ...andard Burner Assembly left rear right front right rear burners STEP 1 Install dual burner ring on dual burner base Line up indentations on bottom of burner ring with pins on top of burner base STEP 1...

Page 9: ...clearing Setting Up Your Range Installing the Oven Racks WARNING The oven racks become hot when the oven is in use The rack supports provide six heights for positioning of the oven racks Three chrome...

Page 10: ...n surfaces Cooktop Operation To avoid the chance of fire explosion or carbon monoxide poisoning do not attempt to use your range without the burners completely and properly assembled see page 6 The bu...

Page 11: ...ing procedure If a burner still does not ignite the igniter continues to spark or if the flame is not spread evenly around the burner cap see the Before You Call for Service section on page 18 Place t...

Page 12: ...mum The range is designed for consumer use conditions only Do not use it to broil continuously for more than 45 minutes at a time After 45 minutes in broil mode turn the oven off and allow it to cool...

Page 13: ...nd the edges or are not done in the center Oven temperature too high Reduce oven temperature Dark heat absorbing pans used Use shiny reflective pans Oven and or rack over crowded Reduce number of pans...

Page 14: ...recommendations MULTIPLE RACK BAKING TIPS Typically when baking on two racks use rack positions 2 and 4 When adapting a single rack recipe to multiple rack baking it may be necessary to add to the ba...

Page 15: ...recipes Take note of the changes that work best and mark your reci pes accordingly You may also consult a cookbook on high altitude cooking for specific recommendations Altitude feet Baking Powder fo...

Page 16: ...cohol and milk can damage the finishes if you allow them to stand for any length of time IMPORTANT The cooktop is exposed to extremely high temperatures The grates are under high stress when hot utens...

Page 17: ...he shape of the holes Clean all the burner rings with window cleaner 3 or rubbing alcohol Use a cleaning brush with plastic bristles or a firm tooth brush When done rinse the parts well with clean wat...

Page 18: ...t free cloth Always wipe stainless steel surfaces with the grain A small amount of baby oil may be applied to stainless steel tops to restore lustre Care and Cleaning Brass Chrome and Copper Surfaces...

Page 19: ...bulb Always ensure that the lens cover is in place when using the oven The lens cover protects the bulb from breakage caused by high oven temperatures or mechanical shock Replacing the lens cover wit...

Page 20: ...re and Cleaning section Burner parts are not properly positioned Make sure burner is assembled according to the Setting Up Your Range section Range set up to use a different type of gas natural or LP...

Page 21: ...s contact your Dacor dealer or visit www everythingdacor com Problem May Be Caused By What to Do Oven will not heat when turned on No power to range See Nothing Works on facing page Gas is turned off...

Page 22: ...CANADA LIMITED FIRST YEAR WARRANTY If your DACOR product fails to function within one year of the original date of purchase due to a defect in material or workmanship DACOR will furnish a new part F...

Page 23: ...RANTY PROCESSING DEPT PO BOX 90070 CITY OF INDUSTRY CA 91715 9907 NO POSTAGE NECESSARY IF MAILED IN THE UNITED STATES BUSINESS REPLY MAIL FIRST CLASS MAIL CITY OF INDUSTRY CA PERMIT NO 1600 POSTAGE WI...

Page 24: ...ilder B Magazine G Architect Designer C Appliance Dealer Showroom H Another Dacor Owner D Kitchen Dealer Showroom I Model Home E Home Show J Other 2 Where did you buy your Dacor appliances A Appliance...

Reviews: