Dacor EF36IWF Use And Care Manual Download Page 5

3

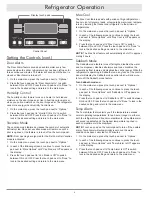
Temperature Controls

For your convenience, your temperature controls are preset at 

the  factory. When you first install your refrigerator, make sure the 

controls are still set to the recommended set points.


„

Press the touch pad next to “FRESH FOOD TEMP” on the 

main menu to display the current set point of the compartment. 

Press the touch pad next to “WARMER” or “COLDER” to 

adjust the set point to the recommended 38°F. Press the touch 

pad next to “Done” to lock in the setting.


„

Press the touch pad next to “FREEZER TEMP” on the main 

menu to display the current set point of the compartment. 

Press the touch pad next to “WARMER” or “COLDER” to 

adjust the set point to the recommended 0°F. Press the touch 

pad next to “Done” to lock in the setting.

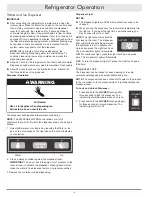
To Adjust Set Point Temperatures:

If you need to adjust the temperature in either the refrigerator 

or freezer compartment, use the settings listed in the chart as 

a guide. The display will show the set point for approximately 3 

seconds.


„

Press the touch pad next to “WARMER” or “COLDER” to 

adjust the set point to the desired temperature. Then, press 

the touch pad next to “Done” to lock in the new set point 

temperature.

NOTE:

 Except when first turning on the refrigerator, do not 

adjust either temperature control more than one setting at a 

time. Wait 24 hours for the temperature to stabilize between 

adjustments.

CONDITION/REASON:

ADJUSTMENT:

REFRIGERATOR too warm

FRESH FOOD Control 

1° lower

FREEZER too warm/too little ice FREEZER Control  

1° lower

REFRIGERATOR too cold

FRESH FOOD Control  

1° higher

FREEZER too cold

FREEZER Control  

1° higher

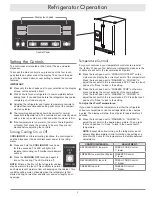
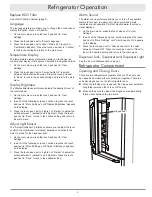
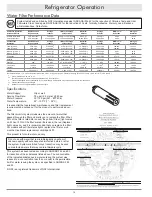
Setting the Controls

The control panel is located on the front of the ice and water 

dispenser.
To access the main control menu, press any of the four touch 

pads located on either side of the display. Then, touch the pad 

next to the desired option or user setting to access the various 

features.

IMPORTANT: 


„

Press only the touch pads next to your selection on the display 

screen, not the selection itself.


„

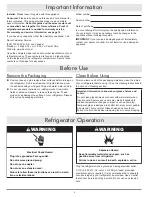
Wait 24 hours for your refrigerator to cool completely before 

adding food. If you add food before the refrigerator has cooled 

completely, your food may spoil.


„

Adjusting the refrigerator and freezer temperature controls to 

a colder than recommended setting will not cool the compart-

ments any faster.


„

The recommended settings should be correct for normal 

household refrigerator use. The controls are set correctly when 

milk or juice is as cold as you like and when ice cream is firm.


„

If the temperature is too warm or too cold in the refrigerator 

or freezer, first check the air vents to be sure they are not 

blocked before adjusting the controls.

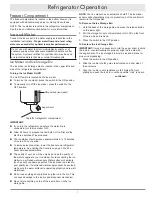
Turning Cooling On or Off

COOLING OFF

 controls all cooling functions, the control panel 

and the dispenser. It does not disconnect power to the refrig-

erator.


„

Press and hold the 

COOLING OFF

 touch pad 

for three seconds. The LED will light up to 

indicate that cooling is off. Neither compartment 

will cool.


„

Press the 

COOLING OFF

 touch pad again to 

turn on the cooling. The LED will turn off.

NOTE:

 At times, the front of the refrigerator cabinet 

may be warm to the touch. This condition is normal 

and helps prevent moisture from condensing on the cabinet. This 

condition will be more noticeable when the refrigerator is first 

started, during hot weather and after excessive or lengthy door 

openings.

Refrigerator Operation

COOLING

LOCKED

AUTO

DISPENSE

WATER

ON

PRESS 3 SEC

PRESS 3 SEC

OFF

COOLING

LOCKED

AUTO

DISPENSE

WATER

ON

PRESS 3 SEC

PRESS 3 SEC

OFF

Control Panel

Display touch pads

Summary of Contents for EF36IWF

Page 1: ...D W10326953 Model EF36IWF Handle style varies Table of Contents Refrigerator Safety 1 Important Information 2 Before Use 2 Refrigerator Operation 2 Care and Cleaning 11 Before You Call for Service 12...

Page 2: ...2009 Dacor all rights reserved...

Page 3: ...ead and obey all safety messages This is the safety alert symbol This symbol alerts you to potential hazards that can kill or hurt you and others All safety messages will follow the safety alert symbo...

Page 4: ...re and Cleaning section Important information to know about glass shelves and covers Do not clean glass shelves or covers with warm water when they are cold Shelves and covers may break if exposed to...

Page 5: ...nd water dispenser To access the main control menu press any of the four touch pads located on either side of the display Then touch the pad next to the desired option or user setting to access the va...

Page 6: ...ad next to Options 2 In each of the following screens continue to press the touch pad next to More Options until Max Cool is Off appears on the display 3 Press the touch pad next to Max Cool is Off to...

Page 7: ...h pad next to either Mettre En Fran ais or Cambiar En Espa ol Press the touch pad next to Confirm to lock in the setting and return to the main menu Temperature Display The temperature display prefere...

Page 8: ...ace To remove the divider Pull the drawer completely out and raise the front of the divider to unhook it from the rear wall of the pantry Lift it out To install the divider Hook the back of divider ov...

Page 9: ...rols on page 3 Wait 24 hours between adjustments The quality of your ice will be only as good as the quality of the water supplied to your ice maker Avoid connecting the ice maker to a softened water...

Page 10: ...ase it for 5 seconds Repeat until water begins to flow Once water begins to flow continue depressing and releasing the dispenser lever 5 seconds on 5 seconds off for an additional 5 minutes This will...

Page 11: ...you must reset the water filter status to turn off the message 1 On the main menu press the touch pad next to Options 2 In each of the following screens continue to press the touch pad next to More O...

Page 12: ...not necessarily in your water supply Performance may vary based on local water conditions Fibers greater than 10 um in length Based on the use of Cryptosporidium parvum oocysts Specifications Water Su...

Page 13: ...r the cleaner see www everythingdacor com IMPORTANT This cleaner is for stainless steel parts only Do not allow the stainless steel cleaner and polish to come into contact with any plastic parts such...

Page 14: ...fans The unit may run even longer if the room is warm a large food load is added doors are opened often or if the doors have been left open Before You Call for Service Electrical Shock Hazard Plug int...

Page 15: ...water A water filter may need to be installed to remove the minerals Water filter installed on the refrigerator Gray or dark discoloration in ice indicates that the water filtration system needs addi...

Page 16: ...tem These parts are compressor evaporator condenser dryer and connecting tubing LIMITATIONS OF COVERAGE Service will be provided by a Dacor designated service company during regular business hours Ple...

Page 17: ...ILITY OR FITNESS FOR A PARTICULAR USE OR PURPOSE ARE LIMITED IN DURATION TO ONE YEAR FROM THE DATE OF ORIGINAL PURCHASE IN NO EVENT SHALL DACOR BE LIABLE FOR INCIDENTAL EXPENSE OR CONSEQUENTIAL DAMAGE...

Page 18: ...16 Notes...

Page 19: ...RANTY PROCESSING DEPT PO BOX 90070 CITY OF INDUSTRY CA 91715 9907 NO POSTAGE NECESSARY IF MAILED IN THE UNITED STATES BUSINESS REPLY MAIL FIRST CLASS MAIL CITY OF INDUSTRY CA PERMIT NO 1600 POSTAGE WI...

Page 20: ...e G Architect Designer C Appliance Dealer Showroom H Another Dacor Owner D Kitchen Dealer Showroom I Model Home E Home Show J Other 2 Where did you buy your Dacor appliances A Appliance Dealer D Build...

Reviews: