background image

English 

3


To Our Valued Customer:

Congratulations on your purchase of the very latest in Dacor® products! Our unique 
combination of features, style and performance make us The Life of the Kitchen™, and a 
great addition to your home.

In order to familiarize yourself with the controls, functions and full potential of your new 
Dacor Appliance, read this use and care manual thoroughly, beginning with the 

Important 

Safety Instructions

 section.

All Dacor appliances are designed and manufactured with quality and pride, while working 
within the framework of our company value. Should you ever experience a problem with 
your product, please first check the Troubleshooting section of this manual for guidance. It 
provides useful suggestions and remedies prior to calling for service.

Valuable customer input helps us to continuously improve our products and services, so 
please feel free to contact our Customer Service Team for assistance with any of your 
product support needs.

Dacor Customer Service Team
14425 Clark Avenue
City of Industry, CA 91745

Telephone:

(800) 793-0093

Fax:

(626) 403-3130

Hours of Operation:

Monday through Friday 6:00 A.M. to 5:00 P.M. Pacific Time

Website:

www.Dacor.com

Thank you for choosing Dacor for your home. We are a company built by families for 
families, and we are dedicated to serving yours. We are confident that your new Dacor 
product will deliver a high level of performance and enjoyment for many years to come.

Sincerely,

Summary of Contents for DWR30M977WM

Page 1: ...User Manual Modernist Warming Drawer DWR30M977WS DWR30M977WM Part No 110142 Rev B ...

Page 2: ... s included with your warming drawer 11 Operations 12 Control panel 12 To turn the unit on 13 Continuous operation 14 Preheating 15 Temperature scale F C 15 Temperature and humidity control setting guidelines 16 Warming serving containers 17 Sabbath option 17 Care and maintenance 18 Care and cleaning of the warming drawer 18 Removing the drawer from the appliance 20 Re installing the drawer 21 Tro...

Page 3: ...ct please first check the Troubleshooting section of this manual for guidance It provides useful suggestions and remedies prior to calling for service Valuable customer input helps us to continuously improve our products and services so please feel free to contact our Customer Service Team for assistance with any of your product support needs Dacor Customer Service Team 14425 Clark Avenue City of ...

Page 4: ... 793 0093 U S A and Canada Monday Friday 6 00 a m to 5 00 p m Pacific Time Web site www dacor com When you call have the complete model and serial number for your appliance available The numbers are found on the product data label located on back of the drawer front See page 3 for label location Write these numbers below for future reference Model number Serial number Date of purchase Since Dacor ...

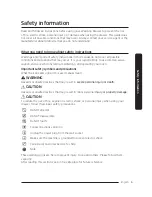
Page 5: ...g and operating your oven Important safety symbols and precautions What the icons and signs in this user manual mean WARNING Hazards or unsafe practices that may result in severe personal injury or death CAUTION Hazards or unsafe practices that may result in minor personal injury or property damage CAUTION To reduce the risk of fire explosion electric shock or personal injury when using your drawe...

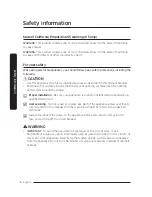
Page 6: ...faces near the opening and crevices around the drawer Proper Installation Be sure your appliance is properly installed and grounded by a qualified technician User servicing Do not repair or replace any part of the appliance unless specifically recommended in this manual All other servicing should be referred to a qualified technician Always disconnect the power to the appliance before servicing by...

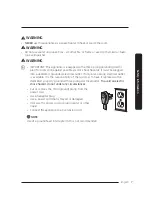
Page 7: ...ugged into a dedicated grounded electrical outlet If only a two prong electrical outlet is available it is the responsibility of the customer to have it replaced with a dedicated properly grounded three prong electrical outlet To avoid an electric shock hazard do not under any circumstances Cut or remove the third ground prong from the power cord Use an adapter plug Use a power cord that is frayed...

Page 8: ...ion instructions Have the installer show you the location of the electrical outlet so that you know where to disconnect power to the appliance Do not repair or replace any part of the warming drawer unless specifically recommended in the literature accompanying it All other service should be done by a qualified technician Use of accessory attachments not recommended by the appliance manufacturer m...

Page 9: ...maintain the unit regularly as instructed in this manual Clean only those parts listed in this manual in the manner specified Do not use abrasive scrubbers or abrasive caustic cleaners or detergents on this appliance They may permanently damage the finishes Do not use aerosol cleaners because they may be flammable or cause corrosion of metal parts Clean the appliance thoroughly before operating it...

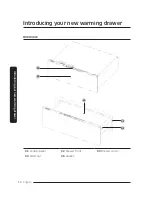
Page 10: ...English 10 Introducing your new warming drawer Introducing your new warming drawer Overview 01 02 03 04 05 01 Control panel 02 Drawer front 03 Drawer cavity 04 Slider rail 05 Gasket ...

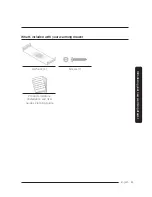
Page 11: ...English 11 Introducing your new warming drawer What s included with your warming drawer Half rack 1 Screws 7 Product Literature Installation and User Guides Planning Guide ...

Page 12: ...e the warming drawer with Medium temperature preset 05 High Activate the warming drawer with High temperature preset 06 Temp Decrease the temperature 07 Temp Increase the temperature 08 1hr Increase the timer setting by 1 hour 09 Dur Decrease the timer setting 10 Dur Increase the timer setting NOTE Before using the drawer remove the protective film from the control panel by grasping the tab in the...

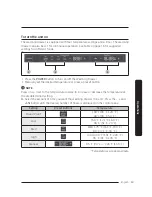
Page 13: ...ess a preset button NOTE Press on next to the temperature display to increase or decrease the temperature at the predetermined setting 3 Select the amount of time you want the warming drawer to be on Press the and 1hr button until the desired number of hours is displayed on the control pane Setting Preset Buttons Temperature Bread Proof 100 F 85 F 120 F 40 C 30 C 50 C Low 150 F 121 F 160 F 65 C 51...

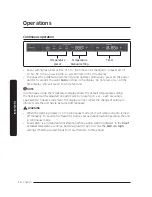
Page 14: ...perature display shows the default temperature setting the heat level can be adjusted on each mode by pressing on or each pressing is equivalent to 5 degree increment the display will not reflect the change of setting In Infinite mode the unit has to be turned off manually WARNING When the warming drawer is on in continuous mode it will remain on until turned off manually To avoid a fire hazard or...

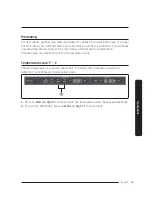
Page 15: ...ing drawer there will be less chance of water due to condensation Preheat times vary depending on the temperature setting Temperature scale F C The warming drawer is preset to Fahrenheit To Change the temperature scale from Fahrenheit to Centigrade Follow below steps 1 1 Press on Med and High for three seconds the temperature scale changes automatically 2 To revert to Fahrenheit press on Med and H...

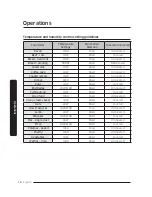
Page 16: ...Uncovered Cooked cereals LOW Moist Uncovered Dinner MED Moist Uncovered Eggs LOW Moist Covered Enchiladas LOW MED Moist Uncovered Fish seafood LOW Moist Covered Fried food HIGH Crisp Uncovered Gravy cream sauces LOW Moist Covered Ham LOW Moist Covered Hors D oeuvres LOW MED Crisp Uncovered Lamb LOW Moist Uncovered Pancakes LOW MED Moist Covered Pies single crust LOW Moist Uncovered Pizza LOW MED M...

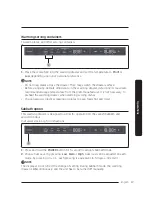
Page 17: ...preheat the warming drawer when warming serving dishes You can also use plastic wrapping on plates to keep foods hot and moist Sabbath option This warming drawer is designed to allow for operation on the Jewish Sabbath and Jewish Holidays Visit www star k org for instructions 1 1 Press and hold the POWER button for 5 second to activate Sabbath mode 2 Choose heat Level by pressing Low Med or High H...

Page 18: ...ce damage and possibly a fire Do not spray water on the warming drawer This may cause the electric shock Regularly use a dry cloth to remove such things as dust or water from the power plug and contact points Control Panel Clean the control panel with a soft cloth dampened with a solution of mild detergent and hot water Rinse and dry with a soft cloth Do not let liquid pass behind the control pane...

Page 19: ...ric shock Regularly remove dust dirt and water from the power plug and contact points Follow these steps before cleaning any drawer surfaces 1 Unplug the warming drawer 2 With a moistened soft lint free cloth or paper towel wipe surfaces inside and out 3 With a dry cloth or paper towel dry all surfaces well 4 Plug in the warming drawer Drawer Slides The warming drawer has push to open sliders on e...

Page 20: ... and maintenance Removing the drawer from the appliance 3 Remove the screw on drawer both sides near the front 1 Open the drawer fully and remove the clamp screw Connector 2 Pull out the clamp and detach the connector 4 Remove the drawer ...

Page 21: ...lling the drawer Clip Slide 1 Extend both rails and pull out the cable right side so the connector hangs outside the frame Put the drawer on both rails and slide it in until it engages under the rails rear clips 2 Fasten the screws both sides ...

Page 22: ...English 22 Care and maintenance Care and maintenance Connector 3 Re attach the connector 4 With the cable under the cable cover insert the clamp through the square hole and fasten the screw ...

Page 23: ...on according to the Operating Instructions section Tripped circuit breaker or blown fuse Check the circuit breaker panel or fuse box tripped breaker or blown fuse Ambient temperature below 32 F 0 C Temperature around warming drawer must be above freezing Drawer does not slide smoothly Drawer is incorrectly mounted into slide mechanism Remount drawer into slide per instructions above Drawer is over...

Page 24: ...ncerning this product For details clarifications contact Dacor What Is Covered CERTIFICATE OF WARRANTIES DACOR OVENS WITHIN THE FIFTY STATES OF THE U S A THE DISTRICT OF COLUMBIA AND CANADA FULL ONE YEAR WARRANTY The warranty applies only to the Dacor appliance sold to the first use purchaser starting from the date of original retail purchase or closing date for new construction whichever period i...

Page 25: ...D CANADA LIMITED FIRST YEAR WARRANTY If your Dacor product fails to function within one year of the original date of purchase due to a defect in material or workmanship Dacor will furnish a new part F O B factory to replace the defective part All delivery installation labor costs and other service fees are the responsibility of the purchaser What Is Not Covered Slight color variations may be notic...

Page 26: ...D OUTSIDE THE FIFTY STATES OF THE UNITED STATES THE DISTRICT OF COLUMBIA AND CANADA ALL IMPLIED WARRANTIES INCLUDING BUT NOT LIMITED TO ANY IMPLIED WARRANTY OF MERCHANTABILITY OR FITNESS FOR A PARTICULAR USE OR PURPOSE ARE LIMITED IN DURATION TO ONE YEAR FROM THE DATE OF ORIGINAL PURCHASE IN NO EVENT SHALL DACOR BE LIABLE FOR INCIDENTAL EXPENSE OR CONSEQUENTIAL DAMAGES IN THE EVENT DACOR PREVAILS ...

Page 27: ...incerely appreciated Thank you 1 How were you first exposed to Dacor products Please check one only A T V Cooking Show F Builder B Magazine G Architect Designer C Appliance Dealer Showroom H Another Dacor Owner D Kitchen Dealer Showroom I Model Home E Home Show J Other 2 Where did you buy your Dacor appliances A Appliance Dealer D Builder B Kitchen Dealer E Other C Builder Supplier 3 For what purp...

Page 28: ...Dacor 14425 Clark Avenue City of Industry CA 91745 Phone 800 793 0093 Fax 626 403 3130 www dacor com ...

Reviews: