Dacor DR30DH Use And Care Manual Download Page 23

21

Operating the Oven

Setting Up the Sabbath Feature

1.  Press the # key.
2.  Press the BAKE or PURE CONV key.
3.  Press the 0 or 2 keys repeatedly if you want to 

change the pre-selected cooking temperature shown 

on the display.

4.  Press (only) the START key. The oven will go into 

Sabbath mode and cook using the mode selected in 

step 2.

Things to Know About Sabbath Mode

• 

The CANCEL


·


SECURE key on your oven remains 

active so that you can turn off the Sabbath feature or 

turn off the oven.

• 

When the oven is cooking, pressing the 2 key on the 

number keypad, then START, tells the oven to raise 

the temperature by 25°F (15°C). Pressing the 0 key 

on the number keypad, then START, tells the oven 

to lower the temperature by 25°F (15°C). In compli-

ance with Jewish law, the heating element will be 

adjusted randomly when these keys are pressed and 

no changes will be seen on the display.

Please visit www.star-k.org for further information 

about Sabbath compliance and usage of this product.

Adjusting the Oven Temperature

Even though your oven is adjusted at the factory to cook 

at the temperature shown on the display, it may cook 

faster or slower than your old oven.

 warning

Do not adjust the probe or self clean offset 

temperatures. The offset for the probe and self clean 

offsets must remain at 0 for proper and/or safe 

operation.

IMPORTANT: Do not measure the temperature inside the 

oven with a thermometer. Opening the door will cause an 

incorrect reading. Also, the temperature inside the oven 

will vary as the elements cycle on and off.
If you are not satisfied with the results from your oven, 

you can adjust the temperature offset as follows:
1.  With the oven off, press and hold the 0 and # keys 

on the number keypad at the same time. After about 

three seconds “PASS” will appear on the display.

2.  Immediately enter 6428 on the number keypad, then 

START. “SLCt” (select) will appear on the display.

3.  Press the key for the cooking mode you want to 

change the offset for (CONV BAKECONV BROIL

PURE CONVCONV ROAST, BAKE or BROIL).

4.  Enter an offset temperature value from 1 to 35°F (1 

to 18 for ovens set to Celsius). Press the # key after 

entering the numeric value if you want the offset to 

be a negative (-) value. Press again to toggle the 

(-) setting off. “Edit” appears on the display when you 

start to enter the offset value.

5.  Press START to save the setting.

6.  Repeat steps 3 to 5 above for any other cooking 

modes you need to offset.

7.  Press CANCEL


·


SECURE to exit offset mode.

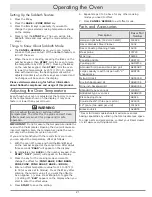
Parts and Accessories

Description

Dacor Part 

Number

Halogen light bulb (12 Volt 20 Watt)

100429

Dacor Stainless Steel Cleaner

A302

Dacor Cooktop Cleaning Cream

A300

Meat probe

72723

Wok ring

AWR4

Cooktop griddle

ADRT14

Cooktop grill

AGDRT14

Standard broil pan and broil pan grill

AER30BP

Large capacity roast/broil pan with “V” 

shaped rack

AORPVR

Island trim kit

ADTK30D

Six inch backguard kit

ADB3006

Nine inch backguard kit

ADB3009

Standard type oven rack

103807

GlideRack type oven rack

ARGOK30

Pizza baking stone

ABS16

Cookie sheets* (three per carton)

ACS303

14” grate (two used per unit)

101524

Black knob kit

AKBDT6

* Dacor full sized cookie sheets maximize oven rack 

baking capabilities by utilizing the total usable rack space.
To order parts and accessories, contact your Dacor dealer 

or visit www.everythingdacor.com.

Summary of Contents for DR30DH

Page 1: ...30DIH C Ta b l e o f C o n t e n t s Important Safety Instructions 1 Getting to Know Your Range 4 Setting Up Your Range 7 Operating the Cooktop 8 Operating the Oven 11 Care and Cleaning 23 Before You...

Page 2: ...2010 Dacor all rights reserved...

Page 3: ...practices that COULD result in severe personal injury or death caution Hazards or unsafe practices that COULD result in minor personal injury or property damage warning WARNING NEVER cover any slots h...

Page 4: ...operate the cooktop without the knobs and trim rings in place Never leave burners unattended at high heat settings Boil over causes smoking and greasy spill overs that may ignite Do not cover the bur...

Page 5: ...ause injury For your safety do not use the oven to cook without the convection filter installed When the filter is not installed the spinning fan blades at the back of the oven are exposed Do not leav...

Page 6: ...blades for safety purposes F Convection element The convection element heats the air that is blown into the oven chamber by the convection fan during the convection cooking process The convection fil...

Page 7: ...once the clock is set the current cook settings and the cooking temperature See below for the symbols that appear on the display U Number keypad The number keypad is used to set the temperature cook t...

Page 8: ...o sear About the Cooktop A Burner control knobs Use the knobs to turn on the burners and adjust the flame size The indicator above each knob illuminates when a burner is on B Trim rings Located behind...

Page 9: ...urner cap on top of the burner ring Make sure it is centered on top 3 Set the inner SimmerSear burner cap on the center of the burner base Line up the ridge on the bottom of the cap with the pins on t...

Page 10: ...ooktop without the burners completely and properly assembled see page 7 The burner rings spread the flame evenly around the burner caps The burner rings must be properly seated for proper burner light...

Page 11: ...by the household ventilation system Eliminate any drafts or reduce the ventilation blower speed to reduce this type of problem To keep the burners operating properly keep the burner igniters burner r...

Page 12: ...control panel is currently set to F or C 3 Press the key to change the temperature scale To leave the setting as is do not touch any keys 4 Press CANCEL SECURE The control panel will go back to the re...

Page 13: ...redients quickly and safely 1 Extend both rack guides completely as shown below 2 Align both sets of safety clips right and left on the back of the rack guides with the oven rack supports as shown 3 I...

Page 14: ...ear on the display until the oven reaches the set temperature Once the oven reaches the set temperature usually in 10 minutes it will beep and PRE will disappear Carefully place your food in the oven...

Page 15: ...not apply to the cooktop The range ships from the factory with this feature enabled To disable or enable the 12 hour timer feature With the oven off push and hold the TIMER 1 key for about ten seconds...

Page 16: ...u to use more oven capacity at once Use this mode for single rack baking multiple rack baking roast ing and preparation of complete meals Many foods such as pizzas cakes cookies biscuits muffins rolls...

Page 17: ...n roast mode is recommended to produce meats that are deliciously seared on the outside and succulently juicy on the inside in record time Foods that are exceptional when prepared in the convection ro...

Page 18: ...utomatically turn itself on or off at a later time you can use the delay timed fea tures warning Food safety is an important consideration when using the delay timed features To avoid potential sickne...

Page 19: ...e Using either key achieves the same result 9 Press START 10 If you entered a START TIME the oven will start at the start time entered 11 If you entered a DURATION or STOP TIME the oven will cook unti...

Page 20: ...r keypad 3 Press START Operating the Oven 4 Allow the oven to preheat Excessive browning may occur if the meat is placed in the oven during preheat mode when PRE appears on the display 5 Once the oven...

Page 21: ...Phone 800 535 4355 www fsis usda gov Dehydrating Defrosting Your range can be used to dehydrate or defrost foods at low heat settings in the Pure Convection mode warning To avoid food poisoning cook...

Page 22: ...have a partially defrosted turkey rib roast or other large cut of meat you may continue to defrost it in your convection oven If wing tips and legs begin to dry out when you defrost poultry you may w...

Page 23: ...not satisfied with the results from your oven you can adjust the temperature offset as follows 1 With the oven off press and hold the 0 and keys on the number keypad at the same time After about three...

Page 24: ...to Pure Convection or convection bake mode For best results when baking on three racks use rack positions 1 3 and 5 with the oven set to Pure Convection mode Turn pans on the racks so that the long s...

Page 25: ...the oven to emit popping sounds during self cleaning These sounds are caused by the expansion and con traction of metal surfaces when the oven heats up and cools down Self clean mode will not functio...

Page 26: ...is complete The door latch will release when the inside has cooled down The clean icon lock icon and ON will disap pear from the display Exercise caution because the oven will still be hot about 400 F...

Page 27: ...irt or grime deposited on the individual parts including the igniters 1 Use a firm tooth brush to gently clean completely around the igniter including all of the metal top and porcelain base Do not us...

Page 28: ...s and Optional WOK Ring CAUTION Do not clean the cooktop grates burner parts or WOK ring in a dishwasher They will be damaged The grates the spill tray and optional WOK ring are coated with a porcelai...

Page 29: ...ith plenty of water Rinse it well after cleaning Optional Roast Broil Pan with V Shaped Rack The roast broil pan has a porcelain enamel finish When you clean it use a solution of detergent and hot wat...

Page 30: ...than normal To replace the light bulb follow these steps 1 Replace the light bulb only with Dacor part number 100429 See page 21 for ordering information 2 Turn off power to the range at the circuit...

Page 31: ...of day not set Set time See Setting Up Your Range Power failure or power was turned off Reset time See Setting Up Your Range Time flashes on display Power failure or power was turned off Reset time Se...

Page 32: ...l not start Sabbath mode when meat probe is connected Disconnect and remove meat probe Oven door will not open Oven is set to self clean Check display If lock symbol appears on display oven door canno...

Page 33: ...the responsibility of the purchaser What Is Not Covered Slight color variations may be noticed because of dif ferences in painted parts kitchen lighting product placement and other factors this warra...

Page 34: ...32 Notes...

Page 35: ...RANTY PROCESSING DEPT PO BOX 90070 CITY OF INDUSTRY CA 91715 9907 NO POSTAGE NECESSARY IF MAILED IN THE UNITED STATES BUSINESS REPLY MAIL FIRST CLASS MAIL CITY OF INDUSTRY CA PERMIT NO 1600 POSTAGE WI...

Page 36: ...e G Architect Designer C Appliance Dealer Showroom H Another Dacor Owner D Kitchen Dealer Showroom I Model Home E Home Show J Other 2 Where did you buy your Dacor appliances A Appliance Dealer D Build...

Reviews: