background image

5

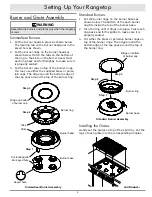
Standard Burners

1.  Put the burner rings on the burner bases as 

shown below. The bottom of the each burner 

ring fits inside the top of the burner base.

2.  Turn the ring until it drops into place. Twist each 

ring back and forth slightly to make sure it is 

properly seated.

3.  Put either the brass or porcelain burner caps on 

top of the burner rings. The ridge around the 

bottom edge of the cap goes around the top of 

the burner ring.

Installing the Grates

Gently set the grates on top of the spill tray. Put the 

legs of each grate into the corresponding dimples. 

Setting Up Your Rangetop

Burner and Grate Assembly

 WARNING

Assemble the burners and grates only when the rangetop 

is cool.

SimmerSear Burners

1.  Put the burner heads in place as shown below. 

The locating tab on the burner head goes in the 

keyed hole as shown.

2.  Put the burner rings on the burner heads as 

shown below. Match the tabs on the bottom of 

the ring to the slots on the burner head. Twist 

each ring back and forth slightly to make sure it 

is properly seated.

3.  Put the burner caps on top of the burner rings. 

You may use either the supplied brass or porce-

lain caps. The ridge around the bottom edge of 

the cap goes around the top of the burner ring.

Standard Burner Assembly

Step 1

Step 2

Step 3

Ridge on bottom 

of burner cap

Burner ring

Burner base

SimmerSear Burner Assembly

Step 1

Slots

Tabs

Step 2

Step 3

Ridge on bottom 

of burner cap

Put locating tab 

into keyed hole

Burner ring

Burner head

Burner base

Keyed hole

continued...

Summary of Contents for Discovery HRTP486

Page 1: ...DYRTP366 DYRTP486 HRTP366 HRTP486 Ta b l e o f C o n t e n t s Important Safety Instructions 1 Getting to Know Your Rangetop 4 Setting Up Your Rangetop 5 Operating Your Rangetop 6 Care and Cleaning 9...

Page 2: ...ives suggestions and remedies that may pre empt a call for service Valuable customerinput helps us continually improve ourproducts and services so feel free to contact ourCustomerAssurance Team forass...

Page 3: ...ituations you cannot resolve Safety Symbols and Labels DANGER Immediate hazards that WILL result in severe personal injury or death WARNING Hazards or unsafe practices that COULD result in severe pers...

Page 4: ...turn all control knobs to the OFF position Do not heat unopened food containers such as baby food jars and cans Pressure build up may cause the container to burst and cause injury Do not cover the bu...

Page 5: ...an electrical outlet with a ground fault interrupter GFI TO REDUCE THE RISK OF INJURY TO PERSONS IN THE EVENT OF A RANGE TOP GREASE FIRE a SMOTHER FLAMES with a close fitting lid cookie sheet or metal...

Page 6: ...on Trim Rings Located behind each knob They pre vent liquids from getting into the rangetop s internal parts Special Rangetop Features Perma Flame The Perma Flame instant re ignition feature automati...

Page 7: ...es only when the rangetop is cool SimmerSear Burners 1 Put the burner heads in place as shown below The locating tab on the burner head goes in the keyed hole as shown 2 Put the burner rings on the bu...

Page 8: ...balanced Has tight fitting lids to keep heat odors and steam in IMPORTANT Avoid spills as much as possible The porcelain surfaces of the grates spill trays and burner caps are acid resistant but not a...

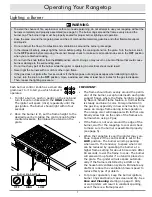
Page 9: ...ch or other open flame If the gas does not ignite after four seconds or if the flame goes out and gas escapes when attempting to light a burner turn the knob to the OFF position Open a window and allo...

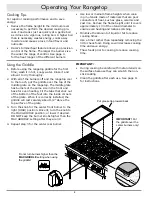
Page 10: ...as burners of the same size in the front and back for even heating Fit the tabs that stick out of the bottom of the feet into the inside corners of the grate When it is correctly installed the griddle...

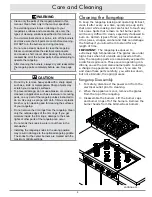
Page 11: ...avoid dangerous fumes or damage to your rangetop s surfaces and accessories use only the types of cleaning solutions specified in this manual To avoid electrical shock or burns turn off the burners a...

Page 12: ...length propor tional to the burner size To increase grate life the Smart Flame feature reduces the flame height under the grate fingers If the flame is uneven be sure that all the burner parts are pr...

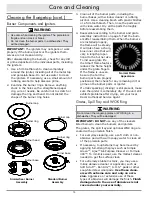
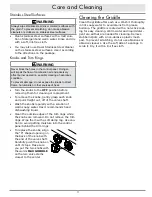
Page 13: ...traight out off of the valve shaft Wash the knobs regularly with a solution of warm soapy water Dacor recommends hand dishwashing liquid Clean the outside edges of the trim rings while the knobs are r...

Page 14: ...large Burner parts are dirty or clogged Clean and dry according to Care and Cleaning section Burner parts are not properly positioned Make sure burner is assembled according to the Setting Up Your Ran...

Page 15: ...these tips or suggestions resolves your issue call Dacor Customer Assurance 833 35 ELITE 833 353 5483 USA Canada 5 00 a m 5 00 p m Pacific Time For warranty non warranty repairs or questions in the US...

Page 16: ...responsibility of the purchaser What Is Not Covered Slight color variations may be noticed because of differ ences in painted parts kitchen lighting product place ment and other factors this warranty...

Page 17: ...15 Notes...

Page 18: ...16 Notes...

Page 19: ...RANTY PROCESSING DEPT PO BOX 90070 CITY OF INDUSTRY CA 91715 9907 NO POSTAGE NECESSARY IF MAILED IN THE UNITED STATES BUSINESS REPLY MAIL FIRST CLASS MAIL CITY OF INDUSTRY CA PERMIT NO 1600 POSTAGE WI...

Page 20: ...what purpose was the product purchased A Replacement only C New Home B Part of a Remodel D Other 4 What is yourhousehold income A Under 75 000 D 150 000 200 000 B 75 000 100 000 E 200 000 250 000 C 10...

Reviews: