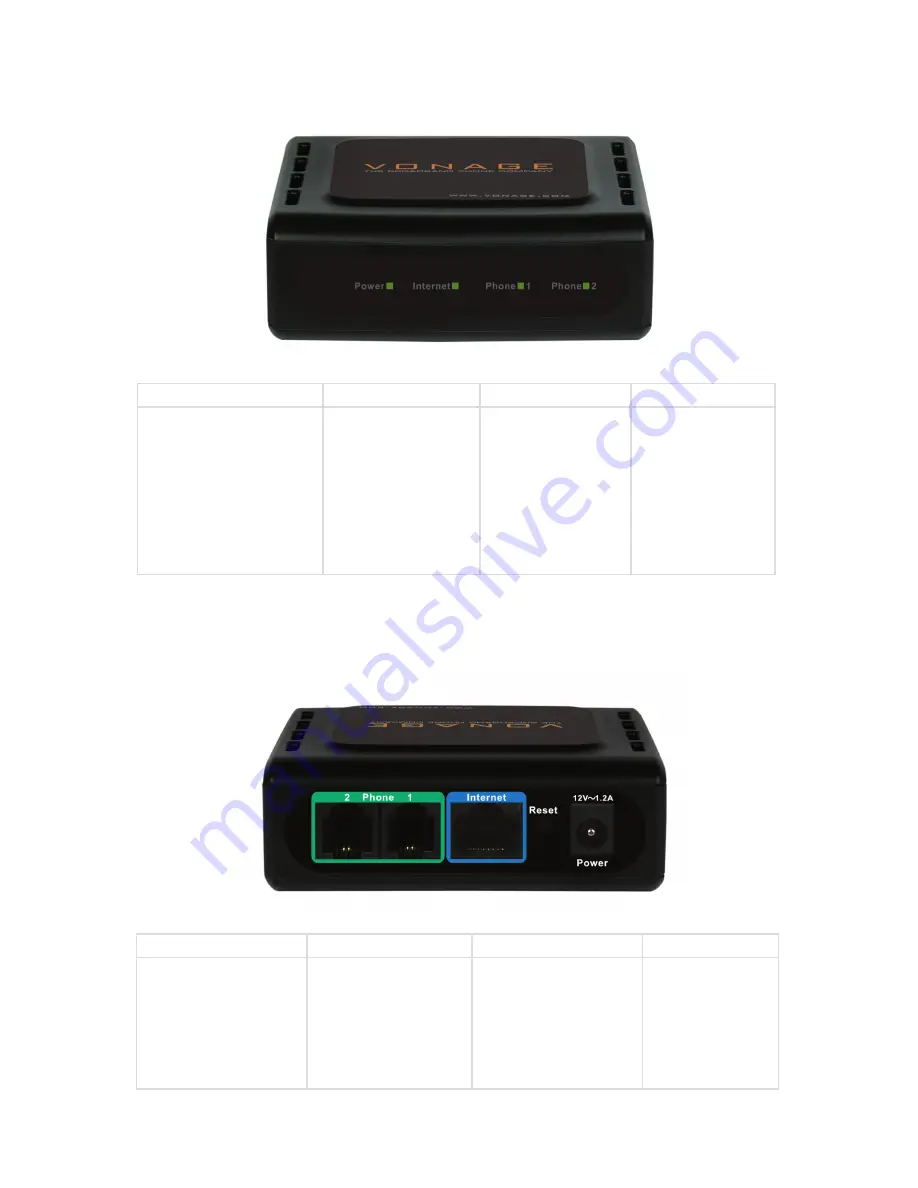
D-Link Vonage VTA-VR Quick Installation Manual Download Page 3

Front Panel

Rear Panel

Power

Internet

Phone 1

Phone 2

When the power light 
stops blinking and is a 
solid green, this indicates 
that your adapter has 
started up properly. Note 
that both the power light 
and the phone light must 
be solid in order to make 
a phone call.

Solid light indicates 
connectivity to your 
router or network 
- whenever there is 
data activity this light 
will blink.

Solid light indicates 
that phone line 1 is 
ready for Vonage 
Internet telephone or 
FAX calls.

Solid light indicates 
that optional phone 
line 2 is ready for 
Vonage Internet 
telephone or FAX 
calls.

Phone (1 & 2)

Internet

Reset

Power

Plug your phone into 
port #1 and if you’ve 
signed up for a second 
Vonage phone line, an 
optional phone or FAX 
machine into phone 
port #2.

Connect to your 
network using the blue 
Ethernet cable.

Press the reset button 
to reset the VTA back to 
the default settings.

Plug in the 
supplied power 
adapter.

Summary of Contents for Vonage VTA-VR

Page 1: ...has everything you need to get your Vonage Internet Phone Service working with the D Link VTA Take a look at the equipment follow the simple instructions provided here and in no time at all you ll be part of the telephone revolution ...

Page 2: ...sed your Vonage Telephone Adapter from a retail location you must first activate your Vonage phone service by visiting www vonage com activate After activation wait 30 minutes before checking for a dial tone Vonage VTA Telephone Adapter RJ 11 Phone Cable Blue Ethernet Cable Stand CD ROM with User Guide Power Adapter ...

Page 3: ... activity this light will blink Solid light indicates that phone line 1 is ready for Vonage Internet telephone or FAX calls Solid light indicates that optional phone line 2 is ready for Vonage Internet telephone or FAX calls Phone 1 2 Internet Reset Power Plug your phone into port 1 and if you ve signed up for a second Vonage phone line an optional phone or FAX machine into phone port 2 Connect to...

Page 4: ...Network Overview Below is a common way to connect your VTA to your network ...

Page 5: ...never there is data activity Install the Hardware 1 2 3 Connect the blue Ethernet cable into the blue port labeled Internet on the back of the telephone adapter Connect the other end to one of your router s Ethernet ports Connect the included power supply to the Power port of the Telephone Adapter Warning Using a power supply with a different voltage will cause damage to the device and will void t...

Page 6: ...ht NOW Bon Vonage 911 Service Vonage s 911 offering is different from that offered by traditional telephone companies please visit www vonage com 911 to learn more about it Insert the provided RJ 11 telephone cable into the green port labeled Phone 1 on the back of the Vonage adapter Connect the other end to your telephone If you activate a secondVonage phone line then connect another phone or FAX...

Page 7: ...power cord from back of device Wait at least 30 seconds Confirm that all the network cables are firmly snapped into the jacks on all the devices Then one device at a time plug the power back in snugly in this order 1 DSL or Cable Modem Wait for the lights to come back on for power and external network connection before continuing Connecting back up to the Internet Service Provider may take several m...

Page 8: ...p process is complete Copyright 2006 D Link Corporation D Link Systems Inc All rights reserved D Link and the D Link logo are registered trademarks of D Link Corporation or its subsidiaries in the United States and other countries Other trademarks are the property of their respective owners Vonage USA 02 27 06 During the startup process you may notice that the Power light on the front of the VTA i...

Reviews: