background image

2


Connecting the DVC-1100 Wireless

Connecting the DVC-1100 Wireless

Connecting the DVC-1100 Wireless

Connecting the DVC-1100 Wireless

Connecting the DVC-1100 Wireless

VideoPhone

VideoPhone

VideoPhone

VideoPhone

VideoPhone

A.

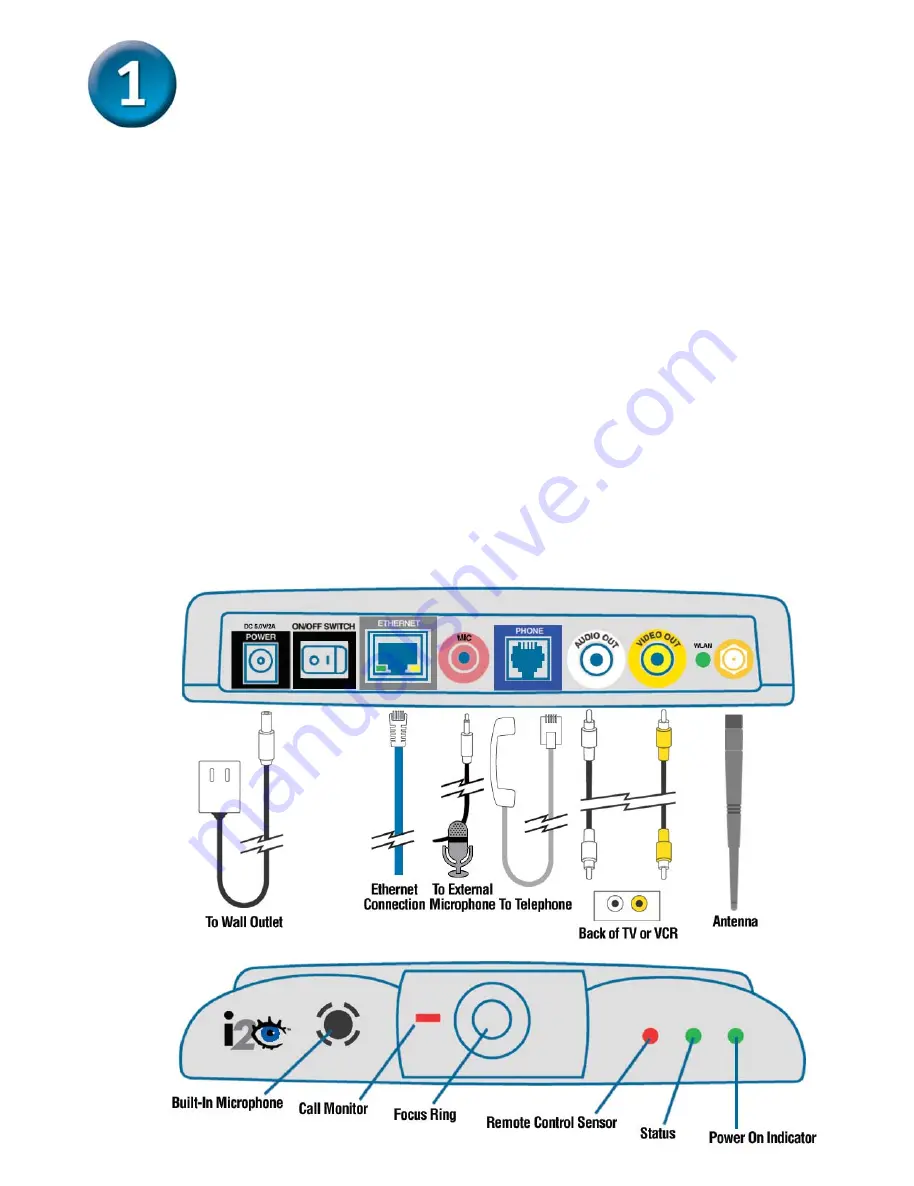
Place the DVC-1100 Wireless VideoPhone directly on top of a television.

To obtain the best viewing experience, the VideoPhone should be 5 to 10

feet away from the intended subject.

B.

Attach the supplied audio/video cable to the DVC-1100 and to the

matching audio/video jacks on the television or VCR.

C.

To connect to a network using an Ethernet cable, attach the supplied

Ethernet cable to the DVC-1100 and to the Cable or DSL modem or

Ethernet network device (hub, switch or router).

D.


To connect using a wireless network, attach the supplied antenna to the

DVC-1100.

E.

Attaching a telephone is optional, but recommended for optimal sound

quality. Attach a standard telephone cable to the telephone and directly

to the DVC-1100.  

Do NOT attach the telephone to a wall telephone

outlet.

F. 

 Plug the supplied AC power cable into an AC outlet and then into the

DVC-1100.

G. 

Attaching an external microphone is optional, but recommended for

optimal sound for a group videoconference.

F

D

B

E

G

C

i 2 e y e

i 2 e y e

i 2 e y e

i 2 e y e

i 2 e y e

All manuals and user guides at all-guides.com

Summary of Contents for i2eye DVC-1100

Page 1: ...able Standard Composite RCA Audio Video Cable Remote Control Patent Pending different voltage rating will damage this product and void the warranty Using a power supply with a 1 1 1 1 1 Using the D Link i2eyeTM DVC 1100 Wireless VideoPhone requires a connection to the Internet over a Broadband connection e g a Cable modem or a DSL modem with a router 2 Attaching a telephone to the DVC 1100 is opti...

Page 2: ...k using an Ethernet cable attach the supplied Ethernet cable to the DVC 1100 and to the Cable or DSL modem or Ethernet network device hub switch or router D To connect using a wireless network attach the supplied antenna to the DVC 1100 E Attaching a telephone is optional but recommended for optimal sound quality Attach a standard telephone cable to the telephone and directly to the DVC 1100 Do NO...

Page 3: ...ompleted the steps in this Quick Installation Guide your connected VideoPhone should look similar to this Before using your D Link DVC 1100 Wireless VideoPhone you will want to understand the network requirements for this device If you are using a residential gateway or router and sharing the broadband connection with your DVC 1100 please read the section starting on Page 50 of the manual included...

Page 4: ...ol is used to enter numbers characters and to make selections from a keyboard that is displayed on the TV screen Mute Video MuteAudio Cancel ENTER key Number sign AdjustContrast Speakerphone Mode The asterisk sometimes called a star key is used to enter a period also called a dot When entering alphanumeric information the left arrow key performs a backspace deleting the character to the left of th...

Page 5: ...on the right and left side of the keyboard to assist you in typing a character quickly To remove the keyboard from the screen highlight the OK key and press ENTER on the remote Also the CANCEL key on the remote removes the keyboard from the screen leaving what you typed on the screen You cannot use a telephone plugged into the i2eye VideoPhone to place regular phone calls as the phone would not be...

Page 6: ...r is one you create for family friends and others to call you You can use your regular phone number or make up a new one The Caller ID function displays thisnameattheotherendofthe connection Your number willl notbevisibletoanyoneelse Click Next Click Next Press the power switch on the back of the DVC 1100 and the Welcome Screen appears Note The Country code for the United States and Canada is 1 Se...

Page 7: ...ength of the available access point on the wireless network Highlight the SSID of the de vice you wish to connect to and press Enter on the re mote control Only if using DVC 1100 in wireless mode Wireless mode is enabled by default Press Enter to choose the Authentication Type be tween Open System and Shared Key Press Enter to choose the appropriate WEP Type be tween 64 128 or 256 bits Press Enter...

Page 8: ...Wizard continued Site survey box highlights the SSID youhavealreadychosen Once connected the status messageshouldsay Wireless Connection OK Connect to an Ethernet Network Using a Cable Connect to an Ethernet Network Using a Cable Connect to an Ethernet Network Using a Cable Connect to an Ethernet Network Using a Cable Connect to an Ethernet Network Using a Cable Uncheck the Enable Wire less checkb...

Page 9: ...ou are not sure which option will work with your Internet connection please contact your ISP or network administrator for support DHCP is used when connect ing directly to a broadband mo dem that offers dynamic IP ad dressing or when behind a router DHCP server that offers static DHCP Fixed IP is used when connect ing to a broadband connection that offers static IP addressing or when behind a rout...

Page 10: ... will see the screen for setting DNS server addresses Only the primary DNS is required although entering both a primary and secondary is recommended To configure a router to work with the DVC 1100 please see the section starting on Page 50 of the DVC 1100 manual Click Next DNS Screen DNS Screen DNS Screen DNS Screen DNS Screen Click Next PPPoE is used when connect ing directly to a DSL modem that ...

Page 11: ...our Setup is Complete our Setup is Complete our Setup is Complete Click Yes System Restart System Restart System Restart System Restart System Restart Select the type of broadband Internet connection you use Click Next Network Speed Screen Network Speed Screen Network Speed Screen Network Speed Screen Network Speed Screen All manuals and user guides at all guides com a l l g u i d e s c o m ...

Page 12: ...12 NOTES NOTES NOTES NOTES NOTES All manuals and user guides at all guides com ...

Page 13: ... D Link Technical Support through our website or by phone Tech Support for customers within the United States D Link Technical Support over the Telephone 877 453 5465 24 hours a day seven days a week D Link Technical Support over the Internet http support dlink com email support dlink com Tech Support for customers within Canada D Link Technical Support over the Telephone 800 361 5265 Monday to Fr...

Reviews: