


2
3
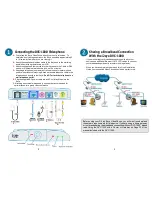
Sharing a Broadband Connection
With the i2eye DVC-1000
If you are sharing your broadband connection with any other
devices, use additional Ethernet (CAT5 UTP) cables to connect
your broadband equipment to a router or home gateway.
When you have completed the steps in this
Quick Installation
Guide,
your connected VideoPhone should look similar to this:
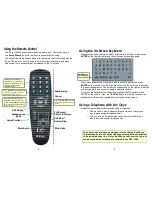
Before using your D-Link i2eye VideoPhone, you will want to understand
the network requirements for this device. If you are using a home gateway
or router and sharing the broadband connection with your DVC-1000, please
read
Using the DVC-1000 with a Router or Gateway
on Page 33 of the
manual included with the DVC-1000.
Connecting the DVC-1000 Videophone
A.
First, place the i2eye VideoPhone directly on top of a television. To
obtain the best viewing experience, the i2eye should be approximately 5
to 10 feet away from where you are viewing it.
B.
Attach the supplied audio/video cable to the i2eye and to the matching
audio/video jacks on the television or VCR.
C.
Attach the supplied Ethernet cable to the i2eye and to the Cable or DSL
modem or Ethernet network device (hub, switch or router).
D.
Attaching a telephone is optional, but recommended for optimal sound
quality when videoconferencing. Attach a standard telephone cable to the
telephone and directly to thei2eye.
Do NOT attach the telephone to a
wall telephone outlet.
E.
Plug the supplied AC power cable into an AC outlet and then into the
i2eye.
F.
Attaching an external microphone is optional, but recommended for
optimal sound for a group videoconference.
B.
D.
C.
E.
F.