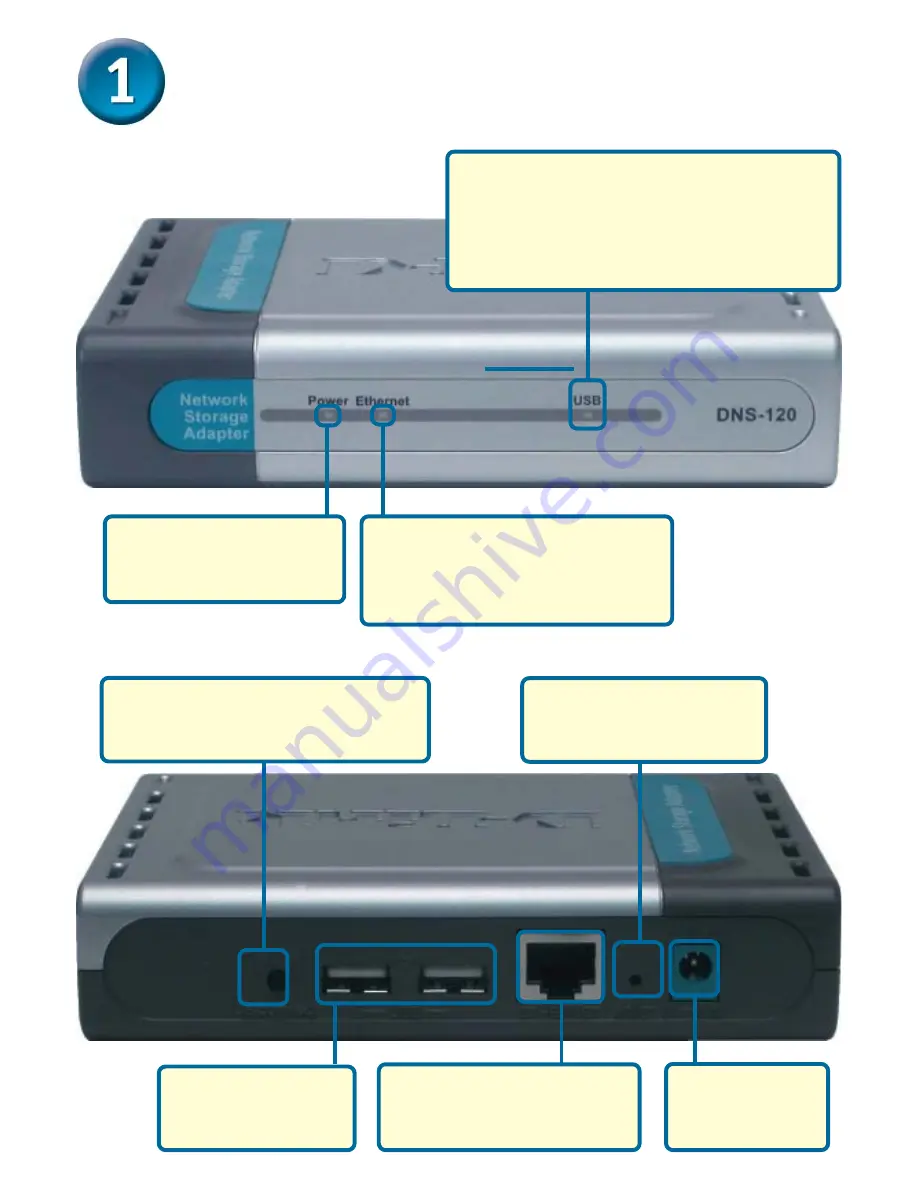
D-Link Express EtherNetwork DNS-120 Quick Installation Manual Download Page 2

2

Hardware Overview

Hardware Overview

Hardware Overview

Hardware Overview

Hardware Overview

Ethernet Port: 

Connects to

your router or switch using
the included Ethernet cable.

Receptor for the
provided  

Power

Adapter

Power LED:

 Solid green

indicates a good power
source connection.

Front Panel

Rear Panel

Ethernet LED:

 Solid green

indicates an Ethernet connection.
Blinking green indicates activity on
the Ethernet network.

USB LED:

 The USB LED will blink green when

a USB drive is being connected. When the
USB drive is fully connected the USB LED
will appear solid green. The USB LED blinks
red when the drive is being disconnected.

USB Ports: 

Connects

your USB drives to
the DNS-120.

Disconnect button: 

Press this

button to safely disconnect USB
drives from the DNS-120.

Reset button: 

This button

will restore the DNS-120
factory default settings.

Summary of Contents for Express EtherNetwork DNS-120

Page 1: ...ltage rating will damage and void the warranty of this product 2004 D Link Systems Inc All rights reserved Trademarks or registered trademarks are the property of their respective holders Software and specifications subject to change without notice DNS 120 009092004 You must have an Ethernet Network and a USB storage device The DNS 120 is DHCP enabled by default If a DHCP server is not detected on...

Page 2: ...D Solid green indicates an Ethernet connection Blinking green indicates activity on the Ethernet network USBLED TheUSBLEDwillblinkgreenwhen a USB drive is being connected When the USB drive is fully connected the USB LED will appear solid green The USB LED blinks red when the drive is being disconnected USBPorts Connects your USB drives to the DNS 120 Disconnect button Press this button to safely ...

Page 3: ...d Ethernet cable to the Ethernet Port on the rear panel of the DNS 120 Attach the Power Adapter to the power receptor on the rear panel of the DNS 120 Attach the other end of the provided Ethernet cable to an available Ethernet port on your router or switch Attach your USB drive s to the USB port s on the rear panel of the DNS 120 ...

Page 4: ...guring the DNS 120 Configuring the DNS 120 Configuring the DNS 120 Configuring the DNS 120 Insert the DNS 120 CD ROM into your CD ROM drive Click on Launch D Link Easy Search Utility Select the DNS 120 Click the Configuration button ...

Page 5: ...he logon screen will appear Type admin for the User Name and leave the Password field blank Click Config Configuring the DNS 120 continued Configuring the DNS 120 continued Configuring the DNS 120 continued Configuring the DNS 120 continued Configuring the DNS 120 continued ...

Page 6: ...fault Choose your Time Zone Select the appropriate time zone from the pull down menu Click Next You will see the following screen Click Next Configuring the DNS 120 continued Configuring the DNS 120 continued Configuring the DNS 120 continued Configuring the DNS 120 continued Configuring the DNS 120 continued ...

Page 7: ...art Click Next The DNS 120 Setup Wizard is complete Please close all web browser windows Use the Easy Search Utility to locate and continue further configuration of the DNS 120 Configuring the DNS 120 continued Configuring the DNS 120 continued Configuring the DNS 120 continued Configuring the DNS 120 continued Configuring the DNS 120 continued Set Additional Information Enter the workgroup name o...

Page 8: ... drive letter to assign Click the Connect button A message will appear indicating the success of the operation Press the Disconnect button on the rear panel of the DNS 120 The USB LED will flash red for a few seconds and turn off You may now safely remove both USB drives NOTE Both drives are disconnected when the Disconnect button is pressed You must remove both drives from the USB ports This is a...

Page 9: ...ranet users FTP access to the drive s or folder s that you want to share Select the Advanced tab Select the FTP Server button Click the Open button Unless additional precautions are taken use of an FTP server to access files over the Internet does not provide secure or encrypted transmission It is recommended that the end user utilize a Virtual Private Network VPN to establish a secure FTP session...

Page 10: ...ess continued Enabling FTP Access continued Enabling FTP Access continued Select a volume or folder Click OK The FTP Server Status is displayed at the bottom of the screen Scroll down to confirm the FTP Server has been started Press apply to save settings and start the FTP server ...

Page 11: ...ard FTP port assignment of 21 You will need to adjust your router s virtual server configuration to include the DNS 120 FTP server IP and port Additional filtering and firewall settings may need to be modified on your router to allow Internet access to the DNS 120 After configuring your router and DNS 120 you should be able to FTP to the DNS 120 using a web browser or FTP client ...

Page 12: ...ian customers can contact D Link technical support through our website or by phone Tech Support for customers within the United States D Link Technical Support over the Telephone 877 453 5465 24 hours a day seven days a week D Link Technical Support over the Internet http support dlink com email support dlink com Tech Support for customers within Canada D Link Technical Support over the Telephone ...

Reviews: