D-Link EXO DIR-2660 User Manual Download Page 72

68

D-Link DIR-2660 User Manual

Section 4 - Configuration

Virtual Server

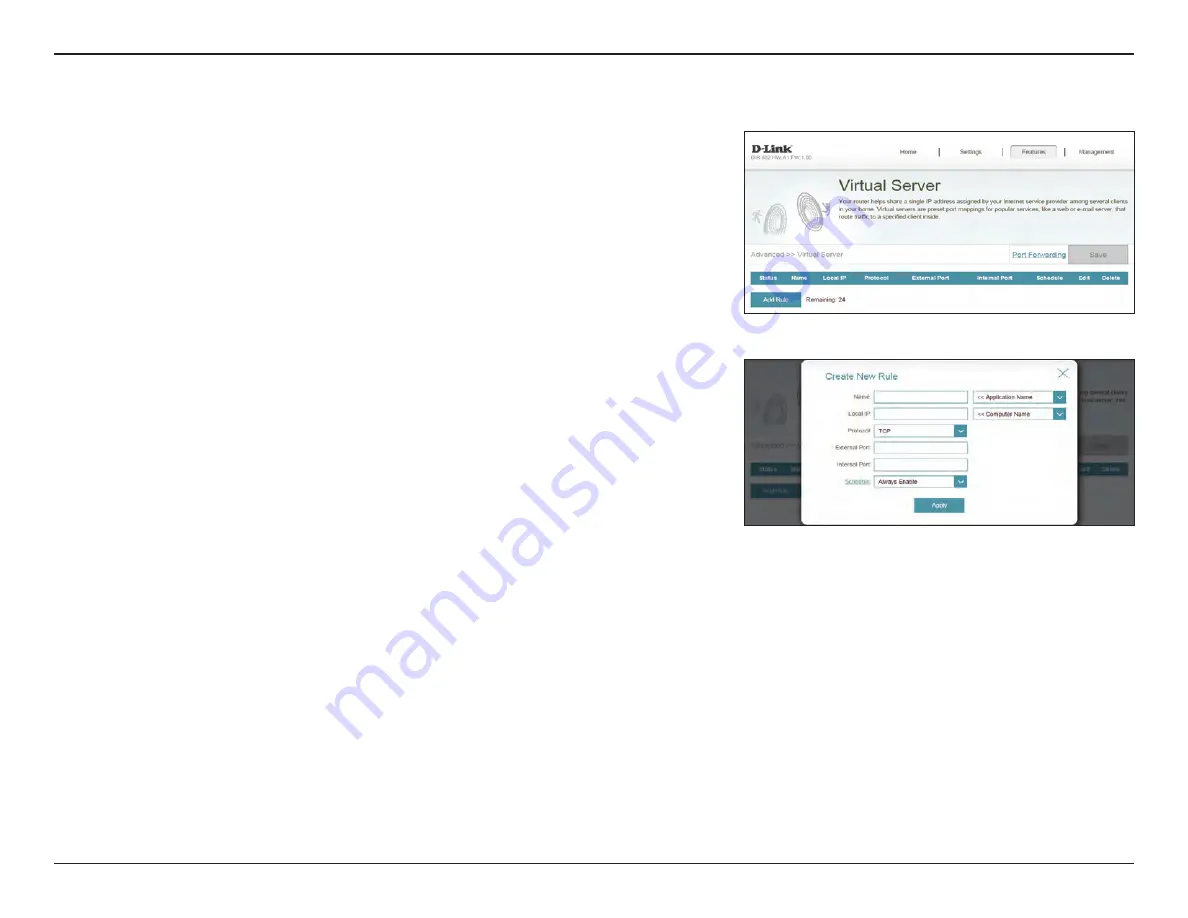
The virtual server allows you to specify a single public port on your router for 

redirection to an internal LAN IP address and Private LAN port. To configure 

the virtual server, from the Port Forwarding page click 

Virtual Server

. To 

return to the main Port Forwarding page, click 

Port Forwarding

.

If you wish to remove a rule, click on its trash can icon in the Delete column. If 

you wish to edit a rule, click on its pencil icon in the Edit column. If you wish to 

create a new rule, click the 

Add Rules 

button. Click 

Save

 when you are done. If 

you edit or create a rule, the following options will appear:

Name:

Enter a name for the rule. Alternatively, select the protocol/Application 

from the drop-down menu.

Local IP:

Enter the IP address of the computer on your local network that you 

want to allow the incoming service to. Alternatively, select the device 

from the drop-down menu.

Protocol:

Select the protocol of the traffic to allow or deny (

TCP

UDP

,

 Both

or

 Other

).

Protocol Number:

If you entered 

Other

 above, enter the protocol number.

External Port:

Enter the public port you want to open.

Internal Port:

Enter the private port you want to open.

Schedule:

Use the drop-down menu to select the time schedule that the rule 

will be enabled for. The schedule may be set to 

Always Enable

, or 

you can create your own schedules in the 

Schedules

 section. Refer 

to 

Schedule 

on page 

77

 for more information.

Click 

Save 

when you are done.

Summary of Contents for EXO DIR-2660

Page 1: ...User Manual DIR 2660 AC2600 Mesh Enabled Smart Wi Fi Router Version 1 00 2018 08 03 ...

Page 2: ...her countries App StoreSM is a service mark of Apple Inc Chrome browser Google Play and Android are trademarks of Google Inc Internet Explorer Windows and the Windows logo are trademarks of the Microsoft group of companies Copyright 2018 by D Link Corporation Inc All rights reserved This publication may not be reproduced in whole or in part without prior expressed written permission from D Link Co...

Page 3: ...etup 14 Setup Wizard 15 Configuration 19 Home 20 Internet 20 DIR 2660 21 Connected Clients 22 USB Device 23 Settings 24 Wizard 24 Internet 24 IPv6 34 VLAN 54 Wireless 56 Guest Zone 59 Network 60 USB Sharing 62 Features 63 QoS Engine 63 Firewall 64 IPv4 IPv6 Rules 66 Port Forwarding 67 Virtual Server 68 Website Filter 69 Static Routes 70 IPv6 71 Dynamic DNS 72 IPv6 Host 73 Quick VPN 74 Management 7...

Page 4: ...nect a Wireless Client to your Router 114 WPS Button 114 Windows 10 115 Windows 8 117 WPA WPA2 117 Windows 7 119 WPA WPA2 119 WPS 122 Windows Vista 126 WPA WPA2 127 Troubleshooting 129 Wireless Basics 133 What is Wireless 134 Tips 136 Wireless Modes 137 Networking Basics 138 Check your IP address 138 Statically Assign an IP address 139 Wireless Security 140 What is WPA 140 Technical Specifications...

Page 5: ...ntents Note UsingapowersupplywithadifferentvoltageratingthantheoneincludedwiththeDIR 2660willcausedamageandvoidthewarranty for this product If any of the above items are missing or damaged please contact your local reseller DIR 2660 Ethernet Cable Power Adapter Quick Installation Guide ...

Page 6: ... based operating system An installed Ethernet adapter Browser Requirements Internet Explorer 10 or higher Firefox 28 or higher Safari 6 or higher Chrome 28 or higher Windows Users Make sure you have the latest version of Java installed Visit www java com to download the latest version Wi Fi APP Requirments iPhone iPad iPodTouch Android or Windows smartphone or tablet Please refer to the mobile app...

Page 7: ...eless surveillance cameras baby monitors sensors and alarms in the places where you need them The DIR 2660 s Smart Connect Technology makes connecting to wireless networks easy by eliminating the confusion of multiple networks Ever since the introduction of 5 GHz multi band wireless technology users have had to guess whether the 5 GHz or 2 4 GHz band network would provide them with better range an...

Page 8: ...o help prevent potential attacks over the Internet The DIR 2660 AC2600 Mesh Enabled Smart Wi Fi Router provides incredible speeds smart antenna technology fast ports cloud features and advanced security features It also features an innovative design and easy installation options 1 Maximum wireless signal rate derived from IEEE Standard 802 11a 802 11g 802 11n and 802 11ac specifications Actual dat...

Page 9: ...ermines whether to connect a device to the 2 4 or 5 GHz band thereby providing the best speed and range for each device and optimally distributing devices to each network Advanced Firewall Features The web based user interface displays a number of advanced network management features Easily apply content filtering based on MAC address URL and or domain name Schedule these filters to be active on c...

Page 10: ...nternet LED A solid white light indicates a connection on the Internet port If the LED is orange the router cannot connect to the Internet 3 Wireless 2 4 GHz LED A solid white light indicates that the 2 4 GHz wireless band is enabled 4 Wireless 5 GHz LED A solid white light indicates that the 5 GHz wireless band is enabled 5 USB LED A solid white light indicates a USB storage device is connected t...

Page 11: ...cable connect your broadband modem to this port 3 Reset Button Insert a paperclip in the hole press the recessed button wait for 10 seconds and release to reset the router to default settings 4 WPS Button Press to start the WPS process and automatically create an encrypted connection to a WPS client 5 Power Connector Connector for the supplied power adapter 6 Power Button Press the power button to...

Page 12: ...8 D Link DIR 2660 User Manual Section 1 Product Overview Front Panel 1 USB 3 0 Port Connect a USB storage device to share files over the network 1 ...

Page 13: ...e Internet port on the router and then turn the modem back on In some cases you may need to call your Internet Service Provider ISP to change connection types USB to Ethernet If connecting to a DSL modem make sure to have your DSL service information provided by your Internet Service Provider handy This information is likely to include your DSL account s Username and Password Your ISP may also sup...

Page 14: ... 1 5 feet thick 0 5 meters at a 45 degree angle appears to be almost 3 feet 1 meter thick At a 2 degree angle it looks over 42 feet 14 meters thick Position devices so that the signal will travel straight through a wall or ceiling instead of at an angle for better reception 3 Building materials make a difference A solid metal door or aluminum studs may have a negative effect on range Try to positi...

Page 15: ...imize performance fully extend the antennas into a 105 degree angle to provide optimal wireless coverage Keep the router in an open area for better wireless coverage 3 Turn off and unplug the power and Ethernet cable to your cable or DSL broadband modem This is required In some cases you may need to turn it off for up to five minutes Hardware Setup 105 Modem DIR 2660 Modem DIR 2660 4 3 2 1 INTERNE...

Page 16: ...ately one minute until the LED indicator on the front of the device changes from orange to solid white 4 Use the included Ethernet cable to connect your modem to the yellow port labeled INTERNET on the router Note This unit is to be used with power supply model S36B52 120A250 04 4 3 2 1 INTERNETRR ESET WPS 12V 2A DCIN POWER 4 3 2 1 INTERNETRR ESET WPS 12V 2A DCIN POWER 4 3 2 1 INTERNETRR ESET WPS ...

Page 17: ...irelessly from a PC connect to a Wi Fi network You can also find the Wi Fi network names and passwords printed on the label attached to the bottom your router 8 If you are connecting to a broadband service that uses a dynamic connection not PPPoE you may be online already Try opening a web browser and connecting to a website If the website does not load proceed to Completing Setup on page 14 4 3 2...

Page 18: ... Internet and connect to your clients D Link Wi Fi Use your Android device iPhone iPad or iPod touch to configure your router D Link Setup Wizard This wizard will launch when you log into the router for the first time Refer to Setup Wizard on page 15 Manual Setup Log in to the router and manually configure your router Refer to Configuration on page 19 ...

Page 19: ...the address bar Alternatively enter the IP address of the router default http 192 168 0 1 PleasewaitwhileyourrouterdetectsyourInternetconnectiontype Iftherouter detects your Internet connection you may need to enter your ISP information such as username and password If the router does not detect a valid Internet connection a list of connection types to choose from will be displayed Select your Int...

Page 20: ...E username and password and click Next to continue Note MakesuretoremoveyourPPPoEsoftwarefromyourcomputer Thesoftware is no longer needed and will not work through a router If the router detected or you selected Static enter the IP and DNS settings supplied by your ISP Click Next to continue Setup Wizard continued ...

Page 21: ...nectfeaturepresentsasinglewirelessnetwork When connecting clients to an extension network they will be automatically added to the best band either 2 4 GHz or 5 GHz To disable the Smart Connect featureandindividuallyconfigure2 4GHzand5GHznetworks referto Wireless on page 56 Inordertosecuretherouter pleaseenteranewpassword Youwillbeprompted for this password every time you want to use the router s w...

Page 22: ...ummary of your settings Click Next to finalize the settings or Back to make changes At the end of the wizard you will be presented with a final summary of your settings Click Finish to close the wizard Congratulations your device has been successfully configured Setup Wizard continued ...

Page 23: ...nger than 10 seconds to restore the router to its default settings To access the configuration utility open a web browser such as Internet Explorer and enter http dlinkrouter local or you may also connect by typing the IP address of the router by default this is http 192 168 0 1 in the address bar The router s home page will open displaying its current connection status The bar at the top of the p...

Page 24: ...age displays whether or not the router is currently connected to the Internet If it is disconnected click Click to repair to bring up the setup wizard refer to SetupWizard on page 15 for more information To bring up more details about your Internet connection click on the Internet icon Click IPv4 or IPv6 to see details of the IPv4 connection and IPv6 connection respectively Click Release IP Addres...

Page 25: ...v4 address and IPv6 address To reconfigure the network settings either click Go to settings on the lower left or click Settings at the top of the page and then Network on the menu that appears Refer to Network on page 60 for more information To reconfigure the wireless settings either click Go to settings on the lower right or click Settings at the top of the page and then Wireless on the menu tha...

Page 26: ...ent s settings click the pencil icon on the client you want to edit Name Enter a custom name for this client Vendor Displays the vendor of the device MAC Address Displays the MAC address of the device IP Address Displays the current IP address of this client Reserve IP Enable to reserve this IP address for this client IP Address Reserved Specify an IP address for the DIR 2660 s DHCP server to assi...

Page 27: ... DLNA media server Windows File Sharing and FTP If you have a USB device connected you can see its name and how much free space it has To reconfigure the USB sharing settings either click Go to settings on the lower right or click Settings at the top of the page and then USB Sharing on the menu that appears Refer to USB Sharing on page 67 for more information ...

Page 28: ...op of the page click Internet to see the Internet configuration options For Dynamic IP DHCP refer to page 25 For Static IP refer to page 26 For PPPoE refer to page 27 For PPTP refer to page 29 For L2TP refer to page 31 For DS Lite refer to page 33 To configure an IPv6 connection click the IPv6 link Refer to page 34 My Internet Connection Is ChooseyourInternetconnectiontypefromthedrop downmenu You ...

Page 29: ...imary DNS server IP address assigned by your ISP This address is usually obtained automatically from your ISP Secondary DNS Server Enter the secondary DNS server IP address assigned by your ISP This address is usually obtained automatically from your ISP MTU Maximum Transmission Unit you may need to change the MTU for optimal performance with your ISP MAC Address Clone ThedefaultMACaddressissettot...

Page 30: ...S Server Enter the primary DNS server IP address assigned by your ISP Advanced Settings Secondary DNS Server Enter the secondary DNS server IP address assigned by your ISP MTU Maximum Transmission Unit you may need to change the MTU for optimalperformancewithyourISP TherecommendedsettingisAuto MAC Address Clone ThedefaultMACaddressissettotheInternetport sphysicalinterface MAC address on the router...

Page 31: ...et connection is maintained during inactivity To disable this feature select Always on as the reconnect mode Advanced Settings Address Mode Select Static IP if your ISP assigned you the IP address subnet mask gateway andDNSserveraddresses Inmostcases selectDynamicIP Dynamic IP Service Name Enter the ISP service name optional Primary DNS Server Enter the primary DNS server IP address assigned by yo...

Page 32: ...vice name optional Primary DNS Server Enter the primary DNS server IP address assigned by your ISP Secondary DNS Server Enter the secondary DNS server IP address assigned by your ISP MTU Maximum Transmission Unit you may need to change the MTU for optimalperformancewithyourISP TherecommendedsettingisAuto MAC Address Clone ThedefaultMACaddressissettotheInternetport sphysicalinterface MAC address on...

Page 33: ...nd or Manual Maximum Idle Time Enter a maximum idle time during which the Internet connection is maintained during inactivity To disable this feature select Always on as the reconnect mode Advanced Settings Address Mode Select Static IP if your ISP assigned you the IP address subnet mask gateway andDNSserveraddresses Inmostcases selectDynamicIP Dynamic IP Primary DNS Server Enter the primary DNS s...

Page 34: ...ay IP Address Enter the gateway IP address provided by your ISP Primary DNS Server Enter the primary DNS server IP address assigned by your ISP Secondary DNS Server Enter the secondary DNS server IP address assigned by your ISP MTU Maximum Transmission Unit you may need to change the MTU for optimalperformancewithyourISP TherecommendedsettingisAuto Click Save when you are done PPTP continued ...

Page 35: ...ual Maximum Idle Time Enter a maximum idle time during which the Internet connection is maintained during inactivity To disable this feature select Always on as the reconnect mode Advanced Settings Address Mode Select Static IP if your ISP assigned you the IP address subnet mask gateway andDNSserveraddresses Inmostcases selectDynamicIP Dynamic IP Primary DNS Server Enter the primary DNS server IP ...

Page 36: ...ay IP Address Enter the gateway IP address provided by your ISP Primary DNS Server Enter the primary DNS server IP address assigned by your ISP Secondary DNS Server Enter the secondary DNS server IP address assigned by your ISP MTU Maximum Transmission Unit you may need to change the MTU for optimalperformancewithyourISP TherecommendedsettingisAuto Click Save when you are done L2TP continued ...

Page 37: ...ally DS Lite DHCPv6 B4 IPv6 Address Enter the B4 IPv4 address value used here WAN IPv6 Address Once connected the WAN IPv6 address will be displayed here IPv6 WAN Default Gateway Once connected the IPv6 WAN default gateway address will be displayed here Manual AFTR IPv6 Address Enter the AFTR IPv6 address used here B4 IPv6 Address Enter the B4 IPv4 address value used here WAN IPv6 Address Once con...

Page 38: ...nfiguration SLAAC DHCPv6 refer to page 39 For PPPoE refer to page 42 For IPv6 in IPv4Tunnel refer to page 46 For 6 to 4 refer to page 49 For 6rd refer to page 51 For Local Connectivity Only refer to page 53 My Internet Connection Is Choose your IPv6 connection type from the drop down menu You will be presented with the appropriate options for your connection type Click Advanced Settings to expand ...

Page 39: ...ddress is selected Primary DNS Server If you selected Use the following DNS address above enter the primary DNS server address Secondary DNS Server If you selected Use the following DNS address above enter the secondary DNS server address LAN IPv6 Address Settings Enable DHCP PD Enable or disable DHCP Prefix Delegation LAN IPv6 Link Local Address Displays the router s LAN link local address If Ena...

Page 40: ...4 i e allowing for a larger address allocation such as 63 Contact your ISP for more information Autoconfiguration Type SelectSLAAC RDNSS SLAAC StatelessDHCP orStatefulDHCPv6 If you selected SLAAC RDNSS or SLAAC Stateless DHCP as the AutoconfigurationType Router Advertisement Lifetime Enter the router advertisement lifetime in minutes If you selected Stateful DHCPv6 as the Autoconfiguration Type IP...

Page 41: ...ry DNS Server Enter the primary DNS server address Secondary DNS Server Enter the secondary DNS server address If Use Link Local Address is disabled these additional parameters are available for configuration IPv6 Address Enter the address supplied by your ISP Subnet Prefix Length Enter the subnet prefix length supplied by your ISP LAN IPv6 Address Settings LAN IPv6 Address Enter the LAN local IPv...

Page 42: ...lDHCPv6 If you selected SLAAC RDNSS or SLAAC Stateless DHCP as the AutoconfigurationType Router Advertisement Lifetime Enter the router advertisement lifetime in minutes If you selected Stateful DHCPv6 as the Autoconfiguration Type IPv6 Address Range Start EnterthestartingIPv6addressfortheDHCPserver sIPv6assignment IPv6 Address Range End Enter the ending IPv6 address for the DHCP server s IPv6 ass...

Page 43: ...automatically or Use the following DNS address If Use the following DNS address is selected Primary DNS Server Enter the primary DNS server address Secondary DNS Server Enter the secondary DNS server address LAN IPv6 Address Settings Enable DHCP PD Enable or disable prefix delegation services LAN IPv6 Link Local Address Displays the router s LAN link local address If Enable DHCP PD is disabled the...

Page 44: ...than 64 i e allowing for a larger address allocation such as 63 Contact your ISP for more information Autoconfiguration Type SelectSLAAC RDNSS SLAAC StatelessDHCP orStatefulDHCPv6 If you selected SLAAC RDNSS or SLAAC Stateless DHCP as the AutoconfigurationType Router Advertisement Lifetime Enter the router advertisement lifetime in minutes If you selected Stateful DHCPv6 as the Autoconfiguration T...

Page 45: ...t Lifetime Enter the router advertisement lifetime in minutes If DHCP PD is disabled in LAN IPv6 Address Settings and Stateful DHCPv6 is chosen as the Autoconfiguration Type IPv6 Address Range Start EnterthestartingIPv6addressfortheDHCPserver sIPv6assignment IPv6 Address Range End Enter the ending IPv6 address for the DHCP server s IPv6 assignment IPv6 Advertisement Lifetime Enter the IPv6 address...

Page 46: ...l performance with your ISP If you selected Static IP as the Address Mode and Share with IPv4 as the PPPoE Session IP Address Enter the IP address provided by your ISP MTU Maximum Transmission Unit you may need to change the MTU for optimal performance with your ISP If you selected Create a new session as the PPPoE Session Username Enter the username provided by your ISP Password Enter the passwor...

Page 47: ...al performance with your ISP IPv6 DNS Settings DNS Type Select either Obtain DNS server address automatically or Use the following DNS address If Use the following DNS address is selected Primary DNS Server Enter the primary DNS server address Secondary DNS Server Enter the secondary DNS server address LAN IPv6 Address Settings Enable DHCP PD Enable or disable prefix delegation services This optio...

Page 48: ...Address Assignment Enable or disable the Automatic IPv6 Address Assignment feature If DHCP PD is enabled in LAN IPv6 Address Settings Enable Automatic DHCP PD in LAN Enable or disable DHCP PD for other IPv6 routers connected to the LAN interface Note Thisfeaturerequiresasmallersubnetprefixthan 64 i e allowing for a larger address allocation such as 63 Contact your ISP for more information Autoconf...

Page 49: ... IPv6 Address Range End Enter the ending IPv6 address for the DHCP server s IPv6 assignment If DHCP PD is disabled in LAN IPv6 Address Settings IPv6 Address Range Start EnterthestartingIPv6addressfortheDHCPserver sIPv6assignment IPv6 Address Range End Enter the ending IPv6 address for the DHCP server s IPv6 assignment IPv6 Advertisement Lifetime Enter the IPv6 address lifetime in minutes Click Sav...

Page 50: ...use Remote IPv6 Address Enter the IPv6 remote address you will use Local IPv4 Address Displays the current local IPv4 address Local IPv6 Address Enter the IPv6 local address you will use Subnet Prefix Length Enter the subnet prefix length supplied by your ISP IPv6 DNS Settings DNS Type Select either Obtain DNS server address automatically or Use the following DNS address If Use the following DNS a...

Page 51: ...v6 address for the router LAN IPv6 Link Local Address Displays the router s LAN link local address Advanced Settings Address Autoconfiguration Settings Enable Automatic IPv6 Address Assignment Enable or disable the Automatic IPv6 Address Assignment feature If DHCP PD is enabled in LAN IPv6 Address Settings Enable Automatic DHCP PD in LAN Enable or disable DHCP PD for other IPv6 routers connected t...

Page 52: ...6 assignment If DHCP PD is disabled in LAN IPv6 Address Settings and SLAAC Stateless DHCP or SLAAC RDNSS is chosen as the Autoconfiguration Type Router Advertisement Lifetime Enter the router advertisement lifetime in minutes If DHCP PD is disabled in LAN IPv6 Address Settings and Stateful DHCPv6 is chosen as the Autoconfiguration Type IPv6 Address Range Start EnterthestartingIPv6addressfortheDHCP...

Page 53: ... connectivity between IPv6 sites and hosts across the IPv4 Internet 6to4 Address Displays the 6 to 4 address 6to4 Relay Enter the 6 to 4 relay supplied by your ISP Primary DNS Server Enter the primary DNS server address Secondary DNS Server Enter the secondary DNS server address LAN IPv6 Address Settings LAN IPv6 Address Enter the LAN local IPv6 address for the router LAN IPv6 Link Local Address D...

Page 54: ...cted SLAAC RDNSS or SLAAC Stateless DHCP as the AutoconfigurationType Router Advertisement Lifetime Enter the router advertisement lifetime in minutes If you selected Stateful DHCPv6 as the Autoconfiguration Type IPv6 Address Range Start EnterthestartingIPv6addressfortheDHCPserver sIPv6assignment IPv6 Address Range End Enter the ending IPv6 address for the DHCP server s IPv6 assignment IPv6 Advert...

Page 55: ... hub and spoke method of networking 6rd Configuration Choose the 6rd DHCPv4 Option to automatically discover and populate the data values or Manual Configuration to enter the settings yourself If you selected Manual configuration 6rd IPv6 Prefix Enter the 6rd IPv6 prefix and mask length supplied by your ISP WAN IPv4 Address Displays the router s IPv4 address 6rd Border Relay IPv4 Address Enter the...

Page 56: ...ected SLAAC RDNSS or SLAAC Stateless DHCP as the AutoconfigurationType Router Advertisement Lifetime Enter the router advertisement lifetime in minutes If you selected Stateful DHCPv6 as the Autoconfiguration Type IPv6 Address Range Start EnterthestartingIPv6addressfortheDHCPserver sIPv6assignment IPv6 Address Range End Enter the ending IPv6 address for the DHCP server s IPv6 assignment IPv6 Adver...

Page 57: ... ULA Settings Enable ULA Click here to enable Unique Local IPv6 Unicast Addresses settings Use Default ULA Prefix Enable this option to use the default ULA prefix If you selected Enable ULA and disabled Default ULA Prefix ULA Prefix Enter your own ULA prefix Current IPv6 ULA Settings Current ULA Prefix Displays the current ULA prefix LAN IPv6 ULA Displays the LAN s IPv6 ULA Click Save when you are...

Page 58: ...ay VLAN feature Priority ID Enable or disable traffic priority ID for the Internet IPTV and VoIP VLANs If Status is enabled Internet VLAN ID Enter the VLAN ID for your Internet connection as provided by your ISP IPTV VLAN ID Enter the VLAN ID for your IPTV service as provided by your ISP VOIP VLAN ID Enter the VLAN ID for your VoIP network as provided by your ISP If Priority ID is enabled Priority...

Page 59: ...InterfaceTrafficType Setting LAN 1 4 Wireless Guest Zone From the drop down menu you can select the type of connection Internet IPTV orVoice over IP coming from theWAN connection to each interface on the DIR 2660 Click Save when you are done VLAN continued ...

Page 60: ...ireless transmission power Schedule Use the drop down menu to select the time schedule that the rule will be enabled for The schedule may be set to Always Enable or you can create your own schedules in the Schedules section Refer to Schedule on page 77 for more information Wi Fi Protected Setup The easiest way to connect your wireless devices to the router is withWi Fi Protected Setup WPS Using WP...

Page 61: ...g n 802 11n only 802 11 Mode 5 GHz Select the desired wireless networking standards to use The available options for the 5 GHz wireless network are Mixed 802 11a n ac Mixed802 11n ac 802 11aconly Mixed802 11a n Mixed 802 11n only or 802 11a only Wi Fi Channel Select the desired channel The default is Auto recommended Transmission Power Select the desired wireless transmission power Channel Width 2...

Page 62: ...rule will be enabled for The schedule may be set to Always Enable or you can create your own schedules in the Schedules section Refer to Schedule on page 77 for more information Wi Fi Protected Setup The easiest way to connect your wireless devices to the router is withWi Fi Protected Setup WPS Using WPS PIN disabled by default due to security vulnerabilities WPS PBC Status Enable or disableWPS PB...

Page 63: ... unavailable 2 4 GHz 5 GHz Status Enable or disable the 2 4 GHz 5 GHz wireless network Wi Fi Name SSID Create a name for your wireless network using up to 32 characters Password Create a password to use for wireless security Schedule Use the drop down menu to select the time schedule that the rule will be enabled for The schedule may be set to Always Enable or you can create your own schedules in ...

Page 64: ... 1 If you change the IP address once you click Save you will need to enter the new IP address in your browser to get back into the configuration utility Subnet Mask Enter the subnet mask of the router The default subnet mask is 255 255 255 0 Management Link The default address to access the router s configuration is http dlinkrouter local Here you can replace dlinkrouter with a name of your choice...

Page 65: ...ss lease in minutes Always Broadcast Enable this feature to broadcast your network s DHCP server to LAN WLAN clients Advanced Settings WAN Port Speed You may set the port speed of the Internet port to 10 Mbps 100 Mbps 1000 Mbps or Auto recommended UPnP Enable or disable Universal Plug and Play UPnP UPnP provides compatibilitywithnetworkingequipment software andperipherals IPv4 Multicast Stream Ena...

Page 66: ...twork DLNA Media Server Choose a name for your DLNA media server so that it can be found Windows File Sharing SAMBA Status Enable or disable the Windows file sharing function allowing connected clients access to shared files over the network FTP Server Status Enable or disable the FTP server function allowing connected clients access to media files through FTP FTP Server Advanced Settings Enable R...

Page 67: ...ected client If some are off screen you can use the and buttons to scroll through the cards A maximum of one device can be assigned Highest priority A maximum of two devices can be assigned High priority A maximum of eight devices can be assigned Medium priority If no devices are explicitly assigned a priority they will all be treated with equal priority If some devices are not assigned a priority...

Page 68: ...nternet and is not recommended in ordinary situations DMZ IP Address If you enabled DMZ enter the IP address of the client you wish to expose or use the drop down menu to quickly select it Enable SPI IPv4 Enabling Stateful Packet Inspection SPI helps to prevent cyber attacks by validating that the traffic passing through the session conforms to the protocol Enable Anti Spoof Checking Enable this f...

Page 69: ...g trouble connecting with your corporate network try turning this ALG off Please check with the system administrator of your corporate network whether your VPN client supports NAT traversal RTSP Allows applications that uses RealTime Streaming Protocol RTSP to receive streaming media from the Internet SIP Allows devices and applications using VoIP Voice over IP to communicate across NAT Some VoIP ...

Page 70: ...reate a new rule click the Add Rule button Click Save when you are done If you edit or create a rule the following options will appear Name Enter a name for the rule Source IP Address Range EnterthesourceIPaddressrangethattherulewillapplyto and using the drop down menu specify whether it is a WAN or LAN IP address Destination IP Address Range Enter the destination IP address range that the rule wi...

Page 71: ...g options will appear Name Enter a name for the rule Local IP Enter the IP address of the computer on your local network that you want to allow the incoming service to Alternatively select the device from the drop down menu TCP Port Enter the TCP ports that you want to open You can enter a single port or a range of ports Separate ports with a comma for example 24 1009 3000 4000 UDP Port Enter the ...

Page 72: ...he following options will appear Name Enteranamefortherule Alternatively selecttheprotocol Application from the drop down menu Local IP Enter the IP address of the computer on your local network that you want to allow the incoming service to Alternatively select the device from the drop down menu Protocol Select the protocol of the traffic to allow or deny TCP UDP Both or Other Protocol Number If ...

Page 73: ... block select DENY client access to ONLY these sites from the drop down menu All other sites will be accessible If you want to specify a list of sites to allow select ALLOW clients access to ONLY these sites from the drop down menu All other sites will be blocked You may specify a maximum of twenty four web sites To add a new site to the list click Add Rule Next under Website URL Domain enter the ...

Page 74: ...o edit a rule click on its pencil icon in the Edit column If you wish to create a new rule click the Add Route button Click Save when you are done If you edit or create a rule the following options will appear Name Enter a name for the rule Destination Network Enter the IP address of packets that will take this route Mask Enter the subnet mask of the route Gateway Enter your next hop gateway to be...

Page 75: ...en you are done If you edit or create a rule the following options will appear Name Enter a name for the rule DestNetwork This is the IP address of the router used to reach the specified destination PrefixLen Enter the IPv6 address prefix length of the packets that will take this route Gateway Enter your next hop gateway to be taken if this route is used Metric Enter a route metric value ranging f...

Page 76: ...he IPv6 host settings To configure an IPv6 dynamic DNS host refer to IPv6 Host on page 73 Enable Dynamic DNS Enable or disable dynamic DNS Enabling this feature will reveal further configuration options Status Displays the current dynamic DNS connection status Server Address Enter the address of your dynamic DNS server or select one from the drop down menu Host Name Enter the host name that you re...

Page 77: ...a rule click on its pencil icon in the Edit column If you wish to create a new rule click the Add Record button Click Save when you are done If you edit or create a rule the following options will appear Host Name Enter the host name that you registered with your dynamic DNS service provider IPv6 Address EntertheIPv6addressofthedynamicDNSserver Alternatively select the server device in the drop do...

Page 78: ...ly change requiring clients credentials to be set up again and a simple DDNS address will be easier than an IP address In the Features menu on the bar on the top of the page click QuickVPN Click User to create manage and delete user accounts with user defined access to certain router services Refer to User on page 87 Configure the following options L2TP over IPsec Enable or disable the Quick VPN s...

Page 79: ...ddress Autoconfiguration Settings Authentication Protocol Choosetheauthenticationprotocoltype MSCHAPv2 PAP orCHAP MSCHAPv2 is the default MPPE Select the encryption cipher strength None RC4 40 or RC4 128 RC4 128 is the default Click Save when you are done Quick VPN continued ...

Page 80: ...ck Schedule and refer to Schedule on page 77 Time Configuration Time Zone Select your time zone from the drop down menu Time Displays the current date and time of the router Enable Daylight Saving Enable or disable daylight saving time AutomaticTime Configuration Update Time Using an NTP Server EnableordisabletoallowanNTPserverontheInternettosynchronize the time and date with your router If you en...

Page 81: ...ncil icon in the Edit column If you wish to create a new rule click the Add Rule button Click Save when you are done If you edit or create a rule the following screen will appear First enter the name of your schedule in the Name field Each box represents one hour with the time at the top of each column To add a time period to the schedule simply click on the starting hour and drag to the ending ho...

Page 82: ...r logs to a SysLog Server If Logging to the Syslog Server is Enabled Syslog Server IP Address Enter the IP address for the Syslog server If the Syslog server is connected to the extender select it from the drop down menu to automatically populate the field Email Settings Enable E mail Notification Enable this option if you want the logs to be automatically sent to an email address If E mail notifi...

Page 83: ...l Log When Full or On Schedule Send When Log Full If enabled this option will set the router to send the log when it is full Send on Schedule If enabled this option will set the router to send according to a set schedule Schedule If you enable Send On Schedule use the drop down menu to select a schedule to apply The schedule may be set to Always Enable or you can create your own schedules in the S...

Page 84: ...played on the screen to prevent online hackers and unauthorized users from gaining access to your router s network settings Advanced Settings Administration Enable HTTPS Server ChecktoenableHTTPStoconnecttotheroutersecurely Insteadofusing http dlinkrouter local you must use https dlinkrouter local in order to connect to the router Enable Remote Management Remote management allows the DIR 2660 to b...

Page 85: ...ost including any rules that you have created If you want to save the current router configuration settings use the Save SettingsTo Local Hard Drive button above Auto Reboot Configuration Reboot The Device Click to reboot the router immediately Auto Reboot You may set the DIR 2660 to automatically reboot at a set time The options are Never Daily Weekly You may set the hour using a 24 hour format t...

Page 86: ...o edit a user account click on its pencil icon in the Edit column If you wish to create a new user click the Create User button Click Save when you are done If you edit or create a rule the following options will appear User Name Enter a username for the new user account Password Enter a password for the new user account SAMBA Status Enable or disable the Windows file sharing function for this use...

Page 87: ...access for this user Permission If FTP is enabled choose to assign either Read Only or Read Write permission Folder Click Browse to select the folder you want to share VPN Status Enable or disable Virtual Private Network VPN functionality for this user Click Save when you are done User continued ...

Page 88: ...mn If you wish to edit a rule click on its pencil icon in the Edit column If you wish to create a new rule click the Add Rule button Click Apply when you are done If you edit or create a rule the following options will appear Name Enter a name for the rule Mac Address Enter the MAC address of the device on your local network that you want to apply the rule to Alternatively select the device from t...

Page 89: ...click Upgrade Firmware Information Current Firmware Version Date The current firmware s version and date will be displayed Check for New Firmware Click this button to prompt the router to automatically check for a new firmwareversion Ifanewerversionisfound itwillpromptyoutoinstallit Upgrade Manually Upgrade Firmware Ifyouwishtoupgrademanually firstdownloadthefirmwarefileyouwish toupgradeto Next cl...

Page 90: ...n the WAN LAN and wireless segments In the Management menu on the bar on the top of the page click Statistics You can view the Internet LAN Wi Fi 2 4 GHz or Wi Fi 5 GHz by clicking on the respective tabs at the top The graph will update in real time To clear the information on the graph click Clear The traffic counter will reset if the device is rebooted ...

Page 91: ...le device to places with free untrusted Wi Fi hotspots in places like coffee shops and hotels by encrypting and relaying it through your home Internet connection This extra hop reduces the chances of hackers stealing your information such as logins passwords and credit card numbers When traveling Quick VPN lets you watch sports and use video streaming services without experiencing blackouts or fil...

Page 92: ...ur information may be intercepted since you control the Quick VPN server you may ignore this UDP Ports 500 4500 1701 and IP Port 50 must be open in order for Quick VPN to work L2TP IPsec VPN usage may be restricted in some countries and on some networks If you have trouble using Quick VPN on some networks but not others and are not violating network access rules try contacting your ISP or network ...

Page 93: ...nable Quick VPN the following options are available Username Enter a username between 1 and 20 characters Password Enter a password between 1 and 20 characters PSK Enter a passkey between 6 and 64 characters Authentication Protocol Choosetheauthenticationprotocoltype MSCHAPv2 PAP orCHAP MSCHAPv2 is the default MPPE Select the encryption cipher strength none RC4 40 or RC4 128 RC4 128 is the default...

Page 94: ...N Setup Instructions This section provides QuickVPN setup instructions for iOS devices using the Export Profile function Refer to Quick VPN Server Setup Instructions on page 89 for more information Open the e mail containing your Quick VPN profile Open the attachment ...

Page 95: ...IR 2660 User Manual Section 5 Quick VPN The Install Profile dialog will appear tap Install in the upper right hand corner of your screen Enter your device s passcode when prompted VPN Setup Instructions Continued ...

Page 96: ...e is now configured to connect to your Quick VPN server Enter the Shared Secret PSK from the Quick VPN configuration page Tap Done Acknowledge the disclaimer by tapping Install in the upper right hand corner Tap the red Install button VPN Setup Instructions Continued ...

Page 97: ...r Disconnect To connect or disconnect from to your Quick VPN server open Settings and tap the button next to VPN TheVPN icon will appear in the notification area at the top of your screen indicating that your device is currently connected to the Quick VPN server ...

Page 98: ... account password when prompted Close the Profiles dialog Mac OS X VPN Setup Instructions This section provides QuickVPN setup instructions for OS X using the ExportProfile function Refer to Quick VPN Server Setup Instructions on page 89 for more information Go to System Preferences Network and select the QuickVPN connection and click Authentication Settings ...

Page 99: ...DIR 2660 User Manual Section 5 Quick VPN Enter your Passkey in the Shared Secret text box and click OK Apply then OK Your Mac is now configured to connect to your Quick VPN server VPN Setup Instructions Continued ...

Page 100: ... User Manual Section 5 Quick VPN Connect or Disconnect To connect to or disconnect from your Quick VPN server go to System Preferences Network Select the Quick VPN connection and click on the Connect or Disconnect button ...

Page 101: ...nd files box Select Set up a virtual private network VPN connection Enter the IP DDNS address of your Quick VPN server in the Internet address box create a name for your connection in the Destination Name check Don t Connect now just set it up so I can connect later and click Next Windows 7 VPN Setup Instructions ...

Page 102: ... save your password enter your Password and check Remember this password Click Create to continue Do not click Connect Now Click Close Click the Start button and type view network connections into the Search programs and files text box Select View network connections VPN Setup Instructions Continued ...

Page 103: ...w configured to connect to your Quick VPN server Click Advanced settings Enter your Passkey in the Key text box under Use preshared key for authentication Click OK to close Advanced Properties and click OK to close Quick VPN Connection Properties VPN Setup Instructions Continued ...

Page 104: ...o or disconnect from your Quick VPN server click on the Network Settings icon in the notification area of the Windows taskbar and from the Dial Up and VPN section click on your Quick VPN connection and click on the Connect or Disconnect button Connect or Disconnect ...

Page 105: ...ick VPN Windows 8 1 8 VPN Setup Instructions This section provides Quick VPN setup instructions for Windows 8 1 8 Click the Start button and type vpn Select Manage virtual private networks From the Network Settings page click Add a VPN Connection ...

Page 106: ...me for your VPN connection 3 Enter your IP DDNS address of your Quick VPN server 4 Select User name and password from Type of sign in info 5 If you would like windows to remember your sign in information enter your User name Password and select Remember my sign in info 6 Choose Save Add a VPN Connection ...

Page 107: ...anual Section 5 Quick VPN Select the Securitytab For the TypeofVPN select Layer2TunnelingwithIPsec L2TP IPSec Right click on the Quick VPN Connection you just created and left click on Properties VPN Setup Instructions Continued ...

Page 108: ...tart button and type view network connections Select View network connections Right click your Quick VPN Connection and left click Properties Select the Security tab For the Type of VPN select Layer 2 Tunneling with IPsec L2TP IPSec VPN Setup Instructions Continued ...

Page 109: ...ettings Enter your Passkey in the Key text box under Use preshared key for authentication Click OK to close Advanced Properties and click OK to close Quick VPN Properties YourWindows8 1 8systemisnowconfiguredtoconnecttoyourQuickVPNserver VPN Setup Instructions Continued ...

Page 110: ...ck VPN Connect or Disconnect To connect to or disconnect from your Quick VPN server click on the Network Settings icon in the notification area of the Windows taskbar Click on your Quick VPN connection and click on the Connect or Disconnect button ...

Page 111: ...User Manual Section 5 Quick VPN Click Start Settings Network Internet Network and Sharing Center VPN Add a VPN Connection Windows 10 VPN Setup Instructions This section provides Quick VPN setup instructions for Windows 10 ...

Page 112: ... of your Quick VPN server 4 Select L2TP IPSec with pre shared key from VPN type 5 Enter the Passkey 6 Select User name and password from Type of sign in info If you would like windows to remember your sign in information enter your User name Password and select Remember my sign in info 7 Choose Save YourWindows10systemisnowconfiguredtoconnecttoyourQuickVPNserver Add a VPN Connection ...

Page 113: ...nnect To connect to or disconnect from your Quick VPN server click on the Network Settings icon in the notification area of the Windows taskbar and click on your Quick VPN connection The Network Internet Settings page will open Click on the Connect or Disconnect button ...

Page 114: ...60 User Manual Section 5 Quick VPN This section provides Quick VPN setup instructions for Android devices Your device s screens may vary Go to Settings More from the Wireless networks VPN Android VPN Setup Instructions ...

Page 115: ...e for your VPN connection 2 Select L2TP IPSec PSK for Type 3 Enter the IP DDNS address of your Quick VPN server 4 Enter your Passkey in IPSec pre shared key field 5 Choose Save Your Android device is now configured to connect to your Quick VPN server Edit VPN Profile ...

Page 116: ...R 2660 User Manual Section 5 Quick VPN Connect or Disconnect To connect to or disconnect from your Quick VPN server go to Settings More from the Wireless networks VPN and select the Quick VPN connection you created ...

Page 117: ...113 D Link DIR 2660 User Manual Section 5 Quick VPN To connect enter your Username and Password and select CONNECT To disconnect select DISCONNECT Connect or Disconnect Continued ...

Page 118: ...layers Blu ray DVD players wireless printers and cameras will have a WPS button or a software utility with WPS that you can press to connect to the DIR 2660 router Please refer to your user manual for the wireless device you want to connect to make sure you understand how to enable WPS Once you know follow the steps below Step 1 Press the WPS button on the DIR 2660 for about 1 second The LED on th...

Page 119: ... can find the default network name and Wi Fi password here Otherwise refer to the product label for the default Wi Fi network SSID and password or enter the Wi Fi credentials set during the product configuration To join an existing network locate the wireless network icon in the taskbar next to the time display and click on it Wireless Icon Clicking on this icon will display a list of wireless net...

Page 120: ...heck box You will then be prompted to enter the Wi Fi password network security key for the wireless network Enter the password into the box and click Next to connect to the network Your computer will now automatically connect to this wireless network when it is detected You can also use Wi Fi Protected Setup WPS to connect to the router Press the WPS button on your D Link device and you will be a...

Page 121: ...ur wireless adapter If you are joining an existing network you will need to know the security key Wi Fi password being used To join an existing network locate the wireless network icon in the taskbar next to the time display Wireless Icon Clicking on this icon will display a list of wireless networks that are within connecting proximity of your computer Select the desired network by clicking on th...

Page 122: ...nter the password into the box and click Next If you wish to use Wi Fi Protected Setup WPS to connect to the router you can also press the WPS button on your router during this step to enable the WPS function When you have established a successful connection to a wireless network the word Connected will appear next to the name of the network to which you are connected to ...

Page 123: ...n your wireless router or access point before configuring your wireless adapter If you are joining an existing network you will need to know the security key or passphrase being used 1 Click on the wireless icon in your system tray lower right corner 2 The utility will display any available wireless networks in your area Wireless Icon WPA WPA2 ...

Page 124: ...ID you would like to connect to and click the Connect button If you get a good signal but cannot access the Internet check your TCP IP settings for your wireless adapter Refer to the Networking Basics section in this manual for more information 4 The following window appears while your computer tries to connect to the router ...

Page 125: ...sword that is on your router and click Connect You can also connect by pushing the WPS button on the router It may take 20 30 seconds to connect to the wireless network If the connection fails please verify that the security settings are correct The key or passphrase must be exactly the same as the one on the wireless router ...

Page 126: ...ireless Client WPS The WPS feature of the DIR 2660 can be configured using Windows 7 Carry out the following steps to use Windows 7 to configure the WPS feature 1 Click the Start button and select Computer from the Start menu 2 Click Network on the left side ...

Page 127: ...IR 2660 User Manual Section 6 Connecting a Wireless Client 3 Double click the DIR 2660 4 Input the WPS PIN number on the router label in the Setup Wireless Setup menu in the Router s Web UI and click Next DIR 2660 ...

Page 128: ...124 D Link DIR 2660 User Manual Section 6 Connecting a Wireless Client 5 Type a name to identify the network 6 To configure advanced settings click the icon Click Next to continue ...

Page 129: ...s being configured Wait for the configuration to complete 8 The following window informs you that WPS on the DIR 2660 has been set up successfully Make a note of the security key as you may need to provide this security key if adding an older wireless device to the network in the future 9 Click Close to complete WPS setup ...

Page 130: ...lity as seen below Right click on the wireless computer icon in your system tray lower right corner next to the time Select Connect to a network If you receive the Wireless Networks Detected bubble click on the center of the bubble to access the utility or The utility will display any available wireless networks in your area Click on a network displayed using the SSID and click the Connect button ...

Page 131: ...Wireless Utility by right clicking on the wireless computer icon in your system tray lower right corner of screen Select Connect to a network It is recommended that you enable wireless security WPA WPA2 on your wireless router or access point before configuring your wireless adapter If you are joining an existing network you will need to know the security key or passphrase being used ...

Page 132: ...ty key or passphrase Wi Fi password that is on your router and click Connect It may take 20 30 seconds to connect to the wireless network If the connection fails please verify that the security settings are correct The key or passphrase must be exactly the same as the one on the wireless router ...

Page 133: ...e device itself Your computer must be on the same IP subnet to connect to the web based utility Make sure you have an updated Java enabled web browser We recommend the following Microsoft Internet Explorer 10 or higher Mozilla Firefox 28 or higher Google Chrome 28 or higher Apple Safari 6 or higher Verify physical connectivity by checking for solid link lights on the device If you do not get a sol...

Page 134: ...er in the address bar This should open the login page for your web management If you still cannot access the configuration unplug the power to the router for 10 seconds and plug back in Wait about 30 seconds and try accessing the configuration If you have multiple computers try connecting using a different computer 2 What can I do if I forgot my password If you forgot your password you must reset ...

Page 135: ...ering the MTU in increments of ten Ex 1492 1482 1472 etc To find the proper MTU Size you ll have to do a special ping of the destination you re trying to go to A destination could be another computer or a URL Click on Start and then click Run Windows 95 98 and Me users type in command Windows NT 2000 XP Vista and 7 users type in cmd and press Enter or click OK Once the window opens you ll need to ...

Page 136: ...th 1452 28 1480 Once you find your MTU you can now configure your router with the proper MTU size To change the MTU rate on your router follow the steps below Open your browser enter the IP address of your router 192 168 0 1 and click OK Enter your username admin and password blank by default Click OK to enter the web configuration page for the device Click on Setup and then click Manual Configure...

Page 137: ...Wireless LANs are used increasingly in both home and office environments and public areas such as airports coffee shops and universities Innovative ways to utilize WLAN technology are helping people work and communicate more efficiently Increased mobility and the absence of cabling and other fixed infrastructure have proven to be beneficial for many users Wireless users can use the same applicatio...

Page 138: ...t transmit data from one point A to point B But wireless technology has restrictions as to how you can access the network You must be within the wireless network range area to be able to connect your computer There are two different types of wireless networksl Wireless Local Area Network WLAN and Wireless Personal Area Network WPAN Wireless Local Area Network WLAN In a wireless local area network ...

Page 139: ... speakers and other devices that operate on batteries Who uses wireless Wireless technology as become so popular in recent years that almost everyone is using it whether it s for home office business D Link has a wireless solution for it Home Uses Benefits Gives everyone at home broadband access Surf the web check email instant message etc Gets rid of the cables around the house Simple and easy to...

Page 140: ...setting up a wireless network Tips Here are a few things to keep in mind when you install a wireless network Centralize your router or access point Make sure you place the router access point in a centralized location within your network for the best performance Try to place the router access point as high as possible in the room so the signal gets dispersed throughout your home If you have a two ...

Page 141: ...eer to peer communication using wireless network adapters on each computer such as two or more DIR 2660 wireless network USB adapters An Infrastructure network contains an access point or wireless router All the wireless devices or clients will connect to the wireless router or access point An Ad hoc network contains only clients such as laptops with wireless USB adapters All the adapters must be ...

Page 142: ...our IP address please follow the steps below Click on Start Run In the run box type cmd and click OK Windows 7 Vista users type cmd in the Start Search box At the prompt type ipconfig and press Enter This will display the IP address subnet mask and the default gateway of your adapter If the address is 0 0 0 0 check your adapter installation security settings and the settings on your router Some fi...

Page 143: ...click on the Local Area Connection which represents your network adapter and select Properties Step 3 Highlight Internet Protocol TCP IP and click Properties Step 4 Click Use the following IP address and enter an IP address that is on the same subnet as your network or the LAN IP address on your router Example If the router s LAN IP address is 192 168 0 1 make your IP address 192 168 0 X where X i...

Page 144: ...n 802 11i and uses Advanced Encryption Standard AES instead of TKIP User authentication which is generally missing in WEP through the extensible authentication protocol EAP WEP regulates access to a wireless network based on a computer s hardware specific MAC address which is relatively simple to be sniffed out and stolen EAP is built on a more secure public key encryption system to ensure that on...

Page 145: ...Hz Output 12 V DC 2 5 A Temperature Operating 0 to 40 C 32 to 104 F Storage 20 to 65 C 4 to 149 F Humidity Operating 10 to 90 maximum non condensing Storage 5 to 95 maximum non condensing Certifications FCC CE Dimensions Weight L x W x H 276 29x208 05x65 32mm 620g 1 Maximum wireless signal rate derived from IEEE Standard 802 11a 802 11g 802 11n and 802 11ac specifications Actual data throughput wi...

Page 146: ...uipment into an outlet on a circuit different from that to which the receiver is connected Consult the dealer or an experienced radio TV technician for help Non modifications Statement Any changes or modifications not expressly approved by the party responsible for compliance could void the user s authority to operate this equipment This transmitter must not be co located or operating in conjuncti...

Page 147: ...NMB 003 du Canada Innovation Science and Economic Development Canada ISED Statement This device complies with ISED licence exempt RSS standard s Operation is subject to the following two conditions 1 this device may not cause interference and 2 this device must accept any interference including interference that may cause undesired operation of the device Le présent appareil est conforme aux CNR d...

Page 148: ...th the e i r p limits specified for point to point and non point to point operation as appropriate and iii Users should also be advised that high power radars are allocated as primary users i e priority users of the bands 5650 5850 MHz and that these radars could cause interference and or damage to LE LAN devices Avertissement i les dispositifs fonctionnant dans la bande 5150 5250 MHz sont réservé...

Page 149: ...nzband Fréquence bande s Bandas de Frecuencia Frequenza e Frequentie s Max Output Power EIRP Max Output Power Consommation d énergie max Potencia máxima de Salida Potenza max Output Max Output Power 5 G 5 15 5 25 GHz 200 mW 5 25 5 35 GHz 200 mW 5 47 5 725 GHz 1 W 2 4 G 2 4 2 4835 GHz 100 mW ...

Page 150: ...uct accessories and software are in compliance with directive 2014 53 EU The full text of the EU Declaration of Conformity and product firmware are available for download from the product page at www dlink com Español Spanish Por la presente D Link Corporation declara que este producto accesorios y software cumplen con las directivas 2014 53 UE El texto completo de la declaración de conformidad de...

Page 151: ... a termék oldaláról tölthető le a www dlink com címen Polski Polish D Link Corporation niniejszym oświadcza że ten produkt akcesoria oraz oprogramowanie są zgodne z dyrektywami 2014 53 EU Pełen tekst deklaracji zgodności UE oraz oprogramowanie sprzętowe do produktu można pobrać na stronie produktu w witrynie www dlink com Português Portuguese Desta forma a D Link Corporation declara que este produ...

Page 152: ...inguna í heild sinni og fastbúnað vörunnar af vefsíðu vörunnar á www dlink com Norsk Norwegian Herved erklærer D Link Corporation at dette produktet tilbehøret og programvaren er i samsvar med direktivet 2014 53 EU Den fullstendige teksten i EU erklæring om samsvar og produktets fastvare er tilgjengelig for nedlasting fra produktsiden på www dlink com Warning Statement The power outlet should be n...

Page 153: ...r your product uses 2 4 GHz and or 5 GHz wireless HINWEIS ZUR VERWENDUNG VON DRAHTLOS NETZWERK WLAN IN DER EUROPÄISCHEN GEMEINSCHAFT NUR FÜR EIN DRAHTLOSES PRODUKT Der Betrieb dieses Geräts in der Europäischen Gemeinschaft bei Nutzung von Kanälen im 5 15 5 35 GHz Frequenzband ist ausschließlich auf Innenräume beschränkt um das Interferenzpotential zu reduzieren Bei diesem Gerät handelt es sich um ...

Page 154: ...e 5 GHz au sein de l UE Merci de vous référer au guide d utilisation ou de la fiche technique afin de vérifier si votre produit utilise 2 4 GHz et ou 5 GHz sans fil AVISO DE USO DE LA LAN DE RADIO INALÁMBRICA EN LA COMUNIDAD EUROPEA SOLO PARA EL PRODUCTO INALÁMBRICO El uso de este dispositivo está restringido a interiores cuando funciona en la Comunidad Europea utilizando canales en la banda de 5 ...

Page 155: ...rol richieste per operare a 5 Ghz nell Unione europea Ti invitiamo a fare riferimento al manuale del prodotto o alla scheda tecnica per verificare se il tuo prodotto utilizza le frequenze 2 4 GHz e o 5 GHz KENNISGEVING VAN DRAADLOOS RADIO LAN GEBRUIK IN DE EUROPESE GEMEENSCHAP ALLEEN VOOR DRAADLOOS PRODUCT Dit toestel is beperkt tot gebruik binnenshuis wanneer het wordt gebruikt in de Europese Gem...

Page 156: ...n Sicherheitsvorschriften dienen als Hilfe zur Gewährleistung Ihrer eigenen Sicherheit und zum Schutz Ihres Produkts Weitere Details finden Sie in den Benutzeranleitungen zum Produkt Statische Elektrizität kann elektronischen Komponenten schaden Um Schäden durch statische Aufladung zu vermeiden leiten Sie elektrostatische Ladungen von Ihrem Körper ab z B durch Berühren eines geerdeten blanken Meta...

Page 157: ... Débranchez toujours le produit de l alimentation avant de le nettoyer et utilisez uniquement un chiffon sec non pelucheux INSTRUCCIONES DE SEGURIDAD Las siguientes directrices de seguridad general se facilitan para ayudarle a garantizar su propia seguridad personal y para proteger el producto frente a posibles daños No olvide consultar las instrucciones del usuario del producto para obtener más i...

Page 158: ...egare sempre il prodotto dalla presa elettrica prima di pulirlo e usare solo un panno asciutto che non lasci filacce VEILIGHEIDSINFORMATIE De volgende algemene veiligheidsinformatie werd verstrekt om uw eigen persoonlijke veiligheid te waarborgen en uw product te beschermen tegen mogelijke schade Denk eraan om de gebruikersinstructies van het product te raadplegen voor meer informatie Statische el...

Page 159: ...es Symbol auf dem Produkt oder der Verpackung weist darauf hin dass dieses Produkt gemäß bestehender örtlicher Gesetze undVorschriftennichtüberdennormalenHausmüllentsorgtwerdensollte sonderneinerWiederverwertungzuzuführenist Bringen Sie es bitte zu einer von Ihrer Kommunalbehörde entsprechend amtlich ausgewiesenen Sammelstelle sobald das Produkt das Ende seiner Nutzungsdauer erreicht hat Für die A...

Page 160: ... en savoir plus sur les produits et emballages respectueux de l environnement veuillez consulter le www dlinkgreen com ESPAÑOL ES Este símbolo en el producto o el embalaje significa que de acuerdo con la legislación y la normativa local este producto no se debe desechar en la basura doméstica sino que se debe reciclar Llévelo a un punto de recogida designado por las autoridades locales una vez que...

Page 161: ...e energia e a ridurre le emissioni di anidride carbonica Per ulteriori informazioni sui prodotti e sugli imballaggi D Link a ridotto impatto ambientale visitate il sito all indirizzo www dlinkgreen com NEDERLANDS NL Ditsymboolophetproductofdeverpakkingbetekentdatditproductvolgensdeplaatselijkewetgevingnietmagwordenweggegooid met het huishoudelijk afval maar voor recyclage moeten worden ingeleverd ...

Page 162: ...padku samych produktów jak i opakowań Firma D Link zaleca aby Państwo zawsze prawidłowo wyłączali z użytku swoje produkty D Link gdy nie są one wykorzystywane Postępując w ten sposób pozwalają Państwo oszczędzać energię i zmniejszać emisje CO2 Aby dowiedzieć się więcej na temat produktów i opakowań mających wpływ na środowisko prosimy zapoznać się ze stroną Internetową www dlinkgreen com ČESKY CZ ...

Page 163: ...karításában és a széndioxid kibocsátásának csökkentésében Környezetbarát termékeinkről és csomagolásainkról további információkat a www dlinkgreen com weboldalon tudhat meg NORSK NO Dette symbolet på produktet eller forpakningen betyr at dette produktet ifølge lokale lover og forskrifter ikke skal kastes sammen med husholdningsavfall men leveres inn til gjenvinning Vennligst ta det til et innsamli...

Page 164: ...udledningerne Du kan finde flere oplysninger om vores miljømæssigt ansvarlige produkter og emballage på www dlinkgreen com SUOMI FI Tämä symboli tuotteen pakkauksessa tarkoittaa että paikallisten lakien ja säännösten mukaisesti tätä tuotetta ei pidä hävittää yleisen kotitalousjätteen seassa vaan se tulee toimittaa kierrätettäväksi Kun tuote on elinkaarensa päässä toimita se lähimpään viranomaisten...

Page 165: ...id För mer information om våra miljöansvariga produkter och förpackningar www dlinkgreen com PORTUGUÊS PT Este símbolo no produto ou embalagem significa que de acordo com as leis e regulamentações locais este produto não deverá ser eliminado juntamente com o lixo doméstico mas enviado para a reciclagem Transporte o para um ponto de recolha designado pelas suas autoridades locais quando este tiver ...

Reviews: