background image

7

D-Link DWR-932C User Manual

Section 2 - Installation

Initial Setup

Installation

This section will guide you through the installation process.

1.  Ensure that your DWR-932C 4G/LTE Mobile Router is powered off.

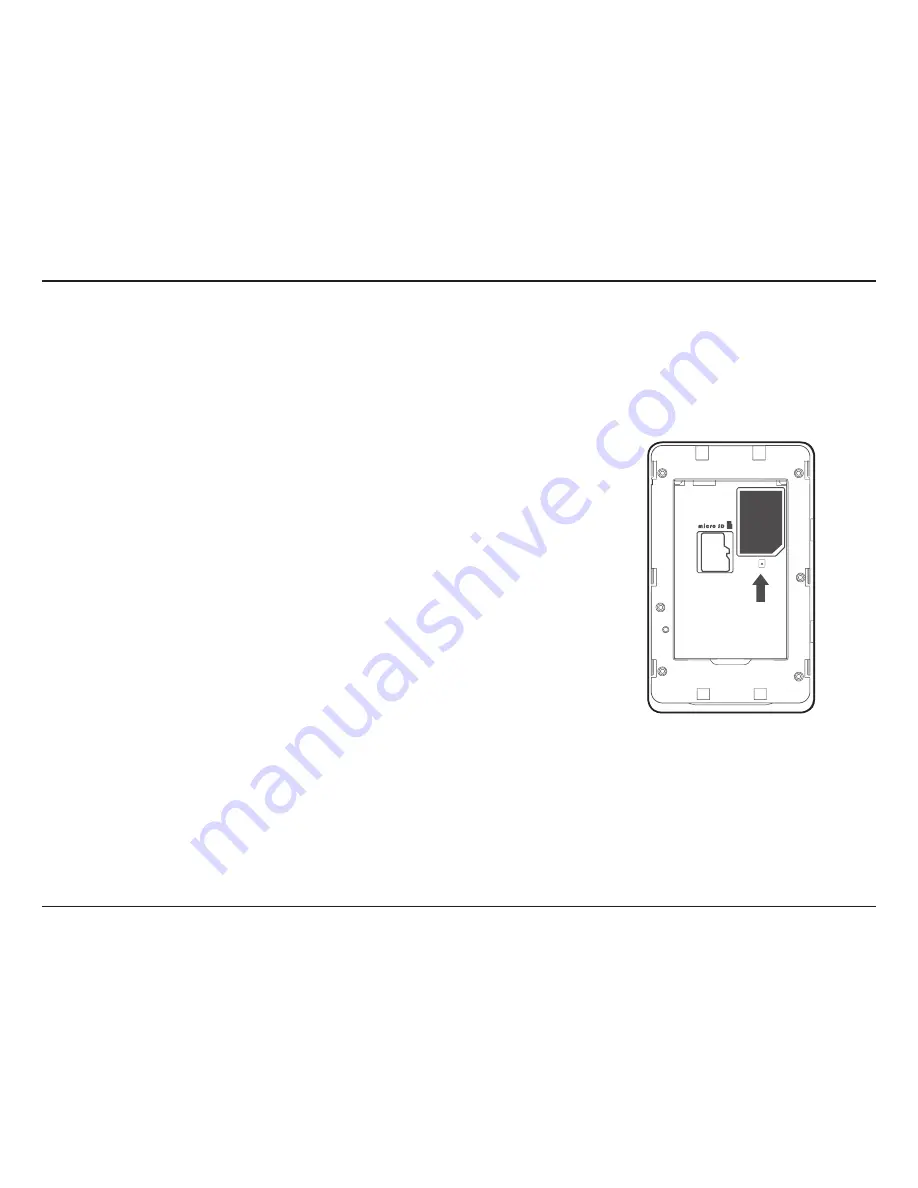
2.  Remove the cover on the underside of the router. Slide your SIM card into the cage provided, 

ensuring that the alignment is the same as indicated by the logo next to the carriage. The 
gold contacts on the card should be facing downwards.

Note:

 Always unplug and turn off the router before installing or removing the SIM card. Never 

insert or remove the SIM card while the router is in use.

3.  Press and hold the power button on the side of the router.

a.  The Battery LED will light up green as the router performs its initialization processes.

b.  After a few moments, the LED indicators will show the current status of the router’s 

various functions. For more information please refer to 

LED Indicators

 on page 6.

SIM

Summary of Contents for DWR-932C

Page 1: ...DWR 932C User Manual 4G LTE Mobile Router Version 1 0 11 02 2015 ...

Page 2: ...egistered trademarks of D Link Corporation or its subsidiaries in the United States or other countries All other company or product names mentioned herein are trademarks or registered trademarks of their respective companies Copyright 2015 by D Link Corporation Inc All rights reserved This publication may not be reproduced in whole or in part without prior expressed written permission from D Link ...

Page 3: ...vigation 14 Quick Access 15 Network Setup 16 Setup Wizard 16 APN For LTE 3G 17 If you selected Basic Protection 17 Connection Settings 17 Wi Fi 2 4 GHz Access Name 18 Wi Fi Status 18 If you selected Basic Protection 19 Admin Settings 20 Date Time 20 Admin Settings 20 Apply Settings 22 Internet Settings 23 Network Status 23 Cellular Information 23 Network Status 23 APN Settings 24 Access Point Name...

Page 4: ...ewall Settings 44 IP Filter 46 Add IP Filter 47 Port Forwarding 48 Add Port Forwarding 49 System 50 System Information 50 About DWR 932C 50 Admin Settings 51 Account 51 Language 52 Date Time 53 Settings Profile 55 Import 55 Export Profiles 56 Export 56 Reset and Reboot 57 Reset and Reboot 57 Firmware Upgrade 58 Upgrade My router 58 Network Statistics 59 Statistics 59 Advanced Options 60 Power Savi...

Page 5: ...iv D Link DWR 932C User Manual Table of Contents Troubleshooting 76 Networking Basics 78 Check your IP address 78 Statically Assign an IP address 79 Technical Specifications 80 Regulatory Information 81 ...

Page 6: ...WR 932C User Manual Section 1 Product Overview Product Overview Package Contents D Link DWR 932C 4G LTE Mobile Router USB Cable If any of the above items are missing from your package please contact your reseller ...

Page 7: ...er with the following Windows Macintosh or Linux based operating system An installed Ethernet adapter Browser Requirements Internet Explorer 9 or higher Firefox 12 or higher Safari 4 or higher Chrome 20 or higher Windows Users Make sure you have the latest version of Java installed Visit www java com to download the latest version 1 Subject to services and service terms available from your carrier...

Page 8: ...nconnectwithoutneedingtoinstallanything Openabrowser connect therouter andyoucansetupyournetworkrightfromthewebinterface Oncethedeviceissetup youcansimplypoweritontostartupyourportable mobile network meaning that you can share your mobile Internet connection without even needing a computer DesignedforTruePortability The DWR 932C 4G LTE Mobile Router is small and slim enough to carry around in your...

Page 9: ...on off the device 2 WPS Button Press this button to add new wireless devices quickly and easily using Wi Fi Protected Setup WPS 3 Status LEDs Please refer to LED Indicators on page 6 4 Micro USB Connector Use the included cable to connect to a powered USB port to charge the device or connect to a computer to access the configuration utility 1 2 3 4 ...

Page 10: ...this button for 6 seconds to reboot the unit Note Ensure that the battery is inserted and the unit is powered on when pressing the reset button 4 Wi Fi Network SSID The network name SSID of the DWR 932C will be displayed here 5 Network SSID Password The network SSID security key of the DWR 932C will be displayed here 4 5 2 1 3 Model No DWR 932C H W Ver A1 F W Ver 1 00 P N EWR932 C1E IMEI XXXXXXXXX...

Page 11: ...ed to 4G network Green Solid Registering with 3G network Blinking Connected to 3G network Purple Solid Registering with 2G network Blinking Connected to 2G network Red No signal or SIM error 2 Wi Fi LED Blue Solid Wi Fi Active Blinking Transmitting data WPS active 3 Battery LED Blue Battery level greater than 50 Amber Charging Green Battery level 10 50 Red Battery Low Purple SMS message received ...

Page 12: ...o next to the carriage The gold contacts on the card should be facing downwards Note Always unplug and turn off the router before installing or removing the SIM card Never insert or remove the SIM card while the router is in use 3 Press and hold the power button on the side of the router a The Battery LED will light up green as the router performs its initialization processes b After a few moments...

Page 13: ...2C 4G LTE Mobile Router is powered off 2 Remove the cover on the underside of the router 3 Slide your microSD card into the cage provided ensuring that the alignment is the same as indicated by the logo next to the carriage The gold contacts on the card should be facing downwards 4 Close the cover SIM ...

Page 14: ... that is 1 5 feet thick 0 5 meters appears to be almost 3 feet 1 meter thick at a 45 degree angle At a 2 degree angle it appears over 42 feet 14 meters thick Position devices so that the signal will travel straight through a wall or ceiling instead of at an angle for better reception 3 Try to position access points wireless routers and computers so that the signal passes through open doorways Mate...

Page 15: ...web based configuration utility For information about how to Connect via Wi Fi on page 11 Once you have configured your router you will be able to connect using the Wi Fi settings that you specified in the configuration process Please ensure that the router is powered on and has sufficient battery power before commencing the setup process Connect via USB To connect to the router via USB plug the p...

Page 16: ... To connect to the router usingWi Fi open your operating system s wireless networking utility and scan for available networks to connect to By default the network name SSID of the DWR 932C will be in the format dlink_DWR 932C_xxxx where xxxx represents the last four character s of the DWR 932C s MAC address The default SSID and password can also be found on the product label situated under the bat...

Page 17: ...ter the security key in the box provided and click OK Your wireless connection utility will confirm that the connection is successful and you can move to the next step to continue to the configuration process You can also set up a connection using the Windows built in WPS feature Please see Connecting to a Wireless Network on page 62 ...

Page 18: ... Internet Explorer and enter the IP address of the router which is 192 168 0 1 by default in the address bar Once you have reached the configuration utility through your web browser you will need to log in Enter admin as the username and then enter the password By default the password is blank Click Sign in to continue Configuration Utility ...

Page 19: ... tab allows you to configure your Internet settings The Wi Fi Setting allows you to configure your Wi Fi network as well as add new devices using WPS The Applications tab allows you to configure firewall and security settings to protect your network from WAN side intrusions The System tab allows you to view system information and alter your login password From the Help tab you can access a general...

Page 20: ...et service you are using the signal strength and your current data usage This area displays the length of connection time and allows you to change between Always Connect and Manual Connect The Wi Fi section displays the number of devices currently connected to the router This area displays the number of SMS messages in your inbox and your draft massages This area displays whether power saving feat...

Page 21: ...on Network Setup Setup Wizard The Wizard page will guide you through the steps required to configure the basic settings of your router such as the IP address network name SSID and password Click on the Setup Wizard button to begin the quick setup wizard ...

Page 22: ...bined Select this if your service provider uses this protocol Password Authentication Protocol Select this if your service provider uses this protocol Challenge Handshake Authentication Protocol Select this if your service provider uses this protocol Click Next to move to the next section In this section you can configure your connection settings Depending on your mobile service provider you may h...

Page 23: ...cally determine the version of WPA to be used based on the client that is connecting to it WPA2 Clients will only be able to associate with the router using the WPA2 standard Clients which do not support WPA2 will not be able to associate with the router AES A newer cipher used by the WPA2 standard Use of this cipher type is required in order to achieve 802 11 speeds AES TKIP TKIP is an encryption...

Page 24: ...er your passphrase to be used when connecting to the router You can predetermine up to 4 WEP keys Select the WEP key you wish to use by clicking on the radio buttons next to the keys Select whether you wish to use HEX or ASCII characters in your key using the drop down menu Enter the desired key in the field provided Click Next to move to the next section If you selected Basic Protection ...

Page 25: ...ter settings as well as the time and date Admin Settings Date Time SNTP Time Zone Date Time Selected Date and Time Toggle the switch to Enable or Disable to automatically synchronize the time with a Simple Network Time Protocol SNTP server Select your current Coordinated Universal Time zone UTC Adjust the dials on the screen with your mouse curser or pointer to set the time and date Displays your ...

Page 26: ...he time zone where you are currently using the DWR 932C to accurately set the time You can specify in hours how frequently the DWR 932C will update the time from an SNTP server Click Next to move to the next section Primary Secondary and Tertiary SNTP Server Time Zone Synchronization Cycle If you enabled automatically synchronize the time with an SNTP server ...

Page 27: ...ink DWR 932C User Manual Section 3 Configuration Apply Settings Check all settings in the wizard and click Apply After applying the new settings you will need to reboot your system Click Apply to save changes ...

Page 28: ...ys your current network provider and signal strength Displays the type of network you are connected to such as 2G 3G or 4G The length of time you have been connected to the network Network Provider Network Type Connection Time Cellular Information Network Status Displays your current IP address Displays your average download speed Displays your average upload speed IP Address IPV4 Total DL Total U...

Page 29: ...obile network Manual Enter the Access Point Name APN for the connection If you do not know this information please contact your service provider Click Apply to save changes APN Selection Mode In this section you can configure your APN settings Depending on your mobile service provider you may have to input optional settings before use if so you may need to contact your service provider regarding t...

Page 30: ...rom the drop down list Enter the username to be used for this connection Enter the password to be used for this connection Choose the authentication method that your ISP uses to connect to its mobile network If you do not know this information please contact your service provider For more information refer to Connection Settings on page 17 Click Apply to save changes If you choose to manually sele...

Page 31: ...isable your Internet Click Apply to save changes Connect disconnect manually Auto automatically connects to a mobile network 2G mode only connects to a 2G mobile network 3G mode only connects to a 3G mobile network 4G mode only connects to a 4G mobile network Select this if you want to allow data roaming Data roaming lets you use an Internet connection internationally outside of you Internet provi...

Page 32: ...ocked from using your SIM Move the toggle to enable SIM card PIN Lock Protection In order to use this function you need to know the PIN of the SIM chip No of Retry SIM Card PIN Lock Protection This section allows you to lock the SIM card currently inserted into the DWR 932C If you enabled Manual Connection Mode Type your SIM s pin code here Click Apply to save changes PIN Code SIM ...

Page 33: ...o select a preferred network when you are roaming outside of your home network Displays the current mode the DWR 932C is operating in Select Automatic to allow the DWR 932C to automatically connect to the first available network when roaming Select Manual to choose your preferred roaming network from the list below Click Apply to save changes PLMN Mode Operator Mode PLMN ...

Page 34: ...llows you to see what the cellular network s access technology is Click Apply to save changes ID Use it Status Operator Name Access Technology If you selected Manual Mode Click on your preferred network to select it or type in the Search box to find your desired network Note You will need to manually disconnect from the current mobile data service before selecting a network using PLMN Available Op...

Page 35: ...932C has a built in DHCP server which can assign IP addresses to connected clients This section shows your current settings and allows you to configure the IP address for the DWR 932C as well as configure its DHCP settings This button takes you through to DHCP Settings where you can configure your IP address and IP range Shows if you are using the DHCP Service Router s current IP address The subne...

Page 36: ... the range of IP numbers that the DHCP will give out DHCP Service IP Address Subnet IP Range Enable disable the DHCP Server Click on the last digit to alter your router s current IP address The subnet number that your router is currently using Click on the last two digits to alter the range of numbers that the DHCP server will give out Click Apply to save changes ...

Page 37: ...e configuration method used Displays whether Wi Fi is enabled Displays the number of people connected to yourWi Fi network General Information SSID Name Encryption DHCP IP Address Subnet MAC Address Displays the name of your Wi Fi network Displays your currentWi Fi security encryption mode Displays whether you are using a DHCP server or not Your router s IP address Your router s subnet number Your...

Page 38: ...e of Wi Fi connection currently being accepted by the router The current channel width being used by your router Choose the clearest channel to help optimize the performanceandcoverageofyourwirelessnetwork By default the channel is set to Auto Channel This can be changedtofitthechannelsettingforanexistingwireless network or to customize your wireless network Click Apply to save changes Wi Fi 2 4 G...

Page 39: ...vicestotheDWR 932CbypushingaPBC button on both devices Simultaneously click Start Via PBC as well as your device s PBC button to begin the Wi Fi Protected Setup feature Move the toggle to enable PIN protection for use with theWi Fi Protected Setup feature The PIN is a unique number that can be used to configure your router Click Apply to save changes ...

Page 40: ...e IP address MAC address Access Auniquenameforeachwirelessclientthatisconnected to your router The network address of the wireless client that is connected to your router The hardware address of the client s wireless adapter Toggle this switch to allow or deny access to specific clients Note If you deny access to a Wi Fi client you will see their MAC address in MAC Filter on page 38 You can re all...

Page 41: ...nts allowed on your network By default advanced protection is selected You may also select between basic protection or no protection Auto WPA or WPA2 The router will automatically determine the version of WPA to be used based on the client that is connecting to it WPA2 Clients will only be able to associate with the router using the WPA2 standard Clients which do not support WPA2 will not be able ...

Page 42: ...acters in your key using the drop down menu Enter the desired key in the field provided Click Apply to save the current settings If you selected Basic Protection Cipher Type Pre Shared Key AES A newer cipher used by the WPA2 standard Use of this cipher type is required in order to achieve 802 11 speeds AES TKIP TKIP is an encryption method commonly used by older devices Select this option for grea...

Page 43: ...t that you wish to deny access to your network Note Youcanviewthecurrentlistofclientsconnectedto yournetworkandtheirMACaddressesinWi Fi Clients onpage35 Click Apply to save changes MAC Filter MAC Filter For Black List ID Delete MAC Address Add New This page allows you to set MAC filters Media Access Control which allow or deny LAN Local Area Network computers from accessing the network A MAC addre...

Page 44: ...Service SMS messages by selecting between a setup inbox and drafts tab These messages can either be saved to the DWR 932C 4G LTE Mobile Router directly or on the SIM card itself Short Message Settings Setup Choose between storing contact numbers on your SIM card or the DWR 932C device The current amount of messages received Your SIM card s contact number Click Apply to save changes Application Set...

Page 45: ...lete a message in your inbox The SMS sender s number The time the message was received The SMS message s content Click Add New to send a new message Click Apply to save changes Inbox Send to Content The number of the person you wish to send the message to Type your message content here ID Delete From Time Content Add New If you clicked Add New ...

Page 46: ...onological number given to each message you save to draft Check this box to select and delete a message in your drafts folder The SMS recipient s number The time the message was last edited The SMS message s content Click Apply to save changes ID Delete To Time Content ...

Page 47: ...as the range of IP numbers that the DHCP will give out DHCP Service IP Address Subnet IP Range Enable disable the DHCP Service Click on the last digit to alter your router s current IP address The subnet number that your router is using Click on the last digits to alter the range of numbers that the DHCP server will give out Click Apply to save changes DHCP Service ...

Page 48: ...ter an application activation code and click the Send button This will allow you to activate applications by sending an SMS to your ISP Unstructured Supplementary Service Data USSD allows ISP specific applications to be activated with an SMS message USSD Code USSD ...

Page 49: ...rized Zone Clicking this toggle will expose a chosen computer to the outside world by completely disabling all firewalls Note Onlyrecommendforadvancedusers enablingthis option will potentially expose your computer to cyber attacks over the Internet Allows multiple machines on the LAN to connect to their corporate network using PPTP protocol Allows multiple machines on the LAN to connect to their c...

Page 50: ...you wish to disable firewall protection on If you selected Access from WAN Port Number The port number used to access the router from the WAN Click Apply to save changes If you selected Firewall Enable IP Filter Rules ChooseDroptoblockallIPaddressesdefinedintheIP Filter section or Allow to only allow those addresses access to your network ...

Page 51: ...network from outside intrusions and malicious attacks ID Delete Protocol Source IP Dest IP Click Add New to add a new filtering rule ID number given to new IP filters Click here to select the filters you wish to delete The protocol for the IP filter rule The source IP address to be filtered The destination IP address to be filtered Click Apply to save changes ...

Page 52: ...y access to Choose between TCP UDP or ICMP or all of the above Enter the source IP address that you wish to filter Click the toggle if you wish enter a single port or a range of ports that you wish to apply the changes to Separate port numbers with a comma Type in the destination IP address Click the toggle if you wish enter a single port or a range of ports that you wish to apply the changes to S...

Page 53: ...orts to specific IP addresses ID Delete Protocol Destination IP Port ID number given to the new rule Click here to select the rules you wish to delete The selected protocol for the IP filter rule The IP address that will be port forwarded to The port number that incoming traffic will be forwarded from Click Add New to add a new port ...

Page 54: ...Port Range The IP address you want to allow port forwarding on Select the protocol for ports that you want to allow or deny access to Choose between TCP UDP or Other Click the toggle to enter the ports you want port forwarding on Enter a single port or a range of ports that you wish to allow port forwarding on Separate port numbers with a comma Click Apply to proceed ...

Page 55: ...nique number assigned to every mobile device The Subscriber Identification Module or SIM card has a unique number called International Mobile Subscriber Identity IMSI This is used to identify and authenticate users on cellular devices The model name of your D Link router Your router s current battery life The length of time your system has been running for Note The FW version number and Modem Vers...

Page 56: ...the auto logout timer Username Old Password New Password Confirm Password Auto logout after Adjust your login username here Enter your old password here Change new password here Confirm new password here Click on the drop down arrow to select the length of time before the DWR 932C automatically logs out Click Update to save your changes Click Apply to proceed ...

Page 57: ...nk DWR 932C User Manual Section 3 Configuration Language This tab allows you to change the default language of the router s web page interface Select your desired language here Click Apply to proceed Language ...

Page 58: ...ime Zone Date Time Selected Date and Time Click the toggle to Enable or Disable automatically synchronize the time with a Simple Network Time Protocol SNTP server Select your current Coordinated Universal Time zone UTC Adjust the dials on the screen with your mouse pointer to set the date and time Displays your new adjusted time Click Apply to proceed ...

Page 59: ...time and date Enter the time zone where you are currently using the DWR 932C to correctly set the time offset You can specify in hours how frequently the DWR 932C will update the time from an SNTP server Primary Secondary and Tertiary SNTP Server Time Zone Synchronization Cycle If you enabled automatic synchronization with an SNTP server ...

Page 60: ...al Section 3 Configuration Settings Profile Browse your computer for previously exported settings Click Apply Import to proceed Select Import In the Import Profiles tab you can import previously configured settings for the router ...

Page 61: ...ction 3 Configuration Export Profiles In the Export Profiles tab you can export your currently configured settings to a computer Click the Click Me button to download the current settings of your DWR 932C To Get Current Profile Export ...

Page 62: ...r reset it to factory default You can also manually reset your router to factory default by pressing the WPS button and power button simultaneously for 5 10 seconds Select the Reset to Default button to reset the DWR 932C to factory default Select the Reboot button to reboot the DWR 932C Reset to Default Reboot Reset and Reboot ...

Page 63: ... firmware Manually upgrade the firmware of your router Select the appropriate file for the upgrade The current version of your firmware Note The FW version number displayed on the image to the right will not be the same as your router s Click the Start Update button Upgrade My Router Open File Current Version Upgrade My router ...

Page 64: ...n Network Statistics Statistics Your total amount of uploaded data Your total amount of downloaded data Click this button to clear data records Uploads Downloads Clear All Data This page allows you to view your router s packet data usage Total Packet Data ...

Page 65: ...ions Click the toggle to use the Universal Plug and Play UPnP feature UPnP On this page you can enable and disable a Universal Plug and Play UPnP feature UPnP devices can easily view and interact with other compatible networking equipment software and peripherals UPNP ...

Page 66: ... to set the length of time after which the DWR 932C will go to sleep when no Wi Fi clients are connected Click Apply to proceed Suspend On this page you can configure power saving settings to help give your DWR 932C longer battery life when you don t have easy access to a charger ...

Page 67: ...62 D Link DWR 932C User Manual Section 3 Configuration Help General Mobile Router FAQs On this page you can find answers to some frequently asked questions ...

Page 68: ...ID and security key Wi Fi password being used These can be found on a label on the underside of the battery cover To join an existing network locate the wireless network icon in the taskbar next to the time display and click on it Clicking on this icon will display a list of wireless networks which are within connecting proximity of your computer Select the desired network by clicking on the SSID ...

Page 69: ...tomatically connect with the router when your device next detects the SSID click the Connect Automatically check box You will then be prompted to enter the network security key Wi Fi password for the wireless network Enter the password into the box and click Next to connect to the network 932C 932C ...

Page 70: ...If you are joining an existing network you will need to know the security key Wi Fi password being used To join an existing network locate the wireless network icon in the taskbar next to the time display Wireless Icon Clicking on this icon will display a list of wireless networks which are within connecting proximity of your computer Select the desired network by clicking on the network name Usin...

Page 71: ...ey for your router will be displayed on a sticker in the router s battery bay Enter the password into the box and click Next If you wish to use Wi Fi Protected Setup WPS to connect to the router you can also press the WPS button on your router at this point to enable the WPS function When you have established a successful connection to a wireless network the word Connected will appear next to the ...

Page 72: ...000 please refer to the user manual of your wireless adapter for help with connecting to a wireless network Most utilities will have a site survey option similar to the Windows 7 utility as seen below If you receive the Wireless Networks Detected bubble click on the center of the bubble to access the utility You can also click on the wireless icon in your system tray lower right corner The utility...

Page 73: ...etwork Highlight the wireless network SSID you would like to connect to and click the Connect button If you get a good signal but cannot access the Internet check your TCP IP settings for your wireless adapter Refer to Networking Basics on page 78 for more information ...

Page 74: ...rity WPA WPA2 on your wireless router or access point before configuring your wireless adapter If you are joining an existing network you will need to know the security key or passphrase being used 2 The utility will display any available wireless networks in your area 1 Click on the wireless icon in your system tray lower right corner Wireless ...

Page 75: ...anual Section 4 Connecting to a Wireless Network 3 Highlight the wireless network SSID you would like to connect to and click the Connect button 4 The following window appears while your computer tries to connect to the router ...

Page 76: ...e same security key or passphrase that is on your router and click Connect It may take 20 30 seconds to connect to the wireless network If the connection fails please verify that the security settings are correct The key or pass phrase must be exactly the same as on the wireless router ...

Page 77: ...dows Vista utility as seen below Right click on the wireless computer icon in your system tray lower right corner next to the time Select Connect to a network If you receive the Wireless Networks Detected bubble click on the center of the bubble to access the utility or The utility will display any available wireless networks in your area Click on a network displayed using the SSID and click the C...

Page 78: ...oint before configuring your wireless adapter If you are joining an existing network you will need to know the security key or passphrase being used 2 Highlight the wireless network SSID you would like to connect to and click Connect 1 Open the Windows Vista Wireless Utility by right clicking on the wireless computer icon in your system tray lower right corner of screen Select Connect to a network...

Page 79: ...e same security key or pass phrase that is on your router and click Connect It may take 20 30 seconds to connect to the wireless network If the connection fails please verify that the security settings are correct The key or passphrase must be exactly the same as on the wireless router ...

Page 80: ...will have a site survey option similar to the Windows XP utility as seen below Right click on the wireless computer icon in your system tray lower right corner next to the time Select View Available Wireless Networks If you receive the Wireless Networks Detected bubble click on the center of the bubble to access the utility or The utility will display any available wireless networks in your area C...

Page 81: ...ny other devices from your computer while you configure the DWR 932C You can also change the IP address of the DWR 932C in the Network section of the configuration utility You may also need to renew your computer s IP address configuration To do this start the Command utility Click on Start Run In the run box type cmd and click OK Windows Vista users type cmd in the Start Search box This will brin...

Page 82: ...change all your settings back to the factory defaults To reset the router open the battery cover and using a paper clip press and hold this button for 6 seconds to reboot the unit The DWR 932C will restore the factory default settings Replace the battery and turn the power on before you attempt to reconnect to it The default IP address is 192 168 0 1 and the default username is admin and the passw...

Page 83: ...your IP address please follow the steps below Click on Start Run In the run box type cmd and click OK Windows Vista users type cmd in the Start Search box At the prompt type ipconfig and press Enter This will display the IP address subnet mask and the default gateway of your adapter If the address is 0 0 0 0 check your adapter installation security settings and the settings on your router Some fir...

Page 84: ...eway the same as the LAN IP address of your router 192 168 0 1 Set Primary DNS the same as the LAN IP address of your router 192 168 0 1 The Secondary DNS is not needed or you may enter a DNS server from your ISP Step 5 Click OK twice to save your settings Click on Start Control Panel Network and Internet Connections Network Connections Configure your Internet Protocol IP settings Step 1 If you ar...

Page 85: ... 150 Mbps Uplink 50 Mbps Wi Fi Access Point 802 11n 802 11g 802 11b Antenna DL MIMO 1x2 One internal diversity antenna USB Interface Micro USB port USIM Slot Standard 6 pin SIM card interface LED Indicators 3 LED Indicators Wireless Security WPA WPA2 Wi Fi Protected Access Firewall Port Range Forwarding DMZ UPnP Dimensions L x W x H 105 x 46 x 16 mm 4 13 x 1 81 x 062 in Weight 100 83 g Operating T...

Page 86: ...ries except in France where restrictive use applies This device may not be used for setting up outdoor radio links in France and in some areas the RF output power may be limited to 10 mW EIR P in the frequency range of 2454 2483 5 MHz For detailed information the end user should contact the national spectrum authority in France This equipment may be operated in AL AD BE BG DK DE FI FR GR GW IS IT ...

Page 87: ...eloupe Martinique St Pierre et Miquelon Mayotte 2454 2483 5 MHz 100 mW indoor 10 mW outdoor Reunion et Guyane 2400 2483 5 MHz 100 mW Rest of EU community 2420 2483 5 MHz 100 mW R TTE 1999 5 EC WLAN 2 4 2 4835 GHz IEEE 802 11b g n Spectrum Regulation MHz Europa ETSI max EIRP Innenbereich max EIRP Außenbereich Europa 2400 2483 5 MHz 100 mW 100 mW Frankreich 2400 2454 MHz 100 mW 100 mW 2454 2483 5 MH...

Page 88: ...ssible by using recyclable low toxic materials in both products and packaging D Link recommends that you always switch off or unplug your D Link products when they are not in use By doing so you will help to save energy and reduce CO2 emissions To learn more about our environmentally responsible products and packaging please visit www dlinkgreen com DEUTSCH DE Dieses Symbol auf dem Produkt oder de...

Page 89: ...signifie que conformément aux lois et règlementations locales ce produit ne doit pas être éliminé avec les déchets domestiques mais recyclé Veuillez le rapporter à un point de collecte prévu à cet effet par les autorités locales certains accepteront vos produits gratuitement En recyclant le produit et son emballage de cette manière vous aidez à préserver l environnement et à protéger la santé de l...

Page 90: ...ca sus productos para que sean lo más ecológicos posible utilizando materiales reciclables y de baja toxicidad tanto en los productos como en el embalaje D Link recomienda apagar o desenchufar los productos D Link cuando no se estén utilizando Al hacerlo contribuirá a ahorrar energía y a reducir las emisiones de CO2 Para obtener más información acerca de nuestros productos y embalajes ecológicos v...

Page 91: ...ke wetgeving niet mag worden weggegooid met het huishoudelijk afval maar voor recyclage moeten worden ingeleverd Zodra het product het einde van de levensduur heeft bereikt dient u het naar een inzamelpunt te brengen dat hiertoe werd aangeduid door uw plaatselijke autoriteiten sommige autoriteiten accepteren producten zonder dat u hiervoor dient te betalen Door het product en de verpakking op deze...

Page 92: ...W celu zminimalizowania takiego wpływu firma D Link konstruuje i wytwarza swoje produkty w taki sposób aby były one jak najbardziej przyjazne środowisku stosując do tych celów materiały nadające się do powtórnego wykorzystania charakteryzujące się małą toksycznością zarówno w przypadku samych produktów jak i opakowań Firma D Link zaleca aby Państwo zawsze prawidłowo wyłączali z użytku swoje produk...

Page 93: ...rtási hulladékkal együtt hanem újrahasznosításra kell küldeni Kérjük hogy a termék élettartamának elteltét követően vigye azt a helyi hatóság által kijelölt gyűjtőhelyre A termékek egyes helyeken ingyen elhelyezhetők A termék és a csomagolás újrahasznosításával segíti védeni a környezetet és az emberek egészségét A D Link és a környezet A D Linknél megértjük és elkötelezettek vagyunk a műveleteink...

Page 94: ...rmasjon angående våre miljøansvarlige produkter og forpakninger kan du gå til www dlinkgreen com DANSK DK Dette symbol på produktet eller emballagen betyder at dette produkt i henhold til lokale love og regler ikke må bortskaffes som husholdningsaffald mens skal sendes til genbrug Indlever produktet til et indsamlingssted som angivet af de lokale myndigheder når det er nået til slutningen af dets ...

Page 95: ...suunnittelee ja valmistaa tuotteensa mahdollisimman ympäristöystävällisiksi käyttämällä kierrätettäviä alhaisia pitoisuuksia haitallisia aineita sisältäviä materiaaleja sekä tuotteissaan että niiden pakkauksissa Suosittelemme että irrotat D Link tuotteesi virtalähteestä tai sammutat ne aina kun ne eivät ole käytössä Toimimalla näin autat säästämään energiaa ja vähentämään hiilidioksiidipäästöjä Lu...

Page 96: ... deverá ser eliminado juntamente com o lixo doméstico mas enviado para a reciclagem Transporte o para um ponto de recolha designado pelas suas autoridades locais quando este tiver atingido o fim da sua vida útil alguns destes pontos aceitam produtos gratuitamente Ao reciclar o produto e respectiva embalagem desta forma ajuda a preservar o ambiente e protege a saúde humana A D Link e o ambiente Na ...

Reviews: