background image

14

D-Link DWR-712 User Manual

Section 3 - Configuration

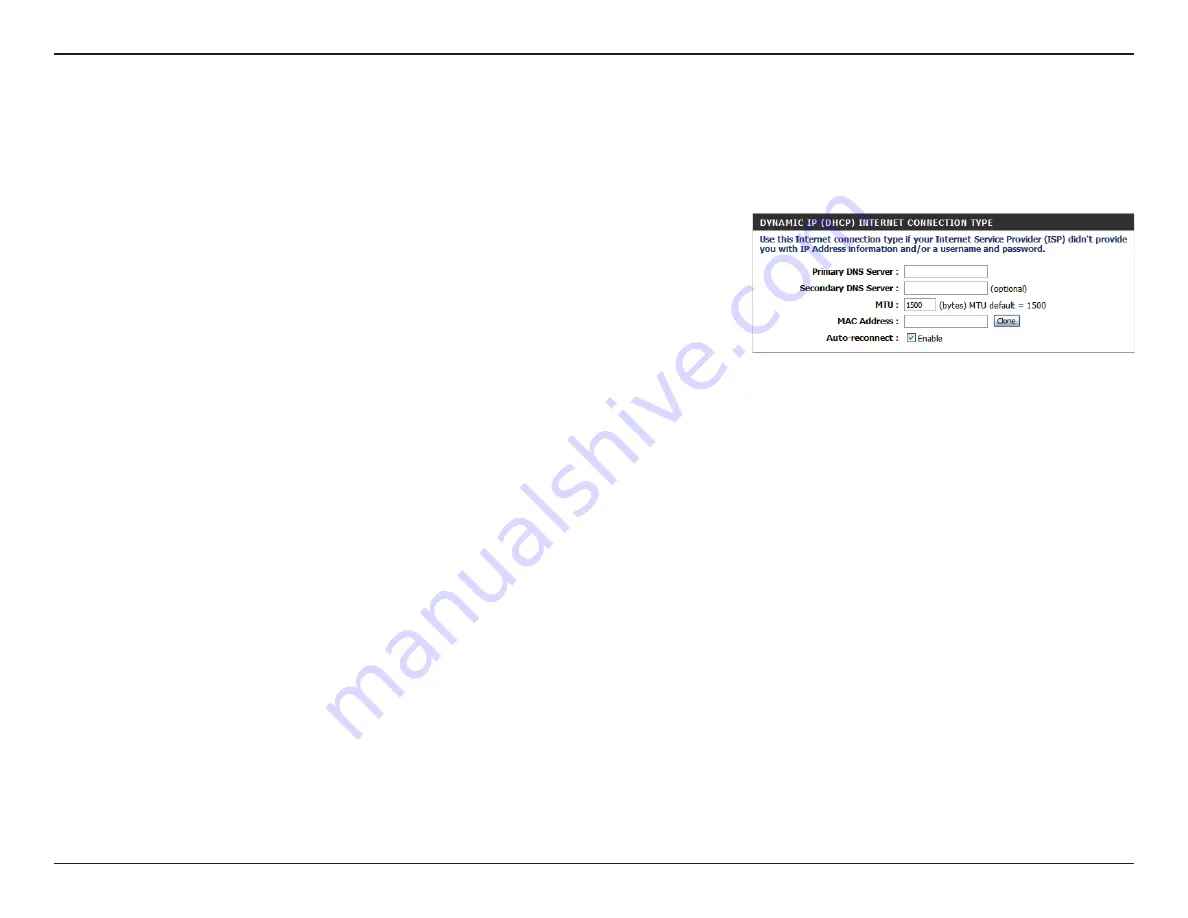
Dynamic IP (DHCP)

This section will help you to obtain IP Address information automatically from your ISP. Use this option if your ISP didn’t provide you with IP Address 

information and/or a username and password. After modifying any settings, click 

Save Settings

 to save your changes.

(Optional) Fill in with IP address of primary DNS server.

(Optional) Fill in with IP address of secondary DNS server.

You may need to change the Maximum Transmission Unit 

(MTU) for optimal performance. The default value is 1500.

The default MAC Address is set to the Internet port’s physical 

interface MAC address on the Broadband Router. It is not 

recommended that you change the default MAC address 

unless required by your ISP. You can use the 

Clone Your PC’s 

MAC Address

 button to replace the Internet port’s MAC 

address with the MAC address of your PC.

This feature enables this product to renew the WAN IP address 

automatically when the lease time has expired.

Primary DNS Server:


Secondary DNS Server:

MTU (Maximum 

Transmission Unit):

MAC Address:


Auto-reconnect:

Summary of Contents for DWR-712

Page 1: ...USER MANUAL ...

Page 2: ...go are trademarks or registered trademarks of D Link Corporation or its subsidiaries in the United States or other countries All other company or product names mentioned herein are trademarks or registered trademarks of their respective companies Copyright 2013 by D Link Corporation Inc All rights reserved This publication may not be reproduced in whole or in part without prior expressed written p...

Page 3: ...ernet Connection 12 Static IP 13 Dynamic IP DHCP 14 PPPoE 15 PPTP 17 L2TP 18 3G 19 Wireless Settings 21 Wireless Connection Setup Wizard 21 Manual Wireless Connection Setup 23 Wireless Settings 24 Wireless Security Mode 25 Wi Fi Protected Setup 28 Network Settings 30 Router Settings 30 DHCP Server Settings 31 Message Service 32 SMS Inbox 32 Create Message 33 Advanced 34 Virtual Server 34 Applicati...

Page 4: ... Wireless 60 Support 61 Connecting to a Wireless Network 62 Using Windows 7 62 Configuring Wireless Security 64 Using Windows Vista 67 Configuring Wireless Security 68 Using Windows XP 70 Configure WEP 71 Configure WPA PSK 73 Troubleshooting 75 Wireless Basics 77 What is Wireless 78 Tips 80 Wireless Modes 81 Networking Basics 82 Check your IP address 82 Statically Assign an IP address 83 Technical...

Page 5: ...d with the DWR 712 will cause damage and void the warranty for this product System Requirements A compatible U SIM card with service Computers with Windows Macintosh or Linux based operating system with an installed Ethernet adapter Internet Explorer 6 or Netscape Navigator Version 6 0 and above for configuration Subject to services and service terms available from your carrier Product Overview Pa...

Page 6: ...et ports Keep your wireless network safe with WPA WPA2 wireless encryption The DWR 712 utilizes dual active firewalls SPI and NAT to prevent potential attacks across the Internet and includes MAC address filtering to control access to your network The HSPA 3G Router can be installed quickly and easily almost anywhere This router is great for situations where an impromptu wireless network must be s...

Page 7: ...book computer through an Ethernet cable WAN RJ 45 Connects to a DSL Cable modem or router through an Ethernet cable SIM Accepts a standard U SIM card for 3G connectivity Power Connects to the included power adapter Power Switch Turns the device on or off Phone Port Connect to a regular phone line LAN Ports Power Connector WAN Port SIM Card Slot Power Switch Phone Port ...

Page 8: ...rdware Overview Front Panel Status 2G 3G SMS WLAN WAN LAN1 LAN2 LAN3 LAN4 Signal Strength Reset Button WPS Button Button Name Function Reset Press this button with an unfolded paperclip to reset the device WPS Press this button to initiate a new WPS connection ...

Page 9: ...mber Signal strength is at level two or three medium Solid Green Signal strength is at level four or five strong WPS Slow Blinking Green WPS is functioning normally Fast Blinking Green WPS is functioning in PBC mode 2G Solid Green EDGE or GPRS connection has been established Blinking Green Data is being transferred via 2G 2 5G 3G Solid Green UMTS HSDPA HSUPA connection is established Blinking Data...

Page 10: ...is configured the router will automatically use 3G for the Internet connection if the Ethernet WAN is not available 4 Insert the Ethernet cable into the LAN Port 1 on the back panel of the DWR 712 HSPA 3G Router and an available Ethernet port on the network adapter in the computer you will use to configure the router Note The DWR 712 HSPA 3G Router LAN Ports are Auto MDI MDIX so both patch and cro...

Page 11: ... A wall that is 1 5 feet thick 0 5 meters at a 45 degree angle appears to be almost 3 feet 1 meter thick At a 2 degree angle it looks over 42 feet 14 meters thick Position devices so that the signal will travel straight through a wall or ceiling instead of at an angle for better reception 3 Try to position access points wireless routers and computers so that the signal passes through open doorways...

Page 12: ...ologintotheconfigurationutility enteradminastheusername andthenenterthepassword By default the password is blank If you get a Page Cannot be Displayed error please refer to the Troubleshooting section for assistance The configuration utility will open to the STATUS DEVICE INFO page You can view different configuration pages by clicking on the categories at the top of the screen SETUP ADVANCED TOOL...

Page 13: ...you to configure your Internet and wireless settings as well as manage yourSMSinbox ToviewtheSetupconfigurationpages clickonSETUP atthetopofthescreen The Internet page allows you to configure how your router connects to the Internet There are two ways to set up your Internet connection You can click on the Internet Connection Setup Wizard button to start a wizard that will guide you through settin...

Page 14: ...ection type you should use contact your Internet Service Provider ISP Click Prev to go back to the previous page or click Cancel to close the wizard Note The DWR 712 has a WAN Failover feature that allows the router to switch to a 3G connection if the WAN connection is down or unavailable To configure this feature please refer to Internet Connection on page 12 Select your time zone from the drop d...

Page 15: ... Layer 2 Tunneling Protocol L2TP See L2TP on page 18 for information about how to configure this type of connection Choose this connection if you have installed a SIM card into the DWR 712 See 3G on page 19 for information about how to configure this type of connection Choose this option if your Internet Setup Provider provided you with IP Address information that has to be manually configured See...

Page 16: ...et Connection Select the Internet Connection type specified by your Internet Service Provider ISP The corresponding settings will be displayed below Please see the following pages for details on how to configure these different connection types If the Internet Host you are using for the Auto Backup feature requires you to enter a Host Name enter it here In most cases you may leave this blank When ...

Page 17: ...t to the Internet port s physical interface MAC address on the Broadband Router It is not recommended that you change the default MAC address unless required by your ISP You can use the Clone Your PC s MAC Address button to replace the Internet port s MAC address with the MAC address of your Ethernet card IP Address Subnet Mask Default Gateway Primary DNS Server Secondary DNS Server MTU MAC Addres...

Page 18: ...erver You may need to change the Maximum Transmission Unit MTU for optimal performance The default value is 1500 The default MAC Address is set to the Internet port s physical interface MAC address on the Broadband Router It is not recommended that you change the default MAC address unless required by your ISP You can use the Clone Your PC s MAC Address button to replace the Internet port s MAC ad...

Page 19: ...en you want to establish PPTP connection all the time If you choose Connect on demand the device will establish PPTP connection when local users want to surf Internet and disconnect if no traffic after time period of Maximum Idle Time Optional Fill in if provided by your ISP Optional Fill in if provided by your ISP If not keep the default value Optional Fill in if provided by your ISP If not keep ...

Page 20: ...pressing Clone Your PC s MAC button The Restore MAC button will reset the router to its default MAC address The amount of time of inactivity before disconnecting established PPPoE session Set it to zero or enable Auto reconnect will disable this feature The default setting of PPPoE is 1492 MAC Address Maximum Idle Time Maximum Transmission Unit MTU ...

Page 21: ...TP IP address of PPTP server User account name that your ISP provides to you for PPTP dial up Password that your ISP provides to you for PPTP dial up Fill in with the same password in Password field Choose Always on when you want to establish PPTP connection all the time If you choose Connect on demand the device will establish PPTP connection when local users want to surf Internet and disconnect ...

Page 22: ...IP L2TP IP address of L2TP server User account name that your ISP provides to you for L2TP dial up Password that your ISP provides to you for L2TP dial up Fill in with the same password in Password field Choose Always on when you want to establish L2TP connection all the time Choose Connect on demand the device will establish L2TP connection when local users want to surf Internet and disconnect if...

Page 23: ...er should reconnect to your 3G network automatically or manually Set the maximum time your connection can be idle before disconnecting Set it to 0 or choose Auto in Reconnect Mode to disable this feature Optional Fill in if provided by your ISP If not keep the default value Prefer Service Type Account Profile Name Username Password Dialed Number Authentication APN PIN Reconnect Mode Maximum Idle T...

Page 24: ...to check whether there is an active connection Set the ping interval the IP address to ping and the packet size to use Activate this feature to use the Ethernet WAN port as an additional LAN port Enabling this option will disable the NAT function of the DWR 712 allowing it to act as a link for your devices to your Internet connection but without routing functions Secondary DNS Server Keep Alive PI...

Page 25: ...you through setting up your wireless settings If you want to manually configure your settings click the ManualWirelessConnectionSetup button and skip to Manual Wireless Connection Setup on page 23 You can also set up a wireless connection to a device automatically or configure your router automatically from a by clicking the Wi Fi Protected Setup button This is described in Wi Fi Protected Setup o...

Page 26: ... that you use AES if your wireless computers and devices support it as it is more secure Click Next to continue If you chose GOOD select whether to use a HEX or ASCII password then enter a password to use for your wireless network If you choose HEX you will need to enter a 10 or 26 digit password using only hex characters 0 9 A F If you choose ASCII the password can be up to 5 or 13 alphanumeric c...

Page 27: ...23 D Link DWR 712 User Manual Section 3 Configuration Manual Wireless Connection Setup To set up your wireless connection manually click Manual Wireless Connection Setup ...

Page 28: ...s specific channels in the wireless spectrum to handle communication between clients Some channels in your area may experience interference from other electronic devices Choose the clearest channel to help optimize the performance and coverage of your wireless network or enable Auto Channel Scan for the router to automatically select the best channel This setting determines whether the SSID will b...

Page 29: ...an choose from 4 different security modes None No security will be used This setting is not recommended WEP WEP encryption will be used This setting is onlyrecommendedifyourwirelessdevicescannot support WPA or WPA2 WPA Personal WPA PSK encryption will be used This setting is recommended for most users WPA Enterprise WPA EAP encryption will be used This setting is only recommended if you have a RAD...

Page 30: ...g options will appear Select whether to use Open or Shared authentication Select whether to use 64 bit or 128 bit encryption Select which WEP key 1 4 to use as the default key This will also change the WEP Key text box to that WEP key for your to configure 1 4 Set the WEP key password for your wireless network Based on whether you are using 64 or 128 bit encryption and whether you are using a HEX ...

Page 31: ...e TKIP or AES cipher The AES cipher is the most secure provided that all of your clients can support it Enter the IP address of your RADIUS server Enter the port used for your RADIUS server Enter the Shared Secret password for your RADIUS server WPA Mode Cipher Type RADIUS Server IP Address RADIUS Server Port RADIUS Server Shared Secret If you choose WPA Enterprise the following options will appea...

Page 32: ...wsyoutocreateawirelessconnectionbetweenyourrouter and a device automatically by simply pushing a button or entering a PIN code You can also useWindows 7 to do initial configuration of your router by using the Connect to anetwork wizard inWindows and entering theWPS PIN AP PIN of the router when prompted After modifying any settings click Save Settings to save your changes ...

Page 33: ...ter will be marked as already configured to computers that try to use WPS configuration such as Windows 7 s Connect to a network wizard You can click the Release button to change the status to UNCONFIGURED to allow for WPS configuration of the router If this is set to UNCONFIGURED you can click the Set button to change the status to CONFIGURED to block WPS configuration of the router This lets you...

Page 34: ...our changes Network Settings Enter the IP address you want to use for the router The default IP address is 192 168 0 1 If you change the IP address you will need to enter the new IP address in your browser to get into the configuration utility Enter the Subnet Mask of the router The default subnet mask is 255 255 255 0 Enter the local domain name for your network Router IP Address Default Subnet M...

Page 35: ... to DHCP clients Enter the secondary WINS IP Address that will be assigned to DHCP clients Enable DHCP Server DHCP IP Address Range DHCP Lease Time Primary DNS IP Address Secondary DNS IP Address Primary WINS IP Address Secondary WINS IP Address DHCP Server Settings The DWR 712 has a built in DHCP Dynamic Host Control Protocol server The DHCP server assigns IP addresses to devices on the network t...

Page 36: ...letes the selected SMS message Opens a Create Message window to reply to the selected SMS message Opens a Create Message windows to forward the selected SMS message to another recipient Click this button to check for new messages Delete Reply Forward Refresh SMS Inbox This page shows all messages that are stored on the SIM card Select a message to display its contents in the SMS window After you r...

Page 37: ...ntent of message Then push the Send Message button to send out this message If you would like to add more than one recipient you must put a semicolon between each of the phone numbers Type the phone number of the recipient Type the message that you would like to send Click this button to send the message Click this button to clear the message Receiver Text Message Send Message Cancel ...

Page 38: ... the default settings for that service to the specified rule ID Specifies which rule to copy the selected Well known service settings to when you click the Copy to button Select a schedule to use and copy to the specified rule ID when you click the Copy to button You may select Always On or use a specific schedule that you have defined To create and edit schedules please refer to Schedules on page...

Page 39: ... address of the computer on your local network that you want to allow the incoming service In the next box enter the port number that you would like to open Tick the checkbox to enable the specified rule Specify the schedule rule number To create schedules please refer to Schedules on page 55 ID Server IP Port Enable Schedule Rule ...

Page 40: ... modifying any settings click Save Settings to save your changes Select from a list of popular applications You can select a service select a rule ID then click the Copy to button to copy the default settings for that service to the specified rule ID Specifies which rule to copy the selected Popular application settings to when you click the Copy to button APPLICATION RULES This identifies the rul...

Page 41: ...s and port s for the rule to affect Select what priority level to use for traffic affected by the rule Low Normal or High Tick the checkbox to enable the specified rule Specify the schedule rule number To create schedules please refer to Schedules on page 55 Enable QOS Packet Filter Upstream Bandwidth Use Schedule Rule ID Local IP Ports Remote IP Ports QoS Priority Enable Use Rule The QoS Engine i...

Page 42: ...ger to configure Wake On LAN If this box is ticked the rule will follow the connection control setting specified in MAC filtering settings specified above If this box is ticked the rule will follow the association control setting specified in MAC filtering settings specified above MAC Address Control Connection Control Association Control ID MAC Address IP Address Wake On LAN C A The MAC Media Acc...

Page 43: ...nter URL that you would like to block All URLs that begin with this URL will be blocked Tick the checkbox to enable the specified rule URL Filter allows you to set up a list of websites that will be blocked from users on your network After modifying any settings click Save Settings to save your changes URL Filter URL Filtering ID URL Enable ...

Page 44: ...hes the listed rules This identifies the rule Specify the local IP address and then specify the port after the colon Specify the remote IP address and then the port after the colon Tick the checkbox to enable the specified rule Specify the schedule rule number Go back to the previous filter page Advance to the next filter page Outbound Filter Outbound Filter Use Schedule Rule ID Source IP Ports De...

Page 45: ...fies the rule Specify the local IP address and then specify the port after the colon Specify the remote IP address and then the port after the colon Tick the checkbox to enable the specified rule Specify the schedule rule number Go back to the previous filter page Advance to the next filter page Inbound Filter Inbound Filter Use Schedule Rule ID Source IP Ports Destination IP Ports Enable Schedule...

Page 46: ...gets for your network Select the SNMP version of your system If you want to limit remote access SNMP access enter the IP address of the remote computer you will use to access this device All other IP addresses will be denied remote SNMP access SNMP SNMP Local SNMP Remote Get Community Set Community IP 1 IP 2 IP 3 IP 4 SNMP Version WAN Access IP Address SNMP Simple Network Management Protocol is a ...

Page 47: ...ny settings click Save Settings to save your changes ROUTING RULES This identifies the rule Enter in the IP of the specified network that you want to access using the static route Enter in the subnet mask to be used for the specified network Enter in the gateway IP address for the specified network Enter in the amount of hops it will take to reach the specified network Note In a transmission path ...

Page 48: ...rming clients of the next window for listening to broadcast and multicast messages The default interval is 3 WMM Wi Fi Multimedia is a QoS Quality of Service system for your wireless network Enable this option to improve the quality of video and voice applications for your wireless clients Select the basic transfer rates based on the speed of wireless adapters on your wireless network It is strong...

Page 49: ...cking WAN pings may provide some extra security from hackers Advanced Network Advanced Network contains settings which can change the way the router handles certain types of traffic We recommend that you do not change any of these settings unless you are already familiar with them or have been instructed to make the change by one of our support personnel After modifying any settings click Save Set...

Page 50: ...unrestricted Internet communication If this computer obtainsitsIPaddressautomaticallyusingDHCP besuretomake a static reservation on the Setup Network Settings page so that the IP address of the DMZ machine does not change Click Save Settings to save your changes or click Don t Save Settings to discard your changes DMZ Sometimes you may want a computer exposed to the outside world for certain types...

Page 51: ...s the Router Adding an asterisk into this field could present a security risk and is not recommended This is the port number used to access the router 8080 is the port usually used for the Web Management interface Admin The Admin page allows you to change the Administrator password and enable Remote Management The admin has read write access while users only have read only access Only the admin ha...

Page 52: ...e with Internet time server checkbox to allow the router to use an NTP server to update the router s internal clock Enter an NTP server to use for time synchronization or use the dropdown box to select one Click the Update Now button to synchronize the time with the NTP server This section will help you set the time zone that you are in and an NTP NetworkTime Protocol server to use Daylight Saving...

Page 53: ...P address of the syslog server that the router will send the logs to The DWR 712 keeps a running log of events and activities occurring on the router You may send these logs to a syslog server on your network After modifying any settings click Save Settings to save your changes Enable Logging to Syslog Server Syslog Server IP Address ...

Page 54: ... account Enter the password for the SMTP account Enter the e mail address where you would like the router to send e mails to Enter a subject for the e mail Click this button to send the current logs to the specified e mail address Enable E mail Notification SMTP Sever IP and Port SMTP Username SMTP Password Send E mail Alert to E mail Subject E mail Log Now E mail Settings allow you to send the sy...

Page 55: ...wse and select the saved file and then click the Upload Settings button to upload the settings to the router This option will restore all settings back to their defaults Any settings that have not been backed up will be lost including any rules that you have created Save Settings To Local Hard Drive Load Settings From Local Hard Drive Restore To Factory Default Settings Here you can save the curre...

Page 56: ...ntil the upgrade is complete If the firmware you want to install is not an official D Link release you will need to check this checkbox Warning Unofficial firmwares are not supported and may cause damage to your device Use of unofficial firmwares is at your own risk Here you can upgrade the firmware of your router Make sure the firmware you want to use is on the local hard drive of the computer an...

Page 57: ...t Enter the Password for your DDNS account The DDNS feature allows you to host a server Web FTP or Game Server using a domain name that you have purchased such as www exampledomain com with your dynamically assigned IP address You can use one of the listed DDNS service or you can sign up for D Link s free DDNS service at www dlinkddns com After modifying any settings click Save Settings to save yo...

Page 58: ...utton The results of the ping attempt will be displayed in the PING RESULT section below This useful diagnostic utility can be used to check if a computer is connected to the network It sends ping packets and listens for responses from the specific host After modifying any settings click Save Settings to save your changes Host Name or IP Address ...

Page 59: ...various firewall and parental control features After modifying any settings click Save Settings to save your changes Enable Schedule Edit Delete Previous Page Next Page Add New Rule Enter a name for your new schedule Select Activate or Inactivate to decide whether features that use the schedule should be active or inactive except during the times specified Select a day of the week for the start ti...

Page 60: ...his option if you want the connection reset feature to activate on a daily schedule Select this option if you want the connection reset feature to activate only on a certain day of the week This feature allows you to reset the internet connection on your router by periodically resetting the connection You can choose to have this happen on a predetermined schedule by configuring the options on this...

Page 61: ...mware version Displays the WAN connection details of the router Displays the 3G connection details of the router Displays the LAN connection details of the router Displays the wireless LAN connection details of the router Displays the list of clients connected to the router Status The STATUS pages allow you to see the current status of the router for various categories including WAN 3G network and...

Page 62: ...revious page of the log Click this button to go to the next page of the log Click this button to skip to the first page of the log Click this button to skip to the last page of the log Click this button to refresh the system log Click this button to download the current system log to your computer Click this button to clear the system log Click this button to go to the Log Settings page For more r...

Page 63: ...nfiguration Statistics Here you can view the packets transmitted and received passing through your router on both WAN and LAN ports The traffic counter will reset if the device is rebooted Click the Refresh button to refresh the WAN statistics ...

Page 64: ...n 3 Configuration Wireless This table displays a list of wireless clients that are connected to your wireless router It also displays the connection time and MAC address of the connected wireless clients Click Refresh to refresh the list ...

Page 65: ...nk DWR 712 User Manual Section 3 Configuration Support The SUPPORT pages provide help information for each section of the device s interface To view the Support pages click on SUPPORT at the top of the screen ...

Page 66: ...00 please refer to the user manual of your wireless adapter for help with connecting to a wireless network Most utilities will have a site survey option similar to the Windows 7 utility as seen below If you receive the Wireless Networks Detected bubble click on the center of the bubble to access the utility You can also click on the wireless icon in your system tray lower right corner The utility ...

Page 67: ...ighlight the wireless network SSID you would like to connect to and click the Connect button If you get a good signal but cannot access the Internet check your TCP IP settings for your wireless adapter Refer to the Networking Basics section in this manual for more information ...

Page 68: ...rity WPA WPA2 on your wireless router or access point before configuring your wireless adapter If you are joining an existing network you will need to know the security key or passphrase being used 2 The utility will display any available wireless networks in your area 1 Click on the wireless icon in your system tray lower right corner Wireless ...

Page 69: ...anual Section 4 Connecting to a Wireless Network 3 Highlight the wireless network SSID you would like to connect to and click the Connect button 4 The following window appears while your computer tries to connect to the router ...

Page 70: ...e same security key or passphrase that is on your router and click Connect It may take 20 30 seconds to connect to the wireless network If the connection fails please verify that the security settings are correct The key or passphrase must be exactly the same as on the wireless router ...

Page 71: ...ta utility as seen below Right click on the wireless computer icon in your system tray lower right corner next to the time Select Connect to a network If you receive the Wireless Networks Detected bubble click on the center of the bubble to access the utility or The utility will display any available wireless networks in your area Click on a network displayed using the SSID and click the Connect b...

Page 72: ...int before configuring your wireless adapter If you are joining an existing network you will need to know the security key or passphrase being used 2 Highlight the wireless network SSID you would like to connect to and click Connect 1 Open the Windows Vista Wireless Utility by right clicking on the wireless computer icon in your system tray lower right corner of screen Select Connect to a network ...

Page 73: ...e same security key or passphrase that is on your router and click Connect It may take 20 30 seconds to connect to the wireless network If the connection fails please verify that the security settings are correct The key or passphrase must be exactly the same as on the wireless router ...

Page 74: ...e a site survey option similar to the Windows XP utility as seen below Right click on the wireless computer icon in your system tray lower right corner next to the time Select View Available Wireless Networks If you receive the Wireless Networks Detected bubble click on the center of the bubble to access the utility or The utility will display any available wireless networks in your area Click on ...

Page 75: ...nfiguring your wireless adapter If you are joining an existing network you will need to know the WEP key being used 2 Highlight the wireless network SSID you would like to connect to and click Connect 1 Open the Windows XP Wireless Utility by right clicking on the wireless computer icon in your system tray lower rightcornerofscreen SelectViewAvailableWirelessNetworks ...

Page 76: ...twork Connection box will appear Enter the same WEP key that is on your router and click Connect It may take 20 30 seconds to connect to the wireless network If the connection fails please verify that the WEP settings are correct The WEP key must be exactly the same as on the wireless router ...

Page 77: ...configuring your wireless adapter If you are joining an existing network you will need to know the WPA key being used 2 Highlight the wireless network SSID you would like to connect to and click Connect 1 Open the Windows XP Wireless Utility by right clicking on the wireless computer icon in your system tray lower rightcornerofscreen SelectViewAvailableWirelessNetworks ...

Page 78: ...sNetworkConnectionboxwillappear EntertheWPA PSKpassphrase and click Connect It may take 20 30 seconds to connect to the wireless network If the connection fails please verify that the WPA PSK settings are correct The WPA PSK passphrase must be exactly the same as on the wireless router ...

Page 79: ...r computer must be on the same IP subnet to connect to the web based utility Make sure you have an updated Java enabled web browser We recommend the following Internet Explorer 6 or higher Netscape 8 or higher Mozilla 1 7 12 5 0 or higher Opera 8 5 or higher Safari 1 2 or higher with Java 1 3 1 or higher Camino 0 8 4 or higher Firefox 1 5 or higher Verify physical connectivity by checking for soli...

Page 80: ...his should open the login page for your the web management If you still cannot access the configuration unplug the power to the router for 10 seconds and plug back in Wait about 30 seconds and try accessing the configuration If you have multiple computers try connecting using a different computer 2 What can I do if I forgot my password If you forgot your password you must reset your router Unfortu...

Page 81: ...reless LANs are used increasingly in both home and office environments and public areas such as airports coffee shops and universities Innovative ways to utilizeWLAN technology are helping people to work and communicate more efficiently Increased mobility and the absence of cabling and other fixed infrastructure have proven to be beneficial for many users Wireless users can use the same applicatio...

Page 82: ...types of wireless networks Wireless Local Area Network WLAN and Wireless Personal Area Network WPAN Wireless Local Area Network WLAN In a wireless local area network a device called an Access Point AP connects computers to the network The access point has a small antenna attached to it which allows it to transmit data back and forth over radio signals With an indoor access point as seen in the pic...

Page 83: ...s a wireless solution for it Home Gives everyone at home broadband access Surf the web check e mail instant message and etc Gets rid of the cables around the house Simple and easy to use Small Office and Home Office Stay on top of everything at home as you would at office Remotely access your office network from home Share Internet connection and printer with multiple computers No need to dedicate...

Page 84: ... setting up a wireless network Tips Here are a few things to keep in mind when you install a wireless network Centralize your Router or Access Point Make sure you place the router access point in a centralized location within your network for the best performance Try to place the router access point as high as possible in the room so the signal gets dispersed throughout your home If you have a two...

Page 85: ...o peer communication using wireless network adapters on each computer such as two or more WNA 2330 wireless network Cardbus adapters An Infrastructure network contains an Access Point or wireless router All the wireless devices or clients will connect to the wireless router or access point An Ad Hoc network contains only clients such as laptops with wireless cardbus adapters All the adapters must ...

Page 86: ...our IP address please follow the steps below Click on Start Run In the run box type cmd and click OK Windows Vista users type cmd in the Start Search box At the prompt type ipconfig and press Enter This will display the IP address subnet mask and the default gateway of your adapter If the address is 0 0 0 0 check your adapter installation security settings and the settings on your router Some fire...

Page 87: ...esents your network adapter and select Properties Step 3 Highlight Internet Protocol TCP IP and click Properties Step 4 Click Use the following IP address and enter an IP address that is on the same subnet as your network or the LAN IP address on your router Example If the router s LAN IP address is 192 168 0 1 make your IP address 192 168 0 X where X is a number between 2 and 99 Make sure that th...

Page 88: ...5 5 11 Mbps in 802 11b mode 3G Uplink Up to 5 76 Mbps 3G Downlink Up to 21 Mbps Standards 802 11b g compatible with 802 11n devices 802 3 802 3u Wireless Security 64 128 bit WEP Wired Equivalent Privacy WPA WPA2 Wi Fi Protected Access Firewall Network Address Translation NAT Stateful Packet Inspection SPI VPN L2TP PPTP IPSEC VPN Pass through Antenna External 3G antenna Ports Four LAN ports RJ 45 W...

Page 89: ...upported frequency band is dependent upon regional hardware version 2 Maximum wireless signal rate derived from IEEE Standard 802 11g specifications Actual data throughput will vary Network conditions and environmental factors including volume of network traffic building materials and construction and network overhead lower actual data throughput rate Environmental factors will adversely affect wi...

Reviews: