background image

43

D-Link DWR-510 User Manual

Section 5 - Connecting to a Wireless Network

Configure WPA-PSK

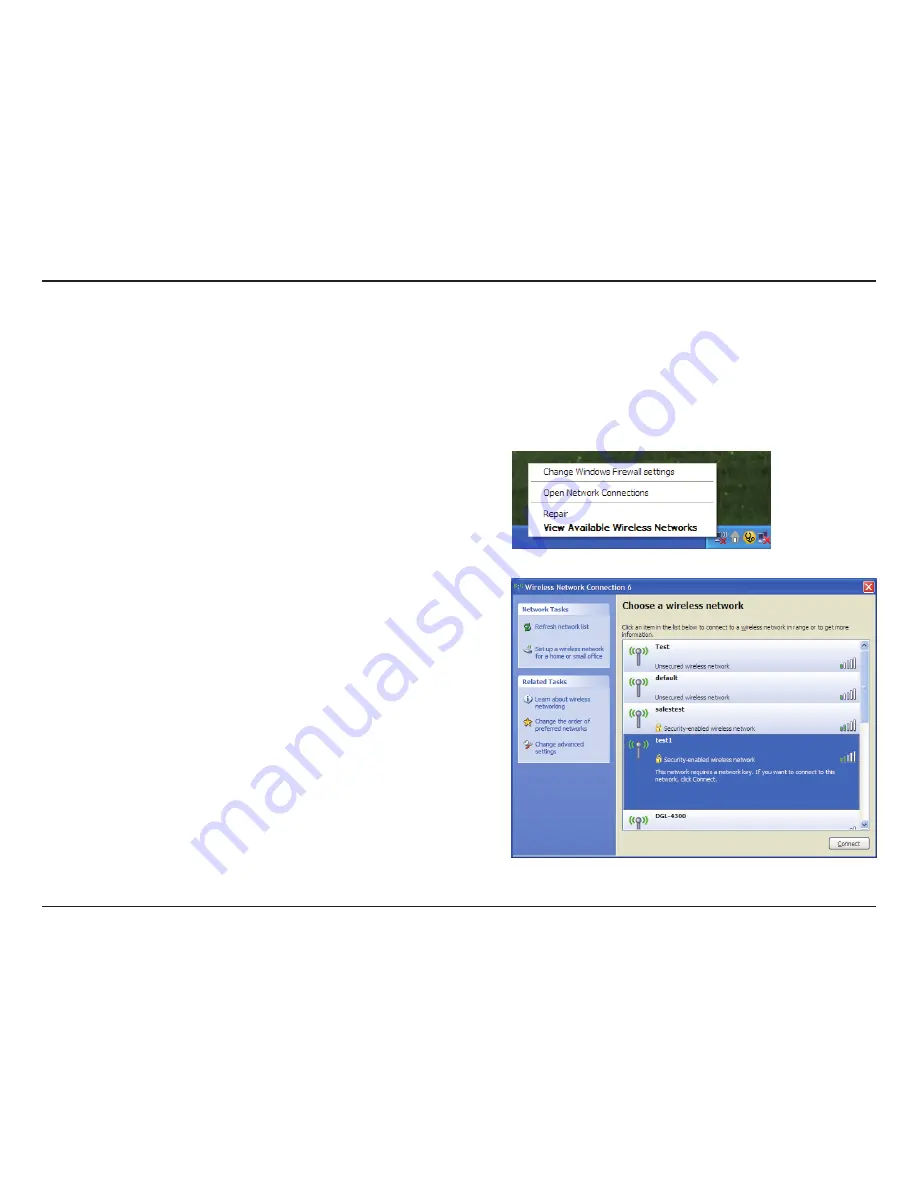
It is recommended to enable WPA on your wireless router or access point before configuring your wireless adapter. If you are joining an 

existing network, you will need to know the WPA key being used.

2. 

Highlight the wireless network (SSID) you would like to connect to 

and click 

Connect

.

1. 

Open  the  Windows

®

  XP  Wireless  Utility  by  right-clicking 

on  the  wireless  computer  icon  in  your  system  tray  

(lower-right  corner  of  screen).  Select 

View  Available  Wireless 

Networks

Summary of Contents for DWR-510

Page 1: ......

Page 2: ...k logo are trademarks or registered trademarks of D Link Corporation or its subsidiaries in the United States or other countries All other company or product names mentioned herein are trademarks or registered trademarks of their respective companies Copyright 2011 by D Link Systems Inc All rights reserved This publication may not be reproduced in whole or in part without prior expressed written p...

Page 3: ...1 Deleting a Message 11 Contact Management 12 Adding Contacts 12 Editing Contacts 13 Deleting Contacts 13 Importing vCards to Contacts 14 Exporting Contacts to vCards 14 Router Mode D Link Connection Manager Windows only 15 Wireless Settings 15 Network Settings 15 Advanced Settings 16 Internet Settings 16 Tools 17 Router Mode Web based Configuration Utility 18 Internet Connection Setup Wizard 19 I...

Page 4: ...ows Vista 37 Configure Wireless Security 38 Using Windows XP 40 Configure WEP 41 Configure WPA PSK 43 Troubleshooting 45 Wireless Basics 47 What is Wireless 48 Tips 50 Wireless Modes 51 Networking Basics 52 Check your IP address 52 Statically Assign an IP address 53 Warnings and Declarations 54 Technical Specifications 58 ...

Page 5: ...ments A compatible U SIM card with service Computers with Windows Macintosh or Linux based operating systems with an installed Ethernet adapter Internet Explorer Version 6 0 or Netscape Navigator Version 6 0 and above for configuration Subject to services and service terms available from your carrier Product Overview Package Contents ...

Page 6: ...e DWR 510 can function in either Wi Fi router mode or 3G USB modem mode When in Wi Fi router mode the device allows Wi Fi capable devices like smart phones portable gaming devices notebooks or digital cameras access to 3G networks via a wireless connection The DWR 510 can share its 3G connection with up to 10 Wi Fi clients When using the D Link DWR 510 Mini 3G 7 2Mbps USB Router as a 3G USB modem ...

Page 7: ...ur computer s USB port Status LED Indicates the status of your network connection Color Solid Blinking Fast Blinking Slow Blue WCDMA HSDPA HSUPA Connected Transmitting Dial on demand Green GSM GPRS Connected Transmitting Dial on demand Red SIM error No service Status LED USB Connector This applies when the device is in standby mode ...

Page 8: ... that is 1 5 feet thick 0 5 meters at a 45 degree angle appears to be almost 3 feet 1 meter thick At a 2 degree angle it looks over 42 feet 14 meters thick Position devices so that the signal will travel straight through a wall or ceiling instead of at an angle for better reception 3 Try to position access points wireless routers and computers so that the signal passes through open doorways and dr...

Page 9: ...k cover of the USB Dongle Product Setup Installing the SIM Card 3 Replace the back cover 2 Insert the SIM card with the gold contacts facing down Make sure that you insert the SIM card in the right direction with the notched edge facing away from the DWR 510 s contacts ...

Page 10: ...nk Connection Manager 4 Enter the PIN code for the SIM card 5 Click the Connect icon in the Connection Manager 6 You can now use the DWR 510 Mini 3G 7 2Mbps USB Router as a 3G modem Note You have to install the Connection Manager software when using the DWR 510 for the first time After successful installation you can configure USB modem and Wi Fi router basic settings Connection Setup Modem Router...

Page 11: ...ct the Mini 3G 7 2Mbps USB Router to your computer the LED will blink green Alternatively you can connect the DWR 510 to a USB power adapter 3 Find the Wi Fi network with the SSID dlink_DWR 510 and connect to it 4 You can now use the DWR 510 Mini 3G 7 2Mbps USB Router as a 3G router Modem Router switch in router position Router Mode ...

Page 12: ...anager New Profile Before starting if the mobile service provider associated with your SIM card is listed in the preset profile list you can directly connect to the desired network using its pre defined profile You also can create your own profile by following the steps below 1 Click the Edit button then go to Connection Profile 2 Click the New button to create a new profile 3 Choose a Profile Nam...

Page 13: ...Connect button to connect to the network via the default profile Once connected you can use the mobile service network to browse the Internet send e mail send text messages and perform other tasks online Connect Ending a Connection If you wish to disconnect click the Connect button again Disconnect ...

Page 14: ... Manual Section 3 Configuration Text Messaging SMS The DWR 510 can be used to perform all the text messaging functions that can be done on a mobile phone such as sending receiving replying forwarding and deleting Windows Mac ...

Page 15: ...to see the contacts stored to the SIM card In the contacts window click the box next to the recipients name and click Add to return to the New SMS window 4 Enter a message to send 5 Click Send to send the message Deleting a Message 1 Click the SMS button 2 Select the messages you want to delete and click Delete 3 Click Delete to delete the selected messages 4 Click Yes to confirm Windows Mac ...

Page 16: ...ts The DWR 510 contacts manager displays all the contacts on the SIM Card Contacts can be added edited deleted and imported 1 Click the Contacts button 2 Click the New button 3 In the Add Contact window enter the contact name and telephone number 4 Click OK to add the contact Windows Mac ...

Page 17: ...ntacts 1 Click the Contacts button 2 Select the contact to edit 3 Click the Edit button 4 Modify the contacts details 5 Click OK to save the changes 1 Click the Contacts button 2 Select the contact to delete and click the Delete button 3 Click Yes to confirm the deletion Windows Mac ...

Page 18: ...tton 3 Select the destination to save the vCard s 4 Click OK to export the card s 5 After the export a message will be displayed Click OK to close 1 Click the Contacts button 2 Click the Import button 3 Select the source of the vCard s 4 Click Open to import the card s 5 After the import a message will display the import information Click OK to close the window ...

Page 19: ... page 18 1 Enter a wireless network name When connecting other devices to your wireless network this is the name you will need to search for 2 Select the maximum number of devices to allow to connect to your wireless network 3 Set the visibility status to Visible or Invisible 4 Choose the wireless channel and security mode 5 Click Apply to save the settings 1 Enter the router IP address and subnet...

Page 20: ...es will be allowed to access your wireless network all other devices will be denied access 3 Click Apply to save the settings Internet Settings 1 If you want to enable Auto APN tick the check box 2 Enter a profile name username password and APN description 3 Set the Reconnect Mode to Always On On Demand or Manual 4 Enter a maximum idle time in minutes or choose 0 for infinite 5 Enter a PIN code 6 ...

Page 21: ...WR 510 User Manual Section 3 Configuration Tools 1 If you want to change the password for the DWR 510 enter a new password in the text box 2 Enter the password again to verify it 3 Click Apply to save the settings ...

Page 22: ...ed configuration utility and its associated features are for Router Mode only Router Mode Web based Configuration Utility To access the configuration utility open a web browser such as Internet Explorer and enter the IP address of the router 192 168 0 1 Type admin in the User Name field and then enter your password Leave the password blank by default Click the Login button to log in to the router ...

Page 23: ...eb interface of the router the Setup Internet page will appear Click the Internet Connection Setup Wizard button to quickly configure your router using the setup wizard If you want to enter your settings without running the wizard click Manual Internet Connection Setup and skip to Manual Internet Configuration ...

Page 24: ... Link DWR 510 User Manual Section 3 Configuration Click Next to continue Create a new password and then click Next to continue Configure your 3G Internet Connection settings and then click Next to continue ...

Page 25: ...21 D Link DWR 510 User Manual Section 3 Configuration Click Connect to save your settings Once the router has finished rebooting click Continue Please allow 1 2 minutes to connect ...

Page 26: ...er a password Enter the APN description Set to Always On On Demand or Manual Enter a maximum idle time in minutes Choose 0 for infinite Enter the PIN code for the SIM card Auto APN ISP Username Password APN Reconnect Mode Maximum Idle Time SIM Card Settings This section lets you enter the Internet connection information provided by your Internet Service Provider ISP ...

Page 27: ...ss Connection Setup Wizard If you want to manually configure the wireless settings on your router click Manual Wireless Connection Setup and refer to Manual Wireless Connection Setup Click the Wireless Connection Setup Wizard button to view the Wireless Security Setup Wizard menu The Welcome menu lists the steps used for setup Click on the Next button to continue ...

Page 28: ...s network Create a name using up to 20 characters The SSID is case sensitive It is recommended that you tick the checkbox to use WPA wireless encryption to secure your wireless network Click Next to continue Type a password that you would like to use for your wireless network in the Network Key entry field Click Next to continue ...

Page 29: ...n The final menu appears to indicate that setup is complete You should write down the Wireless Network Name SSID and Network Key for future reference when connecting other wireless devices to your wireless network Click Save to finish the Security Wizard ...

Page 30: ...umber of clients that can connect wirelessly Choose the wireless channel Set the visibility status to Visible or Invisible Choose the wireless security mode Wireless Network Name Max Associated Number Wireless Channel Visibility Status Security Mode Use this section to configure the wireless settings for your D Link router ...

Page 31: ...ddress Enter the subnet mask If you want to enable DHCP Server check Enabled Otherwise check Disabled Enter values for the DHCP IP address range Router IP Address Subnet Mask Enable DHCP Server DHCP IP Address Range Use this section to configure the internal network settings of your router ...

Page 32: ...D Link DWR 510 User Manual Section 3 Configuration Administrator Settings Enter a password Verify the password Password Verify Password Use this section to change the password for the Administrator account ...

Page 33: ...10 User Manual Section 3 Configuration Factory Reset Click this button to restore all settings to the factory defaults Restore To Factory Default Use this section to restore the router to the factory default settings ...

Page 34: ...evice Information All of your Internet and network connection details are displayed on this page The firmware version is also displayed here Displays the firmware version Displays information about the WAN Displays information about the LAN General WAN LAN ...

Page 35: ...DWR 510 User Manual Section 3 Configuration Wireless Information All of your wireless connection details are displayed on this page Displays the wireless clients and their MAC addresses Number of wireless clients ...

Page 36: ...32 D Link DWR 510 User Manual Section 3 Configuration Support ...

Page 37: ...eless network so that it is protected as it is transmitted from one wireless device to another To gain access to a WEP network you must know the key The key is a string of characters that you create When using WEP you must determine the level of encryption The type of encryption determines the key length 128 bit encryption requires a longer key than 64 bit encryption Keys are defined by entering i...

Page 38: ...nfiguration by opening a web browser and entering the IP address of the router 192 168 0 1 Click on Wireless Settings on the left side 2 Next to Security Mode select WEP 3 Next to WEP Key 1 enter a WEP key that you create Make sure you enter this key exactly on all your wireless devices You may enter up to 4 different keys 4 Click Save Settings to save your settings If you are configuring the rout...

Page 39: ...uthentication protocol EAP WEP regulates access to a wireless network based on a computer s hardware specific MAC address which is relatively simple to be sniffed out and stolen EAP is built on a more secure public key encryption system to ensure that only authorized network users can access the network WPA PSK WPA2 PSK uses a passphrase or key to authenticate your wireless connection The key is a...

Page 40: ... IP address of the router 192 168 0 1 Click on Wireless Settings on the left side 2 Next to Security Mode select WPA PSK or WPA2 PSK 3 Next to Pre Shared Key enter a key passphrase The key is an alpha numeric password between 8 and 63 characters long The password can include symbols _ and spaces Make sure you enter this key exactly the same on all other wireless clients 4 Click Save Settings to sa...

Page 41: ...the Windows Vista utility as seen below Right click on the wireless computer icon in your system tray lower right corner next to the time Select Connect to a network If you receive the Wireless Networks Detected bubble click on the center of the bubble to access the utility or The utility will display any available wireless networks in your area Click on a network displayed using the SSID and clic...

Page 42: ...nt before configuring your wireless adapter If you are joining an existing network you will need to know the security key or passphrase being used 2 Highlight the wireless network SSID you would like to connect to and click Connect 1 Open the Windows Vista Wireless Utility by right clicking on the wireless computer icon in your system tray lower right corner of screen Select Connect to a network ...

Page 43: ...e same security key or passphrase that is on your router and click Connect It may take 20 30 seconds to connect to the wireless network If the connection fails please verify that the security settings are correct The key or passphrase must be exactly the same as on the wireless router ...

Page 44: ...e a site survey option similar to the Windows XP utility as seen below Right click on the wireless computer icon in your system tray lower right corner next to the time Select View Available Wireless Networks If you receive the Wireless Networks Detected bubble click on the center of the bubble to access the utility or The utility will display any available wireless networks in your area Click on ...

Page 45: ...guring your wireless adapter If you are joining an existing network you will need to know the WEP key being used 2 Highlight the wireless network SSID you would like to connect to and click Connect 1 Open the Windows XP Wireless Utility by right clicking on the wireless computer icon in your system tray lower right corner of screen Select View Available Wireless Networks ...

Page 46: ...twork Connection box will appear Enter the same WEP key that is on your router and click Connect It may take 20 30 seconds to connect to the wireless network If the connection fails please verify that the WEP settings are correct The WEP key must be exactly the same as on the wireless router ...

Page 47: ...figuring your wireless adapter If you are joining an existing network you will need to know the WPA key being used 2 Highlight the wireless network SSID you would like to connect to and click Connect 1 Open the Windows XP Wireless Utility by right clicking on the wireless computer icon in your system tray lower right corner of screen Select View Available Wireless Networks ...

Page 48: ...etwork Connection box will appear Enter the WPA PSK passphrase and click Connect It may take 20 30 seconds to connect to the wireless network If the connection fails please verify that the WPA PSK settings are correct The WPA PSK passphrase must be exactly the same as on the wireless router ...

Page 49: ...must be on the same IP subnet to connect to the web based utility Make sure you have an updated Java enabled web browser We recommend the following Internet Explorer 6 0 or higher Netscape 8 or higher Mozilla 1 7 12 5 0 or higher Opera 8 5 or higher Safari 1 2 or higher with Java 1 3 1 or higher Camino 0 8 4 or higher Firefox 1 5 or higher Verify physical connectivity by checking for solid link li...

Page 50: ...f you still cannot access the configuration unplug the power to the router for 10 seconds and plug back in Wait about 30 seconds and try accessing the configuration If you have multiple computers try connecting using a different computer 2 How can I upgrade the firmware on the device To update the firmware on the DWR 510 insert the device into an available USB port on your PC Next launch the firmw...

Page 51: ...eless LANs are used increasingly in both home and office environments and public areas such as airports coffee shops and universities Innovative ways to utilize WLAN technology are helping people to work and communicate more efficiently Increased mobility and the absence of cabling and other fixed infrastructure have proven to be beneficial for many users Wireless users can use the same applicatio...

Page 52: ...u can access the network You must be within the wireless network range area to be able to connect your computer There are two different types of wireless networks Wireless Local Area Network WLAN and Wireless Personal Area Network WPAN Wireless Local Area Network WLAN In a wireless local area network a device called an Access Point AP connects computers to the network The access point has a small ...

Page 53: ...ireless technology as become so popular in recent years that almost everyone is using it whether it s for home office business D Link has a wireless solution for it Home Gives everyone at home broadband access Surf the web check e mail instant message and etc Gets rid of the cables around the house Simple and easy to use Small Office and Home Office Stay on top of everything at home as you would a...

Page 54: ... setting up a wireless network Tips Here are a few things to keep in mind when you install a wireless network Centralize your Router or Access Point Make sure you place the router access point in a centralized location within your network for the best performance Try to place the router access point as high as possible in the room so the signal gets dispersed throughout your home If you have a two...

Page 55: ...o peer communication using wireless network adapters on each computer such as two or more WNA 2330 wireless network Cardbus adapters An Infrastructure network contains an Access Point or wireless router All the wireless devices or clients will connect to the wireless router or access point An Ad Hoc network contains only clients such as laptops with wireless cardbus adapters All the adapters must ...

Page 56: ...our IP address please follow the steps below Click on Start Run In the run box type cmd and click OK Windows Vista users type cmd in the Start Search box At the prompt type ipconfig and press Enter This will display the IP address subnet mask and the default gateway of your adapter If the address is 0 0 0 0 check your adapter installation security settings and the settings on your router Some fire...

Page 57: ... represents your network adapter and select Properties Step 3 Highlight Internet Protocol TCP IP and click Properties Step 4 Click Use the following IP address and enter an IP address that is on the same subnet as your network or the LAN IP address on your router Example If the router s LAN IP address is 192 168 0 1 make your IP address 192 168 0 X where X is a number between 2 and 99 Make sure th...

Page 58: ...instructions may cause harmful interference to radio communications However there is no guarantee that interference will not occur in a particular installation If this equipment does cause harmful interference to radio or television reception which can be determined by turning the equipment off and on the user is encouraged to try to correct the interference by one or more of the following measure...

Page 59: ...s accepted by the FCC with the EUT transmitting at the specified power level in different channels The highest SAR value for the device as reported to the FCC is 1 52 W kg when placed next to the body The FCC has granted an Equipment Authorization for this device with all reported SAR levels evaluated as in compliance with the FCC RF exposure guidelines SAR information on this device is on file wi...

Page 60: ...MHz Chaîne 1 9 peuvent être utilisé Pour les dernières restrictions voir http www art telecom fr For 2 4 GHz wireless LAN operation of this product certain restrictions apply This equipment may use the entire 2400 MHz to 2483 5 MHz frequency band channels 1 through 13 for indoor applications For outdoor use only 2400 2454 MHz frequency band channels 1 9 may be used For the latest requirements see ...

Page 61: ...rd s EN 301 489 1 V1 8 1 7 V1 3 1 17 V2 1 1 24 V1 4 1 4 Radio frequency spectrum usage Article 3 2 of the R TTE Directive Applied Standard s EN 301 511 V9 0 2 EN 301 908 1 V4 2 1 2 V4 2 1 EN 300 328 V1 7 1 5 EMC Directive 2004 108 EC Applied Standard s EN55024 1998 A1 2001 A2 2003 Caution Users have to use the connection to USB interfaces with USB 2 0 version or higher Risk of explosion if battery...

Page 62: ...in NAT Built in firewall Antenna Internal 3G and Wi Fi antenna LED Status Indicator Signal LED Dimensions L x W x H 90 x 28 x 11 mm Operating Temperature 10 to 55 C 14 to 131 F Operating Humidity 10 to 90 Non condensing Certifications CE FCC Supported frequency band is dependent upon regional hardware version Maximum wireless signal rate derived from IEEE Standard 802 11g specifications Actual dat...

Reviews: