D-Link DWR-161 User Manual Download Page 23

19

D-Link DWR-161 User Manual

Section 3 - Configuration
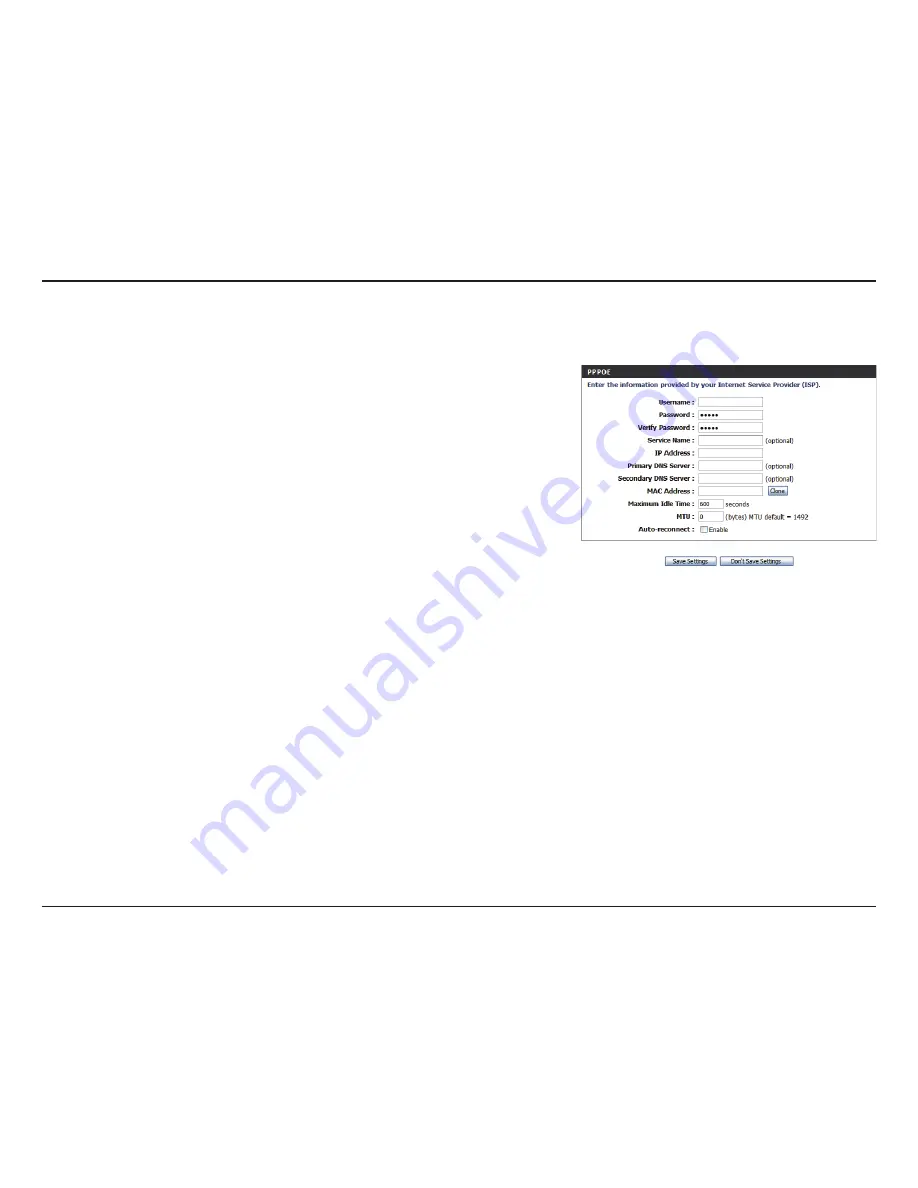
PPPoE

Choose this Internet connection if your ISP provides you with a PPPoE account.

The username/account name that your ISP provides to you 

for PPPoE dial-up.

Password that your ISP provides to you for PPPoE dial-up.

Fill in with the same password in Password field.

(Optional) Fill in if provided by your ISP.

(Optional)  Fill  in  if  provided  by  your  ISP.  If  not,  keep  the 

default value.

(Optional)  Fill  in  if  provided  by  your  ISP.  If  not,  keep  the 

default value.

(Optional)  Fill  in  if  provided  by  your  ISP.  If  not,  keep  the 

default value.

MAC address of the WAN interface. The 

Restore MAC

 button 

will reset the router to its default MAC address.

The  amount  of  time  of  inactivity  before  disconnecting 

established PPPoE session. Setting it to zero or enabling 

Auto-reconnect will disable this feature. 

The default setting of PPPoE is 1492.


The device will dial the PPPoE connection automatically.

Click 

Save Settings

 to save your changes, or click 

Don’t 

Save Settings

 to discard your changes.

Username:


Password:

Verify Password:

Service Name:

IP Address:


Primary DNS Server:


Secondary DNS Server:


MAC Address:


Maximum Idle Time:


Maximum Transmission 

Unit (MTU):

Auto-reconnect:

Summary of Contents for DWR-161

Page 1: ......

Page 2: ...k logo are trademarks or registered trademarks of D Link Corporation or its subsidiaries in the United States or other countries All other company or product names mentioned herein are trademarks or registered trademarks of their respective companies Copyright 2012 by D Link Systems Inc All rights reserved This publication may not be reproduced in whole or in part without prior expressed written p...

Page 3: ...iguration 10 Web based Configuration Utility 10 Setup Wizard 11 Internet Connection Setup Wizard 11 Manual Internet Connection Setup 15 Internet Connection 16 Internet Connection Type 16 Static IP 17 Dynamic IP DHCP 18 PPPoE 19 PPTP 20 L2TP 21 3G 4G 22 iBurst 23 Wi Fi HotSpot 24 Wireless Settings 25 Network Settings 27 Router Settings 27 DHCP Server Settings 28 Virtual Server 29 Application Rules ...

Page 4: ...4 What is WEP 54 Configure WEP 55 What is WPA 56 Configure WPA PSK 57 Configure WPA RADIUS 58 Connect to a Wireless Network 59 Using Windows Vista 59 Configure Wireless Security 60 Using Windows XP 62 Configure WEP 63 Configure WPA PSK 65 Troubleshooting 67 Wireless Basics 69 What is Wireless 70 Tips 72 Wireless Modes 73 Networking Basics 74 Check your IP address 74 Statically Assign an IP address...

Page 5: ...ased operating systems with an installed Ethernet adapter Internet Explorer Version 6 0 or Netscape Navigator Version 6 0 and above for configuration Subject to services and service terms available from your carrier Product Overview Note Using a power supply with a different voltage rating than the one included with the DWR 161 will cause damage and void the warranty for this product Package Conte...

Page 6: ...etwork or using the 10 100 Ethernet port Keep your wireless network safe with WPA WPA2 wireless encryption The DWR 161 utilizes dual active firewalls SPI and NAT to prevent potential attacks across the Internet The 4G USB Router can be installed quickly and easily almost anywhere This router is great for situations where an impromptu wireless network must be set up or wherever conventional network...

Page 7: ...are Overview Side Panel Port Function LAN RJ 45 Insert an Ethernet cable connected to a network device such as a desktop or notebook computer Power Insert the provided DC power adapter into this socket Power Switch Turn the device on or off LAN Power Power Switch ...

Page 8: ... D Link DWR 161 User Manual Section 1 Product Overview Hardware Overview Back Panel Port Function USB Port Connects to a USB modem WPS Button Establishes a secure wireless connection USB Port WPS Button ...

Page 9: ...On Blinking Green Device is on and battery is in use On Solid Red Device is on and battery is low Off Off Device is off Power Adapter On Solid Green Device is on and battery is fully charged On Solid Amber Device is on and battery is charging Off Solid Amber Device is off and battery is charging Off Off Device is off 3G 4G USB Ethernet Wireless Power ...

Page 10: ...USB Solid Green A 3G 4G connection is established Blinking Green Data is being transmitted Ethernet Solid Green An RJ45 cable is plugged in and an Ethernet connection is established Blinking Green Data is being transmitted Wireless Solid Green WLAN is on Blinking Green Data is being transmitted 3G 4G USB Ethernet Wireless Power ...

Page 11: ... switch open the battery lid and then insert the Li ion battery into the battery compartment Note Do not insert or remove the Li ion battery while the power switch is on 2 Close the battery lid 3 Connect the cable of the power adapter to the power port on the back panel of the DWR 161 4 Plug the power adapter into a wall outlet Note It will take about three hours to fully charge the battery for th...

Page 12: ...port on the back of the router 2 Insert a LAN network cable into the LAN port on the back of the router Plug the other end of the LAN cable into the LAN port of your computer or laptop The Ethernet LED will turn green if the Ethernet connection is successfully established Note The DWR 161 4G USB Router LAN Port is Auto MDI MDIX Therefore patch or crossover Ethernet cables can be used 3 Configure t...

Page 13: ...eet thick 0 5 meters at a 45 degree angle will appear to be almost 3 feet 1 meter thick At a 2 degree angle it will appear to be over 42 feet 14 meters thick Position devices in such a way that the signal will travel straight through a wall or ceiling instead of an angle for better reception 3 Try to position access points wireless routers and computers so that the signal passes through open doorw...

Page 14: ...d configuration utility Web based Configuration Utility To access the configuration utility open a web browser such as Internet Explorer and enter the IP address of the router 192 168 0 1 Type admin and then enter the password By default the password is blank If you get a Page Cannot be Displayed error please refer to the Troubleshooting section for assistance ...

Page 15: ... or you can manually configure your Internet connection by using the Manual Internet Connection Setup wizard Click Internet Connection Setup Wizard to begin If you want to enter your settings without running the wizard click Manual Internet Connection Setup and skip to page 15 This wizard will guide you through a step by step process to configure your D Link router to connect to the Internet Click...

Page 16: ...ained on the following page If you are unsure of the connection type you may have to contact your Internet Service Provider ISP Click Prev to go back to the previous page or click Cancel to close the wizard Note The DWR 161 supports several kinds of WAN interfaces allowing you to assign either a WAN or a WWAN 3G 4G connection as the Backup WAN If the Primary WAN is down or unavailable configure th...

Page 17: ...bout how to configure this type of connection Choose this option if your Internet connection requires Layer 2 Tunneling Protocol L2TP See page 21 for information about how to configure this type of connection Choose this option if you already use a SIM card for 3G 4G Internet service from your telecom company See page 22 for information about how to configure this type of connection Choose this op...

Page 18: ...DWR 161 User Manual Section 3 Configuration After you have completed the Setup Wizard click Connect to save your settings A popup box will appear asking you to confirm your settings Click OK to save your settings ...

Page 19: ... 3 Configuration Manual Internet Connection Setup Click Manual Internet Connection Setup to begin If you want to configure your router to connect to the Internet using the wizard click Internet Connection Setup Wizard and refer to page 11 ...

Page 20: ...r Internet Service Provider ISP Select the Internet Connection type specified by your Internet Service Provider ISP The corresponding settings will be displayed below the option you select Please see the following pages for details on how to configure these different connection types Internet Connection Internet Connection Type My Internet Connection is ...

Page 21: ... The default value is 1500 The default MAC Address is set to the Internet port s physical interface MAC address on the Broadband Router It is not recommended that you change the default MAC address unless required by your ISP Click Save Settings to save your changes or click Don t Save Settings to discard your changes IP Address Subnet Mask Default Gateway Primary DNS Server Secondary DNS Server M...

Page 22: ...e Broadband Router It is not recommended that you change the default MAC address unless required by your ISP This feature enables this product to renew your WAN IP address automatically when the lease time is expiring Click Save Settings to save your changes or click Don t Save Settings to discard your changes This section will help you to obtain IP Address information automatically from your ISP ...

Page 23: ...t value Optional Fill in if provided by your ISP If not keep the default value MAC address of the WAN interface The Restore MAC button will reset the router to its default MAC address The amount of time of inactivity before disconnecting established PPPoE session Setting it to zero or enabling Auto reconnect will disable this feature The default setting of PPPoE is 1492 The device will dial the PP...

Page 24: ... up Password that your ISP provides to you for PPTP dial up Fill in with the same password in Password field Choose Always on when you want to establish a PPTP connection all the time If you choose Connect on demand the device will establish a PPTP connection when local users want to surf the Internet and disconnect if there is no traffic after a time period set in Maximum Idle Time The time of no...

Page 25: ...d that your ISP provides to you for L2TP dial up Fill in with the same password in Password field Choose Always on when you want to establish an L2TP connection all the time If you choose Connect on demand the device will establish an L2TP connection when local users want to surf the Internet and disconnect if there is no traffic after a time period set in Maximum Idle Time The time of no activity...

Page 26: ...4G session will be ended Set it to zero or choose Auto in Reconnect Mode to disable this feature Disable or Use LCP Echo Request The setting depends on ISP requirements Click Save Settings to save your changes or click Don t Save Settings to discard your changes Dial Up Profile Country Telecom 3G 4G Network Username Password Verify Password Dialed Number Authentication APN PIN Code Reconnect Mode ...

Page 27: ...nter the secondary DNS server The time of no activity to disconnect established 3G 4G session Set it to zero or choose Auto in Reconnect Mode to disable this feature You may need to change the Maximum Transmission Unit MTU for optimal performance The default value is 1500 Auto or Manual Connect to iBurst network automatically or manually Click to disable Network Address Translation NAT Click Save ...

Page 28: ...to connect to an existing Wi Fi hotspot Click this button to search for Wi Fi hotspots in the area Click this button to refresh the list Click this button to select a Wi Fi hotspot Click Save Settings to save your changes or click Don t Save Settings to discard your changes Wi Fi HotSpot Search Refresh Select ...

Page 29: ...nd 802 11g wireless clients disable this mode A wireless network uses specific channels in the wireless spectrum to handle communication between clients Some channels in your area may experience interference from other electronic devices Choose the clearest channel to help optimize the performance and coverage of your wireless network Click Save Settings to save your changes or click Don t Save Se...

Page 30: ...you will have to manually enter your SSID to connect to the router WIRELESS SECURITY MODE This device supports three wireless security modes WEP WPA Personal WPA Enterprise or None WEP is the original wireless encryption standard WPA provides a higher level of security and WPA Personal does not require an authentication server When WPA enterprise is enabled the router uses EAP 802 1x to authentica...

Page 31: ...router The default IP address is 192 168 0 1 If you change the IP address you will need to enter the new IP address in your browser to get into the configuration utility Enter the Subnet Mask of the router The default subnet mask is 255 255 255 0 Enter the local domain name for your network Click Save Settings to save your changes or click Don t Save Settings to discard your changes Router IP Addr...

Page 32: ...s Secondary WINS IP Address assign a WINS Server to DHCP clients Click Save Settings to save your changes or click Don t Save Settings to discard your changes Enable DHCP Server DHCP IP Address Range DHCP Lease Time Primary DNS IP Address Secondary DNS IP Address Primary WINS IP Address Secondary WINS IP Address DHCP Server Settings The DWR 161 has a built in DHCP Dynamic Host Control Protocol ser...

Page 33: ...ose the number of a schedule rule that you have defined VIRTUAL SERVERS LIST Identifies the virtual server Enter the last digits of the IP address of the computer on your local network that you want to allow the incoming service In the next box enter the port number that you would like to open Select this box to enable the rule Specify the schedule rule number Click Save Settings to save your chan...

Page 34: ...tions Rules allow some of these applications to work with the DWR 161 APPLICATION RULES Select from a list of popular applications Copies the predefined application rule to the line of the specified ID Identifies the rule The name of the trigger Specify the incoming port for the trigger rule Select this box to enable the rule Click Save Settings to save your changes or click Don t Save Settings to...

Page 35: ...port after the colon Select Low Normal or High Select a checkbox to enable the particular QoS rules individually Click Save Settings to save your changes or click Don t Save Settings to discard your changes Enable QoS Packet Filter Upstream Bandwidth Downstream Bandwidth ID Local IP Ports Remote IP Ports QoS Priority Enable The QoS Engine improves your online gaming experience by ensuring that you...

Page 36: ...IP address Click Trigger to configure Wake On LAN If this box is selected the rule will follow the connection control setting specified above If this box is selected the rule will follow the association control setting specified above Click Save Settings to save your changes or click Don t Save Settings to discard your changes MAC Address Control Connection Control Association Control ID MAC Addre...

Page 37: ...s the rule Enter a URL that you would like to block Click to enable the specific URL filter URL Filter allows you to set up a list of Web sites that will be blocked from users on your network URL Filter Click Save Settings to save your changes or click Don t Save Settings to discard your changes URL Filtering ID URL Enable ...

Page 38: ...Specify the remote IP address and then the port after the colon Select this box to enable the filter Specify the schedule rule number Go back to the previous filter page Advance to the next filter page Click Save Settings to save your changes or click Don t Save Settings to discard your changes Outbound Filter Outbound Filter Use Schedule Rule Copy to ID ID Source IP Ports Destination IP Ports Ena...

Page 39: ...dress and then specify the port after the colon Select this box to enable the filter Specify the schedule rule number Go back to the previous filter page Advance to the next filter page Click Save Settings to save your changes or click Don t Save Settings to discard your changes Inbound Filter Inbound Filter Use Schedule Rule Copy to ID ID Source IP Ports Destination IP Ports Enable Schedule Rule ...

Page 40: ...sword private in this field to gain Read and Write access to the network using SNMP software Enter up to four IP addresses of any trap targets on your network Select the SNMP version of your system Click Save Settings to save your changes or click Don t Save Settings to discard your changes SNMP SNMP Local SNMP Remote Get Community Set Community IP 1 IP 2 IP 3 IP 4 SNMP Version SNMP Simple Network...

Page 41: ...static route Enter the subnet mask to be used for the specified network Enter the gateway IP address to the specified network Enter the amount of hops it will take to reach the specified network Note In a transmission path each link is terminated at a network device such as a router or gateway The number of hops equals the number of routers or gateways that data must pass through before reaching t...

Page 42: ... listening to broadcast and multicast messages The default interval is 3 WMM Wi Fi Multimedia is QoS Quality of Service system for your wireless network Enable this option to improve the quality of video and voice applications for your wireless clients Select the basic transfer rates based on the speed of wireless adapters on your wireless network It is strongly recommended to keep this setting to...

Page 43: ...rom hackers Click to enable power saving when in battery mode Click Save Settings to save your changes or click Don t Save Settings to discard your changes Advanced Network Advanced Network contains settings which can change the way the router handles certain types of traffic We recommend that you do not change any of these settings unless you are already familiar with them or have been instructed...

Page 44: ...nternet IP address of the PC that has access to the Broadband Router If you enter an asterisk in this field then anyone will be able to access the Router Adding an asterisk into this field could present a security risk and is not recommended This is the port number used to access the router Example 8080 is the port used for the Web Management interface Click Save Settings to save your changes or c...

Page 45: ...e computer s clock over a network Choose the NTP Server used for synchronizing the time and date This page will help you set the time zone that you are in and the NTP Network Time Protocol Server Daylight Saving can also be configured to adjust the time when needed Click Save Settings to save your changes or click Don t Save Settings to discard your changes Time Zone Enable Daylight Saving Automat...

Page 46: ...lso select your computer from the drop down box only if you want to receive an IP address from the router via DHCP The DWR 161 keeps a running log of events and activities occurring on the router You may send these logs to a SysLog server on your network Click Save Settings to save your changes or click Don t Save Settings to discard your changes Enable Logging to Syslog Server Syslog Server IP Ad...

Page 47: ...er the SMTP server IP address followed by a colon and the port number e g 123 123 123 1 25 Enter the SMTP username Enter the SMTP password Enter the e mail address where you would like the e mail sent to Enter a subject for the e mail Click this button to access the e mail log Click Save Settings to save your changes or click Don t Save Settings to discard your changes Enable E mail Notification S...

Page 48: ...ously saved router configuration settings Browse to find the saved file and then click Upload Settings to transfer those settings to the router This option will restore all settings back to their defaults Any settings that have not been backed up will be lost including any rules that you have created Save Settings To Local Hard Drive Load Settings From Local Hard Drive Restore To Factory Default S...

Page 49: ... Upload to start the firmware upgrade This page allows you to upgrade the firmware of your router Make sure the firmware you want to use is on the local hard drive of the computer and then click Browse to upload the file Please check the D Link support site for firmware updates at http support dlink com You can download firmware upgrades to your hard drive from the D Link support site Current Firm...

Page 50: ...S service provider Enter the Username for your DDNS account Enter the Password for your DDNS account The DDNS feature allows you to host a server Web FTP or Game Server using a domain name that you have registered www whateveryournameis com with your dynamically assigned IP address Sign up for D Link s free DDNS service at www dlinkddns com Enable DDNS Provider Host Name Username E mail Password K...

Page 51: ...to ping Packet Internet Groper and click Ping The status of your Ping attempt will be displayed in the Ping Result box This useful diagnostic utility can be used to check if a computer is connected to the network It sends ping packets and listens for responses from the specific host Host Name or IP Address PING Result ...

Page 52: ...r new schedule Enter the time at which you would like the schedule to become active Selectthetimeatwhichyouwouldlike the schedule to become inactive Click Save Settings to save your changes or click Don t Save Settings to discard your changes This page allows you to manage schedule rules for various firewall and parental control features Add New Rule Edit Delete Name of Rule 1 Start Time hh mm End...

Page 53: ...t time and firmware version Displays the MAC address and the private local IP settings for the router Displays 3G 4G card info link status and the network name Displays the MAC address and the public IP settings for the router Displays the wireless MAC address and your wireless settings such as SSID Channel and Encryption type Displays the list of DHCP clients General WAN 3G 4G Card LAN Wireless L...

Page 54: ...al Section 3 Configuration Logs This page allows you to view logs and define events that you want to view This router also has an internal syslog server so you can send the log files to a computer that is running a syslog utility ...

Page 55: ...er Manual Section 3 Configuration Statistics This page allows you to view the packets transmitted and received passing through your router on both WAN and LAN ports The traffic counter will reset if the device is rebooted ...

Page 56: ...ser Manual Section 3 Configuration Wireless This table displays a list of wireless clients that are connected to your wireless router It also displays the connection time and MAC address of the connected wireless clients ...

Page 57: ...53 D Link DWR 161 User Manual Section 3 Configuration Support ...

Page 58: ...eless network so that it is protected as it is transmitted from one wireless device to another To gain access to a WEP network you must know the key The key is a string of characters that you create When using WEP you must determine the level of encryption The type of encryption determines the key length 128 bit encryption requires a longer key than 64 bit encryption Keys are defined by entering i...

Page 59: ...curity Mode select Enable WEP Security 3 Next to Authentication select Open or Shared Key 4 Select either 64 bit or 128 bit encryption from the drop down box next to WEP Encryption 5 Next to Key Type select either Hex or ASCII Hex recommended Letters A F and numbers 0 9 are valid ASCII All numbers and letters are valid 6 Next to Key 1 enter a WEP key that you create Make sure you enter this key ex...

Page 60: ...ble authentication protocol EAP WEP regulates access to a wireless network based on a computer s hardware specific MAC address which is relatively simple to sniff out and steal EAP is built on a more secure public key encryption system to ensure that only authorized network users can access the network WPA PSK WPA2 PSK uses a passphrase or key to authenticate your wireless connection The key is an...

Page 61: ...o Security Mode select Enable WPA Personal Security or Enable WPA2 Personal Security 3 Next to Cipher Mode select TKIP AES or Auto 4 Next to PSK EAP select PSK 5 Next to Passphrase enter a key passphrase The key is an alpha numeric password between 8 and 63 characters long The password can include symbols _ and spaces Make sure you enter this key exactly the same on all other wireless clients 6 En...

Page 62: ...ering the IP address of the router 192 168 0 1 Click on Wireless Settings on the left side 2 Next to Security Mode select Enable WPA Personal Security or Enable WPA2 Personal Security 3 Next to Cipher Mode select TKIP AES or Auto 4 Next to PSK EAP select EAP 5 Next to RADIUS Server 1 enter the IP Address of your RADIUS server 6 Next to Port enter the port you are using with your RADIUS server 1812...

Page 63: ...the Windows Vista utility as seen below Right click on the wireless computer icon in your system tray lower right corner next to the time Select Connect to a network If you receive the Wireless Networks Detected bubble click on the center of the bubble to access the utility or The utility will display any available wireless networks in your area Click on a network displayed using the SSID and clic...

Page 64: ...nt before configuring your wireless adapter If you are joining an existing network you will need to know the security key or passphrase being used 2 Highlight the wireless network SSID you would like to connect to and click Connect 1 Open the Windows Vista Wireless Utility by right clicking on the wireless computer icon in your system tray lower right corner of screen Select Connect to a network ...

Page 65: ...e same security key or passphrase that is on your router and click Connect It may take 20 30 seconds to connect to the wireless network If the connection fails please verify that the security settings are correct The key or passphrase must be exactly the same as on the wireless router ...

Page 66: ... have a site survey option similar to the Windows XP utility as seen on this page Right click on the wireless computer icon in your system tray lower right corner next to the time Select View Available Wireless Networks If you receive the Wireless Networks Detected bubble click on the center of the bubble to access the utility or The utility will display available wireless networks in your area Cl...

Page 67: ...guring your wireless adapter If you are joining an existing network you will need to know the WEP key being used 2 Highlight the wireless network SSID you would like to connect to and click Connect 1 Open the Windows XP Wireless Utility by right clicking on the wireless computer icon in your system tray lower right corner of screen Select View Available Wireless Networks ...

Page 68: ...twork Connection box will appear Enter the same WEP key that is on your router and click Connect It may take 20 30 seconds to connect to the wireless network If the connection fails please verify that the WEP settings are correct The WEP key must be exactly the same as on the wireless router ...

Page 69: ...configuring your wireless adapter If you are joining an existing network you will need to know the WPA key being used 2 Highlight the wireless network SSID you would like to connect to and click Connect 1 Open the Windows XP Wireless Utility by right clicking on the wireless computer icon in your system tray lower right corner of screen Select View Available Wireless Networks ...

Page 70: ...etwork Connection box will appear Enter the WPA PSK passphrase and click Connect It may take 20 30 seconds to connect to the wireless network If the connection fails please verify that the WPA PSK settings are correct The WPA PSK passphrase must be exactly the same as on the wireless router ...

Page 71: ...must be on the same IP subnet to connect to the web based utility Make sure you have an updated Java enabled web browser We recommend the following Internet Explorer 6 0 or higher Netscape 8 or higher Mozilla 1 7 12 5 0 or higher Opera 8 5 or higher Safari 1 2 or higher with Java 1 3 1 or higher Camino 0 8 4 or higher Firefox 1 5 or higher Verify physical connectivity by checking for solid link li...

Page 72: ...his should open the login page for your the web management If you still cannot access the configuration unplug the power to the router for 10 seconds and plug back in Wait about 30 seconds and try accessing the configuration If you have multiple computers try connecting using a different computer 2 What can I do if I forgot my password If you forgot your password you must reset your router Unfortu...

Page 73: ...eless LANs are used increasingly in both home and office environments and public areas such as airports coffee shops and universities Innovative ways to utilize WLAN technology are helping people to work and communicate more efficiently Increased mobility and the absence of cabling and other fixed infrastructure have proven to be beneficial for many users Wireless users can use the same applicatio...

Page 74: ...ou can access the network You must be within the wireless network range area to be able to connect your computer There are two different types of wireless networks Wireless Local Area Network WLAN and Wireless Personal Area Network WPAN Wireless Local Area Network WLAN In a wireless local area network a device called an Access Point AP connects computers to the network The access point has a small...

Page 75: ...ireless technology as become so popular in recent years that almost everyone is using it whether it s for home office business D Link has a wireless solution for it Home Gives everyone at home broadband access Surf the web check e mail instant message and etc Gets rid of the cables around the house Simple and easy to use Small Office and Home Office Stay on top of everything at home as you would a...

Page 76: ...setting up a wireless network Tips Here are a few things to keep in mind when you install a wireless network Centralize your Router or Access Point Make sure you place the router access point in a centralized location within your network for the best performance Try to place the router access point as high as possible in the room so the signal gets dispersed throughout your home If you have a two ...

Page 77: ...o peer communication using wireless network adapters on each computer such as two or more WNA 2330 wireless network Cardbus adapters An Infrastructure network contains an Access Point or wireless router All the wireless devices or clients will connect to the wireless router or access point An Ad Hoc network contains only clients such as laptops with wireless cardbus adapters All the adapters must ...

Page 78: ...our IP address please follow the steps below Click on Start Run In the run box type cmd and click OK Windows Vista users type cmd in the Start Search box At the prompt type ipconfig and press Enter This will display the IP address subnet mask and the default gateway of your adapter If the address is 0 0 0 0 check your adapter installation security settings and the settings on your router Some fire...

Page 79: ...sents your network adapter and select Properties Step 3 Highlight Internet Protocol TCP IP and click Properties Step 4 Click Use the following IP address and enter an IP address that is on the same subnet as your network or the LAN IP address on your router Example If the router s LAN IP address is 192 168 0 1 make your IP address 192 168 0 X where X is a number between 2 and 99 Make sure that the...

Page 80: ...Antenna 1 Internal antenna Battery 1700 mAh Ports LAN RJ 45 USB LED Status Indicators Power 3G 4G USB Ethernet Wireless Dimensions L x W x H 102 x 81 x 23 mm 4 0 x 3 2 x 0 9 inches Operating Temperature 0 to 40 C 32 to 104 F Operating Humidity 10 to 90 Non condensing Certifications CE FCC RoHS 1 Maximum wireless signal rate derived from IEEE Standard 802 11g specifications Actual data throughput w...

Reviews: