background image


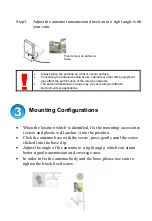
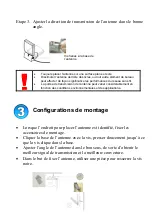
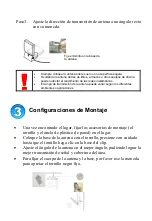
Step3.  Adjust the antenna transmission direction to a right angle with 

your coin. 


• 

Always place the antenna on a flat or secure surface.


• 

Concealing the antenna behind books, cabinets or other office equipment 

may affect the performance of the wireless networks.


• 

The antenna transmission range may vary according to different 

environments or applications.


Mounting Configurations 


• 

When the location which is identified, fix the mounting accessories 
( screw and plastic wall anchor ) into the position. 

• 

Click the antenna base with the screw, press gently until the screw 
clicked into the base clip. 

• 

Adjust the angle of the antenna to a right angle, which can attain 
better signal transmission and coverage area. 

• 

In order to fix the antenna body and the base, please use coin to 
tighten the black fixed screw. 


Fixed screw on antenna 
base 

Summary of Contents for DWL-M60AT

Page 1: ...ckage and identify the optimal location for the antenna Notice Allow the cable to bend naturally It is recommended that you place the antenna near wireless devices to avoid excessive strain to the cable and connector Step 2 Place the antenna on a stable flat surface and use the enclosed mounting accessories to mount the antenna on the walls or ceiling Remove the existing antenna and start to link ...

Page 2: ...to different environments or applications Mounting Configurations When the location which is identified fix the mounting accessories screw and plastic wall anchor into the position Click the antenna base with the screw press gently until the screw clicked into the base clip Adjust the angle of the antenna to a right angle which can attain better signal transmission and coverage area In order to fi...

Page 3: ...MCC jumper cable Technical Support D Link provides free technical support for customers within the United States during the warranty period on this product U S customers can contact D Link Technical Support through our web site or by phone D Link Technical Support over Telephone 1 800 758 5489 24 Hours a Day 7 Days a Week 1 Year Limited Warranty from date of purchase D Link Technical Support over ...

Page 4: ...für die Antenne Hinweis Das Kabel sollte nicht verbogen oder geknickt werden Platzieren Sie die Antenne möglichst in der Nähe der drahtlosen Geräte damit Kabel und Stecker nicht zu stark gespannt werden müssen 2 Schritt Setzen Sie die Antenne auf eine stabile ebene Fläche Verwenden Sie das beigelegten Installationszubehör um die Antenne an der Wand oder Decke anzubringen Entfernen Sie die bisherig...

Page 5: ...nd Anwendung schwanken Installationseinstellungen Wenn ein geeigneter Standort gefunden ist setzen Sie die Installationsteile Schraube und Kunststoffwandhaken ein Klicken Sie den Antennenfuß mit der Schraube ein und drücken Sie so lange vorsichtig bis die Schraube in den Fuß Clip einrastet Richten Sie die Antenne rechtwinklig aus um eine bessere Signalübertragung und einen größeren Abdeckungsberei...

Page 6: ... der Website von D Link unter www dlink de D Link bietet kostenfreie technische Unterstützung für Kunden innerhalb Deutschlands Österreichs der Schweiz und Osteuropas Unsere Kunden können technische Unterstützung über unsere Website oder telefonisch anfordern Web http www dlink de E Mail support dlink de Telefon 00800 7250 4000 Telefonische technische Unterstützung erhalten Sie montags bis donners...

Page 7: ... de l emballage et identifier l endroit idéal pour placer l antenne Note Il est conseillé de placer l antenne prêt de l équipement sans fil de sorte que le câble et le connecteur ne soient pas tendus de façon excessive Etpae 2 Placer l antenne sur une face plane et stable et utiliser les accessoires de montage fournis pour fixer l antenne sur le mûr ou le plafond Enlver l antenne existante et comm...

Page 8: ...onsidérablement en fonction des conditions environnementales et des applications Configurations de montage Lorsque l endroit pour placer l antenne est identifié fixer les accessoires de montage Cliquer la base de l antenne avec la vis presser doucement jusqu à ce que la vis clique dans la base Ajuster l angle de l antenne dans le bon sens de sorte d obtenir le meilleur signal de transmission et la...
Page 9: ...ion D Link MCC Support Technique Vous trouverez la documentation et les logiciels les plus récents sur le site web D Link Le service technique de D Link est gratuit pour les clients aux Etats Unis durant la période de garantie Ceux ci peuvent contacter le service technique de D Link par notre site internet ou par téléphone Assistance technique D Link par téléphone 0 820 0803 03 Assistance techniqu...

Page 10: ... caja y coloque la posición óptima para la antena Nota Permita que el cable se doble de forma natural Se recomienda que coloque la antena cerca del dispositivo inalámbrico para evitar una excesiva tensión del cable y el conector Paso 2 Coloque la antena sobre una superficie estable plana y use los accesorios de montaje incluidos para montar la antena sobre las paredes o el techo Quite la antena ex...

Page 11: ...ambientes o aplicaciones Configuraciones de Montaje Una vez encontrado el lugar fijar los accesorios de montaje el tornillo y el ancla de plástico de pared en el lugar Coloque la base de la antena con el tornillo presione con cuidado hasta que el tornillo haga clic en la base del clip Ajuste el ángulo de la antena en el mejor ángulo pudiendo lograr la mejor transmisión de señal y cobertura del áre...
Page 12: ...cional del cable D Link Soporte Técnico D Link proporciona el soporte técnico gratuito para clientes dentro de los Estados Unidos durante el período de la garantía sobre este producto Los clientes estadounidenses pueden ponerse en contacto con el Soporte técnico de D Link por nuestro sitio web o por teléfono D Link Soporte Técnico Telefónico D Link Iberia 34 93 4090770 1 Año de garantía limitada d...

Page 13: ... posizionamento per una miglior trasmissione e ricezione Nota Verificare che il cavo non sia attorcigliato ma ben steso Si raccomanda di posizionare l antenna il più vicino possibile agli altri accessori wireless onde evitare particolari tensioni dovute alla distanza tra cavo e connettore Step 2 Posizionare l antenna su una superficie piana e stabile utilizzando gli appositi accessori di montaggio...

Page 14: ...funzione dell ambiente di installazione e degli apparati utilizzati Configurazione e montaggio Una volta identificato dove installare l antenna fissare gli accessori di montaggio presenti nella confezione nella posizione preferita Fare pressione delicatamente sulla base dell antenna per sbloccare la vite di fissaggio mediante un cacciavite e regolare manualmente l angolo dell antenna stessa per ot...

Page 15: ... D Link modello DWL 660 Contattate il vostro rivenditore di fiducia per avere ulteriori informazioni sul cavo opzionale D Link ANT24 JC Supporto Tecnico D Link mette a disposizione un Supporto Tecnico telefonico gratuito in caso di informazioni o problematiche di configurazione dell apparato Potete contattare in Supporto Tecnico D Link via telefono via posta elettronica oppure via web attraverso i...

Page 16: ...вки и выберите оптимальное размещение для антенны Внимание Позвольте кабелю сгибаться естественным образом Рекомендуется размещать антенну рядом с беспроводными устройствами во избежание деформации кабеля и коннектора Шаг 2 Разместите антенну на устойчивой плоской поверхности или используйте крепежный комплект для установки антенны на стену или потолок Отключите существующую антенну и подключите D...

Page 17: ...арьироваться для различных приложений и окружения Установка на стену Когда вы выбрали расположение для антенны установите крепежный комплект винт и настенный пластиковый анкер Зафиксируйте корпус антенны мягким нажатием на винте пока винт не защелкнется в зажиме корпуса Отрегулируйте угол антенны для обеспечения лучшего приема сигнала и области покрытия Для фиксации положения антенны относительно ...

Page 18: ...у Для установки дополнительного кабеля обращайтесь к вашему поставщику оборудования Техническая Поддержка D Link обеспечивает бесплатную техническую поддержку клиентов в течение гарантийного срока изделия Клиенты могут связаться со службой технической поддержки D Link через web сайт или по телефону Телефоны службы технической поддержки D Link 7 095 744 00 99 Техническая Поддержка D Link через Inte...

Page 19: ...0AT 天線 附有 1 5m 纜線 安裝配件 螺絲 1 塑膠錨釘 1 塑膠電纜夾 2 快速安裝指南 安裝 DWL M60AT 第 1 步 從包裝中小心地取出天線 確認天線的最佳安裝位置 注意 讓纜線自然彎曲 建議將天線安裝於無線設備旁 距離不要太遠 以避免 將纜線拉的太緊 第 2 步 將天線置於穩固 平坦的表面 用所附安裝附件將其安裝 在牆上或天花板上 拆掉現有天線 開始安裝 DWL M60AT D Link DWL M60AT 2 4GHz 無線室內天線 安裝指南 ...

Page 20: ... 步 用硬幣將天線發射方向調整到最佳角度 總是將天線安裝在平坦或安全的表面 將天線隱藏於書籍 櫃子或其他辦公室設備後面可能影響無線網路的性能 天線發射範圍可能受環境或應用層面的影響 安裝配置 選好位置後 將安裝附件 螺絲和塑膠錨釘 固定到位置上 用螺絲卡住天線基座 輕按將螺絲卡入基座夾 調整天線至正確角度 可獲得最佳信號發射和覆蓋區域 請用硬幣上緊黑色固定螺絲 以固定天線本體和基座 固定的螺絲位於天線基座 ...

Page 21: ...線與 D Link DWL 660 無線網路 PC 卡連結 請向經銷商洽詢選購 D Link MCC 轉接線 技術支援 友冠技術支援 台灣地區用戶可以透過我們的網站 電子郵件或電話與友冠 資訊技術支援人員 聯絡 支援服務時間從週一到週五 上午 8 30 a m 到 5 30 p m Web http www dlinktw com tw FAQ http www dlinktw com tw faq html Email dssqa dlinktw com tw Phone 0800 002 615 如果您是台灣地區以外的用戶 請向 D Link 全球各地分公司 取得支援服務 ...

Reviews: