background image

10

D-Link Systems, Inc.

DSM-G600 Install Guide

Confi guration

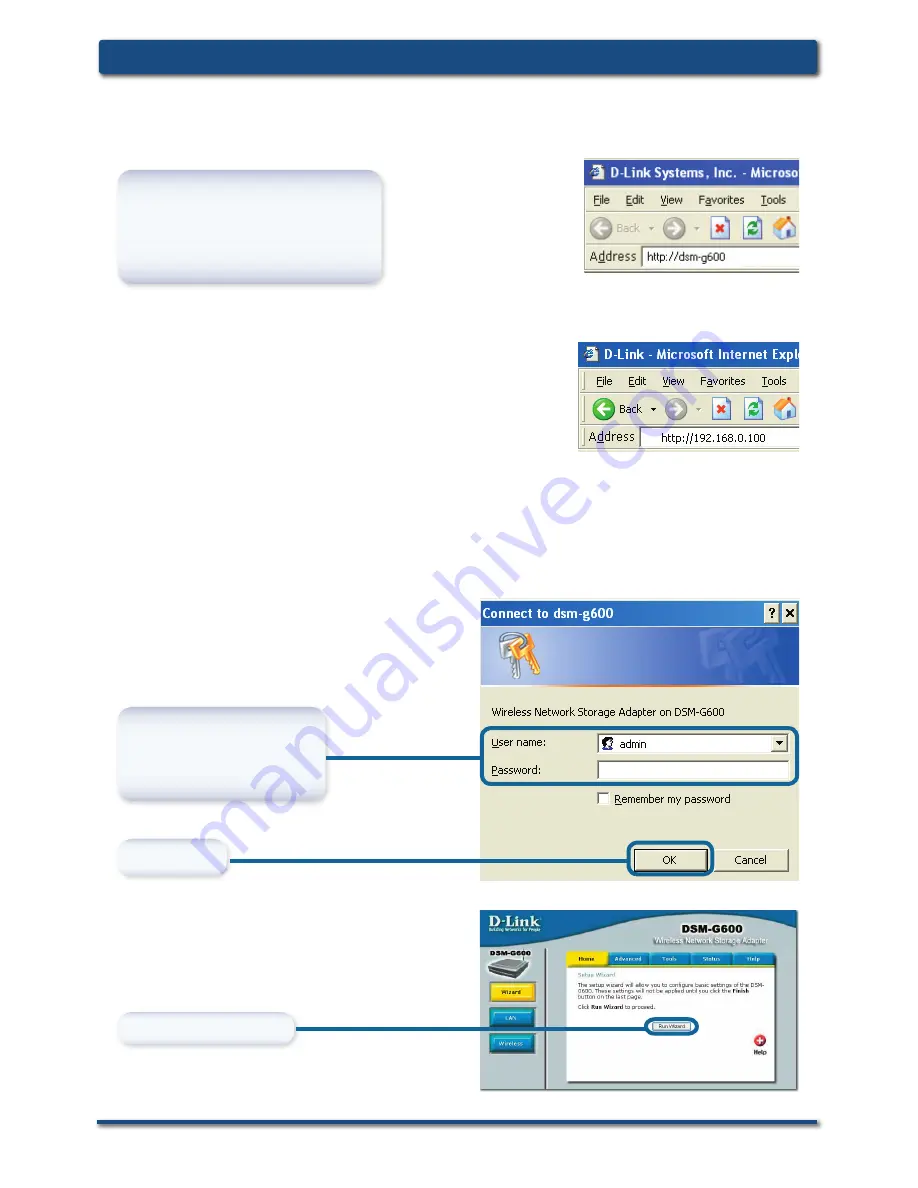
Open your Web browser and 
type 

http://dsm-g600

 into the 

URL address box. Then press 
the Enter or Return key.

The logon pop-up screen will appear.

Type 

admin

 for the user 

name  and  leave  the 
password fi eld blank.

Click 

OK

.

Confi guration

Click 

Run Wizard

.

If  you  cannot  access  the  DSM-G600  with  the 

DNS  name,  enter  the  IP  address  instead.  If  a 

DHCP  server  is  not  available,  the  DSM-G600 

will  default to an IP address of 192.168.0.100. 

Your computer must have an IP address in the 

same network (192.168.0.x where x is between 

1 and 254). 

If  you  have  a  DHCP  server,  you  can  check 

the  DHCP  log  or  table  to  fi nd  the  IP  address 

received by the DSM-G600.

Summary of Contents for DSM-G600 - MediaLounge Wireless G Network Storage Enclosure NAS...

Page 1: ...Version 1 0 DSM G600 Wireless Network Storage Enclosure...

Page 2: ...ard Drive and or Internal 3 5 ATA IDE Hard Drive An available Ethernet port on the network Manual and Software on CD Package Contents D Link DSM G600 Wireless Storage Enclosure Ethernet Cable 12V 3A P...

Page 3: ...e Blinking indicates startup or a reboot WLAN LED A solid light indicates that wireless is ready This LED blinks during wireless data transmission WLAN LED A solid light indicates that wireless is rea...

Page 4: ...also be connected but will be limited to USB 1 1 speed Power Receptor Receptor for the supplied power adapter LAN Port Connects to your Ethernet network The LAN port supports Auto MDI MDI X allowing...

Page 5: ...D Link Systems Inc 5 DSM G600 Install Guide Installation Overview Installation Overview Once you ve completed your DSM G600 installation your network may appear similar to the diagram below...

Page 6: ...crew the two screws on the back panel of the DSM G600 to remove the cover B Connect the IDE cable to the IDE cable connector on your hard drive Note Make sure the jumper setting on your hard drive is...

Page 7: ...E Replace the cover and screw the two screws on the back panel of the DSM G600 F Connect an Ethernet cable to the Ethernet port located on the back of the DSM G600 Note It is required that an Etherne...

Page 8: ...nect the antenna to the antenna connector located on the back of the DSM G600 Installing the Hardware continued Note When you rst power on the DSM G600 will automatically format your hard drive if it...

Page 9: ...meters at a 45 degree angle appears to be almost 3 feet 1 meter thick At a 2 degree angle it looks over 42 feet 14 meters thick Position devices so that the signal will travel straight through a wall...

Page 10: ...password eld blank Click OK Con guration Click Run Wizard If you cannot access the DSM G600 with the DNS name enter the IP address instead If a DHCP server is not available the DSM G600 will default...

Page 11: ...tatic IP Address Subnet Mask Gateway Address Usually the LAN address of your router DNS Address A Domain Name Server translates Domain names into IP addresses Con guration continued Click Next Enter t...

Page 12: ...lected Select Client if you will be connecting to an existing wireless router or access point Select Access Point if wireless clients will be connecting directly to the DSM G600 In Wireless Mode selec...

Page 13: ...on the D Link CD ROM Con guration continued Click Next If your wireless network is using WPA PSK security click WPA PSK and enter the encryption settings All devices on your network must share the sa...

Page 14: ...l Guide Con guration Select the appropriate Time Zone in the pulldown menu Set device date and time You have completed the basic con guration using the setup wizard Enter the Workgroup name Con gurati...

Page 15: ...Windows XP using UPnP Double click My Network Places on the Windows Desktop For Windows XP users it is recommended to activate UPnP for ease of use To learn how to activate UPnP please refer to page...

Page 16: ...ide Accessing the DSM G600 Double click My Computer on the Windows Desktop Under Tools select Map Network Drive Select a drive letter for the DSM G600 Select Browse to nd the DSM G600 on the network A...

Page 17: ...essing the DSM G600 Select your DSM G600 share folder Click OK Accessing the DSM G600 in Windows 2000 XP continued In the My Computer window the newly created mapped drive will be displayed Double cli...

Page 18: ...ms Inc DSM G600 Install Guide Accessing the DSM G600 Accessing the DSM G600 in Mac OS X From the desktop Go menu select Connect to Server Click Browse Click DSM G600 By default there is no password Cl...

Page 19: ...00 Install Guide Accessing the DSM G600 The share window will open Accessing the DSM G600 in Mac OS X continued The DSM G600 will appear on your desktop Double click on the shared drive to access your...

Page 20: ...m EST World Wide Web http support dlink ca E mail support dlink ca Version 1 0 Revised 05 27 2005 Copyright 2005 D Link Corporation D Link Systems Inc All rights reserved D Link the D Link logo are re...

Reviews: