background image

Section 3 – Configuration 


D-Link DSL-2543B User Manual 


15 

Quick Setup 

This chapter is concerned with using your computer to configure the WAN connection. The following chapter describes the various windows used to 
configure and monitor the Router including how to change IP settings and DHCP server setup. 
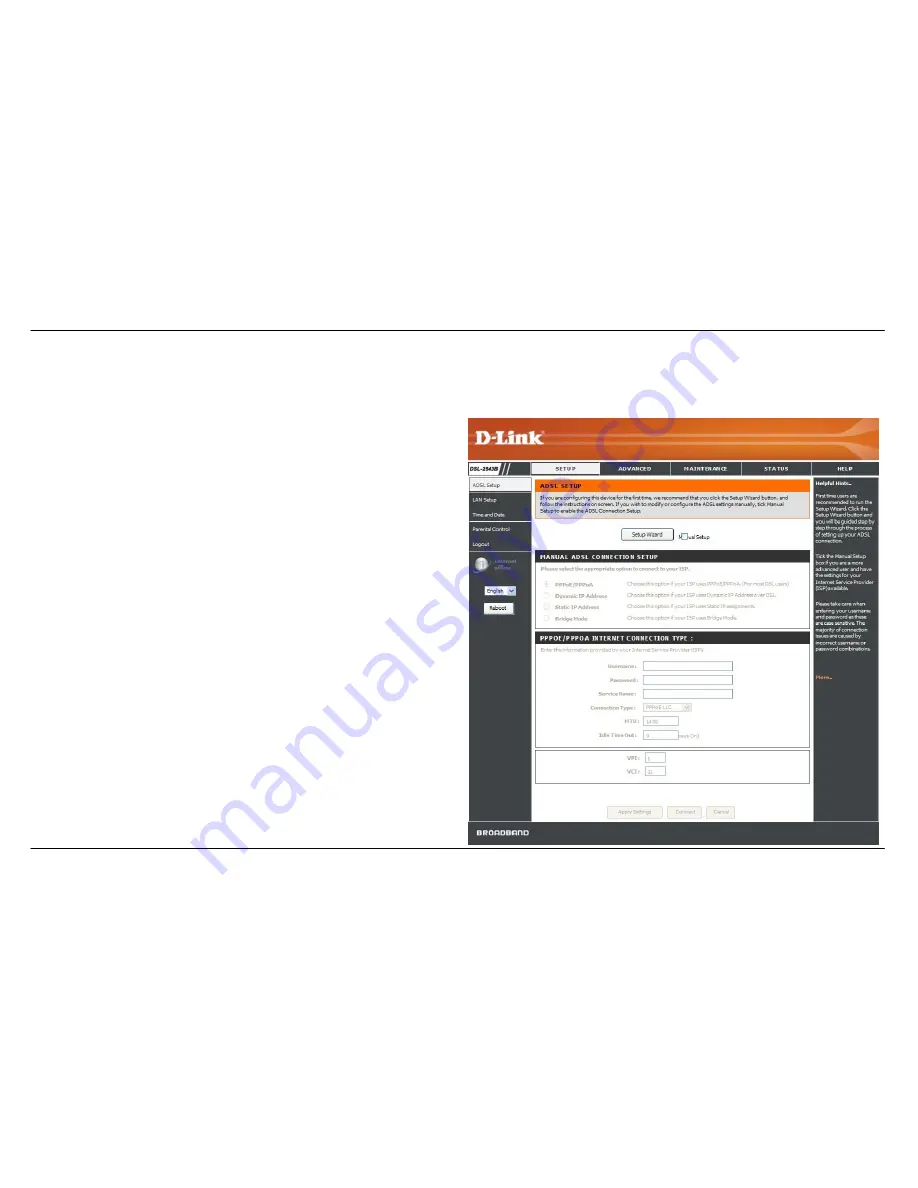
 

QUICK SETUP 

Click the 

Setup Wizard

 link in the middle of the top of the window of the 

Router’s opening page to launch a series of setup windows.   
 
Alternatively, you can tick the Manual Setup check box and click the 
desired setting option radio button in the middle of the window. The 
manual ADSL connection setup is described later in this manual.     


Summary of Contents for DSL-2543B

Page 1: ......

Page 2: ...FIRMWARE UPDATE 47 Factory Reset Button 12 DIAGNOSTICS 48 Network Connections 13 SYSTEM LOG 49 SETUP 14 STATUS 50 Web based Configuration Utility 14 DEVICE INFO 50 QUICK SETUP 15 CONNECTED CLIENTS 51 ADSL SETUP 21 STATISTICS 52 PPPoE PPPoA 22 ROUTING INFO 53 Dynamic IP Address 23 HELP 54 Static IP Address 24 Bridge Mode 25 TROUBLESHOOTING 55 LAN SETUP 26 NETWORKING BASICS 57 Use the Router for DHC...

Page 3: ... Installation Guide Note Using a power supply with a different voltage rating than the one included with the DSL 2543B will cause damage and void the warranty for this product System Requirements ADSL Internet service Computer with 200MHz Processor 64MB Memory CD ROM Drive Ethernet Adapter with TCP IP Protocol Installed Internet Explorer v6 or later FireFox v1 5 or Safari 1 3 or above Windows 2000...

Page 4: ...lows you to select a data path to a particular network destination that will remain in the routing table and never age out If you wish to define a specific route that will always be used for data traffic from your LAN to a specific destination within your LAN for example to another router or a server or outside your network to an ISP defined default gateway for instance Default Routing This allows...

Page 5: ...ff the Router ADSL Port Use the ADSL cable to connect to the your telephone line RJ 11 port Ethernet Ports Use the Ethernet ports to connect the Router to a computer or an Ethernet LAN Reset Button To manually reset depress button with the power on for at least seven seconds Power Insert Use the adapter shipped with the Router to connect to power source ...

Page 6: ...ht will blink green If the indicator lights steady green after the POST the system has failed and the device should be rebooted Internet A solid green light indicates the WAN IP address from IPCP or DHCP and DSL is up or a static IP address is configured and PPP negotiation has been successfully completed If the indicator blinks green this means the Router is active If the Router power is off this...

Page 7: ... the tables to list this information This way you have a hard copy of all the information needed to setup the Router If it is necessary to reconfigure the device all the necessary information can be easily accessed Be sure to keep this information safe and private Low Pass Filters Since ADSL and telephone services share the same copper wiring to carry their respective signals a filtering mechanism...

Page 8: ...can use the Router If you must install an adapter follow the installation instructions that come with the Ethernet NIC adapter Additional Software It may be necessary to install software on your computer that enables the computer to access the Internet Additional software must be installed if you are using the device a simple bridge For a bridged connection the information needed to make and maint...

Page 9: ...tting and Connection Type configurations Connection Type settings listed in parenthesis PPPoE PPoA PPPoE LLC PPPoE VC Mux PPPoA LLC or PPPoA VC Mux Dynamic IP Address 1483 Bridged IP LLC or 1483 Bridged IP VC Mux Static IP Address Bridged IP LLC 1483 Bridged IP VC Mux 1483 Routed IP LLC 1483 Routed IP VC Mux Bridge Mode 1483 Bridged IP LLC or 1483 Bridged IP VC Mux Modulation Type ADSL uses variou...

Page 10: ...nal connections This setting can be changed in the WAN Settings window of the web management interface Information you will need about DSL 2543B Username This is the Username needed access the Router s management interface When you attempt to connect to the device through a web browser you will be prompted to enter this Username The default Username for the Router is admin The user cannot change t...

Page 11: ... configured as DHCP clients It is recommended that your collect and record this information here or in some other secure place in case you have to re configure your ADSL connection in the future Once you have the above information you are ready to setup and configure your DSL 2543B ADSL Router Device Installation The DSL 2543B connects two separate physical interfaces an ADSL WAN and an Ethernet L...

Page 12: ...if the ADSL line is connected and the Router is properly configured this should light up after several seconds If this is the first time installing the device some settings may need to be changed before the Router can establish a connection Factory Reset Button The Router may be reset to the original factory default settings by using a ballpoint or paperclip to gently push down the reset button in...

Page 13: ...gher than 10Mbps be sure that the device has auto negotiation NWay enabled for the connecting port Use standard twisted pair cable with RJ 45 connectors The RJ 45 port on the Router is a crossed port MDI X Follow standard Ethernet guidelines when deciding what type of cable to use to make this connection When connecting the Router directly to a PC or server use a normal straight through cable You ...

Page 14: ...et up and configure your new D Link Router using the Web based configuration utility Web based Configuration Utility Connect to the Router To configure the WAN connection used by the Router it is first necessary to communicate with the Router through its management interface which is HTML based and can be accessed using a web browser The easiest way to make sure your computer has the correct IP se...

Page 15: ...and monitor the Router including how to change IP settings and DHCP server setup QUICK SETUP Click the Setup Wizard link in the middle of the top of the window of the Router s opening page to launch a series of setup windows Alternatively you can tick the Manual Setup check box and click the desired setting option radio button in the middle of the window The manual ADSL connection setup is describ...

Page 16: ...UP CHANGE YOUR ROUTER PASSWORD This window of the Setup Wizard is used to change the Router password D Link recommends to help secure your network the user change the Current Password from the factory default admin The New Password should be between 1 and 16 alphanumeric characters Once you have filled out the fields in this window including re typing the new password in the Confirm Password field...

Page 17: ...Quick Setup windows The Connection Type options are 1483 Bridged IP LLC 1483 Bridged IP VC Mux 1483 Routed IP LLC 1483 Routed IP VC Mux PPPoE LLC PPPoE VC Mux PPPoA LLC and PPPoA VC Mux Click the Next button when you are finished to proceed to the next Setup Wizard window QUICK SETUP SELECT THE INTERNET CONNECTION TYPE If the following Setup Wizard window appears please select the connection type ...

Page 18: ...ON If you are instructed to change the VPI or VCI numbers type in the correct setting in the available entry fields The Internet connection cannot function if these values are incorrect Select the specific Connection Type from the drop down menu The available connection and encapsulation types are 1483 Bridged IPLLC and 1483 Bridged IP VC Mux You may want to copy the MAC address of your Ethernet a...

Page 19: ... connection and encapsulation types are 1483 Bridged IP LLC 1483 Bridged IP VC Mux 1483 Routed IP LLC and 1483 Routed IP VC Mux Click Next to go to the last Setup Wizard window QUICK SETUP BRIDGE MODE CONFIGURATION If you are instructed to change the VPI or VCI numbers type in the correct setting in the available entry fields The Internet connection cannot function if these values are incorrect Se...

Page 20: ...click the Restart button to save the new configuration settings and restart the Router If you need to change settings from a previous window click the Back button QUICK SETUP REBOOT CONFIRMATION DIALOG Click the OK button to proceed with the Router reboot QUICK SETUP REBOOT TIME INDICATOR The following window opens to indicate the amount of time it will take to reboot the Router QUICK SETUP REBOOT...

Page 21: ...sed to configure ADSL Setup LAN Setup Time and Date and Parental Control settings directly from the Setup directory To access the ADSL Setup windows for Manual ADSL Connection Setup for PPPoE PPPoA Dynamic IP Address Static IP Address and Bridge Mode click on the ADSL Setup link button on the left side of the first window that appears when you successfully access the web manager The Router also al...

Page 22: ...vailable options are PPPoE LLC PPPoE VC Mux PPPoA LLC and PPPoA VC Mux If you have not been provided specific information for the Connection Type setting leave the default setting 3 Leave the MTU value at the default setting unless you have specific reasons to change this 4 Some users will want to set an Idle Time Out This is an age out value in minutes before the Router times out 5 If you are ins...

Page 23: ...LC and 1483 Bridged IP VC Mux If you have not been provided specific information for the Connection Type setting leave the default setting 2 Some ISPs record the unique MAC Address of your computer s Ethernet adapter when you first access their network This can prevent the Router which has a different MAC address from being allowed access to the ISPs network and the Internet To clone the MAC addre...

Page 24: ...eferred DNS Server and Alternate DNS Server information manually 2 Choose the Connection Type from the drop down menu This defines both the connection protocol and encapsulation method used for your ADSL service The available options are 1483 Bridged IP LLC 1483 Bridged IP VC Mux 1483 Routed IP LLC and 1483 Routed IP VC Mux If you have not been provided specific information for this setting leave ...

Page 25: ... connection follow these steps 1 Choose the Connection Type from the drop down menu This defines both the connection protocol and encapsulation method used for your ADSL service The available options are 1483 Bridged IP LLC and 1483 Bridged IP VC Mux If you have not been provided specific information for this setting leave the default setting 2 If you are instructed to change the VPI or VCI values...

Page 26: ... Address or Subnet Mask type in the desired values in the Router Settings section and click the Apply Settings button Your web browser should automatically be redirected to the new IP address You will be asked to login again to the Router s web manager The DHCP server is enabled by default for the Router s Ethernet LAN interface DHCP service will supply IP settings to workstations configured to au...

Page 27: ...th the highest IP address number in the pool Type in the DHCP Lease Time in the entry field provided This is the amount of time in hours that a workstation is allowed to reserve an IP address in the pool if the workstation is disconnected from the network or powered off Disable the DHCP Server To disable DHCP deselect the Enable DHCP Server check box in the DHCP Server Settings Optional section an...

Page 28: ...ton or set the time and date manually deselect the Automatically synchronize with Internet time servers check box and make the desired changes If you opt to use NTP you must use the drop down menu to select the NTP server URL in the First NTP Time Server field You may also want to choose a Second NTP Time Server using the drop down menu The Router also allows you to set the time zone you are in by...

Page 29: ... or Select Day s in which case you must tick the checkboxes for the desired individual days of the week select the desired Start Time and End Time or tick the All Day 24 hrs checkbox and then click the Block Website button Configured URL blocking entries are displayed in the table in the middle of the window To remove a Blocked URL entry in the table tick the Remove check box and then click the Re...

Page 30: ...services Click the Pre defined rule radio button to select an existing rule or click Custom rule to set up a rule as follows Enter a rule name in the Custom rule filed enter an IP address in the Private IP field select a Protocol Type from the drop down menu enter a range of ports in the Public Start Port and Public End Port fields and then click the Add Apply Settings button to see the customized...

Page 31: ...w connections back to the application on the LAN side using the Open Ports Applications such as games video conferencing and other remote access applications require that specific ports in the Router s firewall be opened for access by applications You can configure the port settings on this window by clicking the Select an application radio button and then using the drop down menu to choose an exi...

Page 32: ...VoIP where it may help prevent dropped calls Large amounts of non critical data can be scaled so as not to affect these prioritized sensitive real time programs The Router allows you to either tick the Auto Detection check box to automatically detect real time streaming to prioritize entire packets default or to manually configure IP QoS based on ToS Application and User Define classifications D L...

Page 33: ...ueues Input a Weight in percentage and a Range from 0 to 7 Tick the Enable check box for each queue configured Some experimentation may be necessary to achieve the optimum results with your particular ISP s connection When you are finished click Apply Settings and then click the Reboot button to let your new settings take effect Selecting Application in the Classify drop down menu will display the...

Page 34: ...y queue and then selecting the associated Application Type Tick the Enable check box for each queue configured Some experimentation may be necessary to achieve the optimum results with your particular ISP s connection When you are finished click Apply Settings and then click the Reboot button to let your new settings take effect Selecting User Define in the Classify drop down menu will display the...

Page 35: ... for the Router to match when examining packets crossing the specified priority queue It is recommended that you not enter a QoS scheme of this type unless you fully understand Offsets pointers masks and IP headers or you are instructed to do so by your ISP When you are finished click Apply Settings and then click the Reboot button to let your new settings take effect Here s an example of some typ...

Page 36: ...ter Protocol Select the transport protocol TCP UDP ICMP TCP UD or Any that will be used for the filter rule Source IP Address Source Subnet Mask For an Outbound Filter this is the IP address or IP addresses and their associated subnets on your LAN for which you are creating the filter rule For an Inbound Filter this is the IP address or IP addresses and their associated subnets for which you are c...

Page 37: ... Address Source Subnet Mask For an Outbound Filter this is the IP address or IP addresses and their associated subnets on your LAN for which you are creating the filter rule For an Inbound Filter this is the IP address or IP addresses and their associated subnets for which you are creating the filter rule Source Port The Source Port is the TCP UDP port on either the LAN or WAN depending on if you ...

Page 38: ... discovery DNS instructs the Router to automatically obtain the DNS IP address from the ISP through DHCP If your WAN connection uses a Static IP address auto discovery for DNS cannot be used If you have DNS IP addresses provided by your ISP click the Use the following DNS server addresses radio button and enter these IP addresses in the available entry fields for the Preferred DNS Server and the A...

Page 39: ...ss changes DDNS requires that an account be setup with one of the supported DDNS providers Tick the Enable Dynamic DNS check box enter the required DDNS information click the Apply Settings button and then click the Reboot button on the left panel to let your changes take effect to set this information in the Router Note DDNS requires that an account be setup with one of the supported DDNS servers...

Page 40: ... IP address of this PC or server will then be the DMZ IP address You can designate the server s IP address as the DMZ by going to the DMZ Settings section and typing in the IP address in the IP Address field provided and then enabling its status by ticking the Enable DMZ checkbox clicking Apply Settings and then clicking the Reboot button on the left panel to let your changes take effect For the s...

Page 41: ...Settings Click the Reboot button on the left panel to let your changes take effect Advanced ADSL To access the Advanced ADSL window click the Advanced ADSL button in the Advanced directory This window allows the user to set the configuration for ADSL protocols For most ADSL accounts the default settings Autosense will work This configuration works with all ADSL implementations If you have been giv...

Page 42: ... tick the Enable UPnP check box select the connection or connections on which you will enable UPnP listed under Available Connections and click the Apply Settings button Click the Reboot button on the left panel to let your changes take effect When Enable Multicast Streams IGMP is ticked Multicast packets are allowed to pass in both directions on the WAN interface Most users will want to leave thi...

Page 43: ...utton in the Advanced directory Simple Network Management Protocol is a standard for internetwork and intranetwork management Tick the SNMP Agent check box and configure the parameters for SNMP on this window and then click the Apply Settings button Click the Reboot button on the left panel to let your changes take effect ...

Page 44: ...ss of the remote system used for management enter optional identifying information in the Details field if desired and click the Add Apply button Once the IP address appears in the bottom half of this section click the Reboot button on the left panel to let your changes take effect Use the Access Control section in the middle of the window to restrict a service from being accessed via the WAN inte...

Page 45: ... Maintenance directory To change the Administrator s password type the Current Password in the first field the New Password in the second field and enter the password again in the Confirm Password field to be certain you have typed it correctly Click the Apply Settings button and then click the Reboot button on the left panel to let your changes take effect The system User Name remains admin this ...

Page 46: ... The file type is bin and may be named anything you wish To load a previously saved configuration file click the Browse button and locate the file on your computer Click the Upload Settings button to load the settings from your local hard drive Confirm that you want to load the file when prompted The Router will reboot and begin operating with the configuration settings that have just been loaded ...

Page 47: ...type in the name and path of the file or click on the Browse button to search for the file Click the Update Firmware button to begin copying the file The file will load and restart the Router automatically To save your current configuration file to your computer click the Backup Now button A File Download dialog box will open Click the Save button and then designate the location for the configurat...

Page 48: ...ance directory This window is used to test connectivity of the Router A Ping test may be done through the local or external interface to test connectivity to known IP addresses The diagnostics feature executes a series of tests of your system software and hardware connections Use this window when working with your ISP to troubleshoot problems ...

Page 49: ...l Error Warning Notice Informational and Debugging Use the Mode drop down menu to select Local Remote or Both Click the Apply Settings button and then click the Reboot button on the left panel to allow your new settings to take effect The bottom half of this window allows you to configure the Router to e mail the system log to a specific e mail address To use this feature you will need to contact ...

Page 50: ...t information about the LAN and WAN interfaces and device information including Firmware Version and MAC address Status Use the various read only windows to view system information and monitor performance Device Info To access the Device Info window click the Device Info button in the Status directory ...

Page 51: ...543B User Manual 51 Connected Clients To access the Connected Clients window click the Connected Clients button in the Status directory The Connected LAN Clients list displays active DHCP clients when the router is acting as a DHCP server ...

Page 52: ... User Manual 52 Statistics To access the Statistics window click the Statistics button in the Status directory Use this window to monitor traffic on the Ethernet or ADSL connection This window also displays information concerning ADSL status ...

Page 53: ... To access the Routing Info window click the Routing Info button in the Status directory This window is used to direct forwarding by matching destination addresses to the network paths used to reach them Click the Refresh button to refresh the Routing Table information ...

Page 54: ...Section 3 Configuration D Link DSL 2543B User Manual 54 Help To access the Help window click the Help directory ...

Page 55: ... set the password back to admin Note Please refer to the next section Networking Basics to check your PC s IP configuration if you can t see the login windows 2 How do I reset my Router to the factory default settings Ensure the Router is powered on Press and hold the reset button on the back of the device for approximately 5 to 8 seconds This process should take around 1 to 2 minutes Note Resetti...

Page 56: ...e and password are correct 5 What can I do if my Router can t be detected by running the installation CD Ensure the Router is powered on Check that all the cables are firmly connected at both ends and all LEDs work correctly Ensure only one network interface card on your PC is activated Click on Start Control Panel Security Center to disable the firewall Note There is a potential security issue if...

Page 57: ...n In the run box type cmd and click on the OK At the prompt type ipconfig and press Enter This will display the IP address subnet mask and the default gateway of your adapter If the address is 0 0 0 0 check your adapter installation security settings and the settings on your router Some firewall software programs may block a DHCP request on newly installed adapters If you are connecting to a wirel...

Page 58: ...Highlight Internet Protocol TCP IP and click on the Properties Step 4 Click on the Use the following IP address and enter an IP address that is on the same subnet as your network or the LAN IP address on your router Example If the router s LAN IP address is 192 168 1 1 make your IP address 192 168 1 X where X is a number between 2 and 99 Make sure that the number you choose is not in use on the ne...

Page 59: ...e LAN interface four RJ 45 ports for 10 100BASE T Ethernet connection ADSL Standards ANSI T1 413 Issue 2 ITU G 992 1 G dmt Annex B ITU G 992 2 G lite Annex B ITU G 994 1 G hs ADSL2 Standards ITU G 992 3 G dmt bis Annex B ADSL2 Standards ITU G 992 5 Annex B Protocols IEEE 802 1d Spanning Tree TCP UDP ARP RARP ICMP RFC1058 RIP v1 RFC1213 SNMP v1 v2c RFC1334 PAP RFC1389 RIP v2 RFC1577 Classical IP ov...

Reviews: