H
ARDWARE
I
NSTALLATION
This chapter provides step-by-step instructions on how to install the
DMC-1002 into the DMC-1000 chassis.
Step 1:
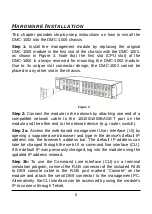
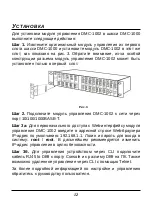
Install the management module by replacing the original
DMC-1000 module in the first slot of the chassis with the DMC-1002,
as shown in Figure 3. Note that the first slot (CPU slot) of the
DMC-1000 is always reserved for mounting the DMC-1002 module.
Due to its unique slot connector design, the DMC-1002 cannot be
placed in any other slot in the chassis.
Figure 3
Step 2:
Connect the module to the network by attaching one end of a
compatible network cable to the 10/100/1000BASE-T port on the
module and the other end to the network device (e.g. router, switch).
Step 3a:
Access the web-based management User Interface (UI) by
opening a supported web browser and type in the device's default IP
address into the browser's address bar. The default IP address can
later be changed through the web UI or command line interface (CLI).
If the default IP was previously changed, log into the module using the
updated IP address instead.
Step 3b:
To use the Command Line Interface (CLI) on a terminal
simulation program, connect the RJ45 connector of the included RJ45
to DB9 console cable to the RJ45 port marked "Console" on the
module and attach the serial DB9 connector to the management PC.
Alternatively, the CLI interface can be accessed by using the module's
IP to connect through Telnet.
5

