background image

68

D-Link DIR-605 User Manual

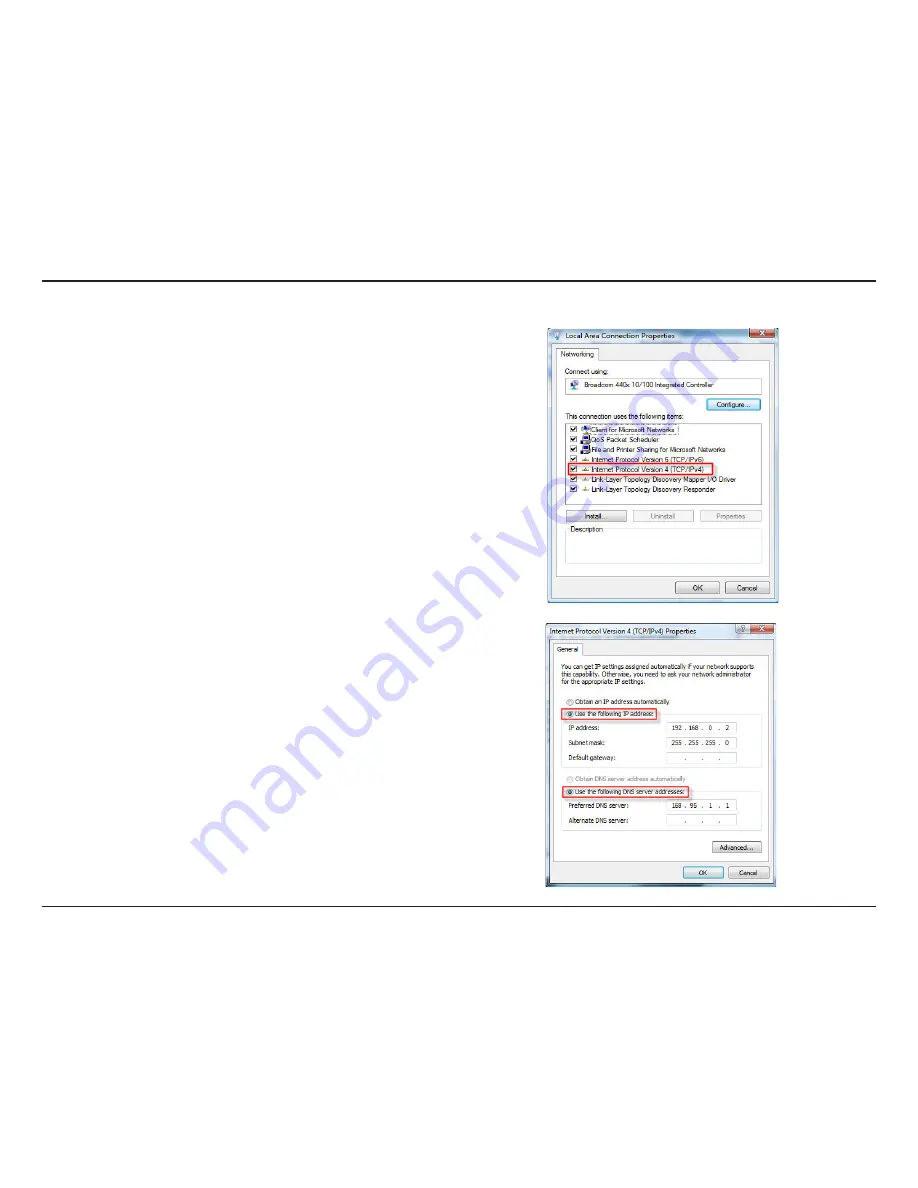
Section 8 - Configuring the IP Address in Vista

4.

 Tick  the 

Internet  Protocol  Version  4  (TCP/IPv4)

  checkbox  in 

the 

Networking 

tab  in  the 

Local  Area  Connection  Properties


window.  

5.

 Click the “Use the following IP address” option in the 

General


tab in the 

Local Area Connections Properties

 window and 

enter the desired IP address in the space offered. Then click 

the “Use the following DNS server adresses” option on the 

same tab and enter the desired DNS server information. 

Summary of Contents for DIR-605

Page 1: ......

Page 2: ...et Setup 18 Static assigned by ISP 18 Dynamic Cable 19 PPPoE DSL 20 PPTP 21 L2TP 22 Dual Access for Russia only 23 Wireless Setup 24 LAN Setup 30 DHCP Server Settings 31 Time and Date 32 Parental Cont...

Page 3: ...Wi Fi Protection 63 Setting Up a Configured Router 64 Changing the Computer Name and Joining a Workgroup 65 Configuring the IP Address in Vista 67 Setting Up a Connection or Network Wirelessly 70 Con...

Page 4: ...ating systems with an installed Ethernet adapter Internet Explorer Version 6 0 or Netscape Navigator Version 6 0 and above for configuration Package Contents Note Using a power supply with a different...

Page 5: ...filters can be scheduled to be active on certain days or for a duration of hours or minutes Secure Multiple Concurrent Sessions The DIR 605 can pass through VPN sessions It supports multiple and conc...

Page 6: ...s Pressing the Reset Button restores the router to its original factory default settings Receptor for the Power Adapter The Auto MDI MDIX WAN port is the connection for the Ethernet cable to the Cable...

Page 7: ...ring data transmission WLAN LED A solid light indicates that the wireless segment is ready This LED blinks during wireless data transmission Local Network LEDs A solid light indicates a connection to...

Page 8: ...SB cable and connect an Ethernet cable to the WAN port on the router and then turn the modem back on In some cases you may need to call your ISP to change connection types USB to Ethernet If you have...

Page 9: ...t is 1 5 feet thick 5 meters at a 45 degree angle appears to be almost 3 feet 1 meter thick At a 2 degree angle it looks over 42 feet 14 meters thick Position devices so that the signal will travel st...

Page 10: ...the router 4 Plug an Ethernet cable into one of the four LAN ports on the router Plug the other end into the Ethernet port on your computer 5 Turn on or plug in your modem Wait for the modem to boot a...

Page 11: ...write down your existing settings before making any changes In most cases your computer should be set to receive an IP address automatically in which case you will not have to do anything to your comp...

Page 12: ...and connect it to your other router Do not plug anything into the WAN port of the D Link router 8 You may now use the other three LAN ports to connect other Ethernet devices and computers To configur...

Page 13: ...nfiguration utility Web based Configuration Utility To access the configuration utility open a web browser such as Internet Explorer and enter the IP address of the router 192 168 0 1 Enter the user n...

Page 14: ...ou may run the setup wizard from the opening Internet Setup window to quickly set up your router Click Internet Connection Setup Wizard you will be directed to the first window of the wizard Click Nex...

Page 15: ...click Next to continue If you selected Dynamic you may need to enter the MAC address of the computer that was last connected directly to your modem If you are currently using that computer click Clone...

Page 16: ...signed you the IP address subnet mask gateway and DNS server addresses Note Make sure to remove your PPPoE software from your computer The software is no longer needed and will not work through a rout...

Page 17: ...gs supplied by your Internet provider Click Next to continue Click Connect to save your settings If you selected Big Pond enter your Big Pond username and password Click Next to continue Please allow...

Page 18: ...er It is not recommended that you change the default MAC address unless required by your ISP Enter the Primary DNS server IP address assigned by your ISP This is optional Maximum Transmission Unit you...

Page 19: ...e WAN s physical interface MAC address on the Broadband Router You can use the Clone MAC Address button to copy the MAC address of the Ethernet Card installed by your ISP and replace the WAN MAC addre...

Page 20: ...maintained during inactivity To disable this feature enable Auto reconnect Maximum Transmission Unit You may need to change the MTU for optimal performance with your specific ISP 1492 is the default M...

Page 21: ...r your PPTP account name Enter your PPTP password and then retype the password in the next box Enter a maximum idle time during which the Internet connection is maintained during inactivity To disable...

Page 22: ...2TP account name Enter your L2TP password and then retype the password in the next box Enter a maximum idle time during which the Internet connection is maintained during inactivity To disable this fe...

Page 23: ...a PPPoE connection as previously described for PPPoE connections and add the physical WAN IP settings as instructed from the ISP Second configure a PPTP connection as previously described for PPTP con...

Page 24: ...gure the wireless settings manually click the Manual Wireless Connection Setup button The parameters for this window are described later in this section The Wireless Security section that directly fol...

Page 25: ...nter a Wireless Security Password in the textbox and then click Next to continue This window displays a summary of your wireless security settings Please print this out or record this information in a...

Page 26: ...setting for an existing wireless network or to customize the wireless network The Auto Channel Selection setting can be selected to allow the DIR 605 to choose the channel with the least amount of int...

Page 27: ...er this key exactly on all your wireless devices You may enter up to four different keys either using Hex or ASCII Hex is recommended letters A F and numbers 0 9 are valid In ASCII all numbers and let...

Page 28: ...t w o r k K e y e n t e r a passphrase The key is an alpha numeric password between 8 and 63 characters long The password can include symbols _ and spaces Make sure you enter this key exactly the sam...

Page 29: ...A2 Wireless Security enhanced 2 Next to Cipher Type select TKIP AES or Auto 3 Next to PSK EAP select EAP 4 Next to RADIUS Server 1 enter the IP Address of your RADIUS server 5 Next to Port enter the p...

Page 30: ...nce you click Apply you will need to enter the new IP address in your browser to get back into the configuration utility Enter the Subnet Mask The default subnet mask is 255 255 255 0 Enter the Domain...

Page 31: ...Dynamic Host Control Protocol The DIR 605 has a built in DHCP server The DHCP Server will automatically assign an IP address to the computers on the LAN private network Be sure to set your computers...

Page 32: ...your computer s time settings to copy your PC s time settings Tick the Automatically synchronize with D Link s Internet time server checkbox and then use the drop down menu to select an NTP Server NTP...

Page 33: ...ese sites or Turn Parental Control ON and DENY computers access to ONLY these sites Enter the keywords or URLs that you want to block or allow Any URL with the keyword in it will be blocked The schedu...

Page 34: ...box to enabled the rule Enter a name for the rule Enter the IP address of the computer on your local network that you want to allow the incoming service to Enter the port or ports that you want to op...

Page 35: ...plications makes some of these applications work with the DIR 605 Check the box to enable the rule Enter a name for the rule This is the port used to trigger the application It can be either a single...

Page 36: ...p down menu and click the arrow to copy that MAC Address The schedule of time when the network filter will be enabled The schedule may be set to Always which will allow the particular service to alway...

Page 37: ...at will be used for the filter rule Enter the desired port range for the filter rule Enable DMZ Host DMZ IP Address Name Action Source Dest Schedule IP Address Protocol Port Range Firewall DMZ This se...

Page 38: ...data Enabling CTS will add overhead and may lower wireless through put None CTS is typically used in a pure 802 11g environment If CTS is set to None in a mixed mode environment populated by 802 11b c...

Page 39: ...g may provide some extra security from hackers Tick this checkbox to allow the WAN port to be Pinged You may set the port speed of the WAN port to 10Mbps 100Mbps or 10 100Mbps Auto Some older cable or...

Page 40: ...his feature enables you to perform Administrator tasks from the remote Internet host The Internet IP address of the computer that has access to the Broadband Router If you input an asterisk into this...

Page 41: ...sfer those settings to the Router This option will restore all configuration settings back to the settings that were in effect at the time the router was shipped from the factory Any settings that hav...

Page 42: ...dow to locate the firmware update on your hard drive Click Save Settings to complete the firmware upgrade Firmware Upgrade Browse You can upgrade the firmware of the Router here Make sure the firmware...

Page 43: ...upports DDNS Dynamic Domain Name Service The Dynamic DNS service allows a dynamic public IP address to be associated with a static host name in any of the many domains allowing access to a specified h...

Page 44: ...waps and impedance mismatch This feature significantly reduces service calls and returns by allowing users to easily troubleshoot their cable connections The Ping Test is used to send Ping packets to...

Page 45: ...schedule rule applies to the full 24 hour period If the new schedule rule does not apply to the full 24 hour period untick the previous checkbox and then enter a specific beginning and ending time Na...

Page 46: ...Activity Debug Information Attacks Dropped Packets and Notice Enter the your SNTP server name or IP address and enter your mail address before sending your system log by mail Save Log File Log Type Se...

Page 47: ...connect from your ISP and use DHCP Renew to connect to your ISP If your WAN connection is set up for PPPoE a Connect button and a Disconnect button will be displayed Use Disconnect to drop the PPPoE c...

Page 48: ...the first page of the log View the last page of the log View the previous page View the next page Clear the log Click this button to go directly to the Log Settings window Maintenance Log Settings Thi...

Page 49: ...ays the Traffic Statistics Here you can view the amount of packets that pass through the DIR 605 on both the WAN and the LAN ports The traffic counter will reset if the device is rebooted The NAPT Act...

Page 50: ...User Manual Section 3 Configuration Wireless The wireless client table displays a list of current connected wireless clients This table also displays the connection time and MAC address of the connect...

Page 51: ...51 D Link DIR 605 User Manual Section 3 Configuration Help Click the desired hyperlink to get more information about how to use the Router...

Page 52: ...less network so that it is protected as it is transmitted from one wireless device to another To gain access to a WEP network you must know the key The key is a string of characters that you create Wh...

Page 53: ...o Authentication select either Shared Key or Open Shared Key is recommended as it provides greater security when WEP is enabled 4 Select either 64Bit or 128Bit encryption from the drop down menu next...

Page 54: ...uthentication protocol EAP WEP regulates access to a wireless network based on a computer s hardware specific MAC address which is relatively simple to be sniffed out and stolen EAP is built on a more...

Page 55: ...left side 2 Next to Security Mode select Enable WPA Only Wireless Security enhanced or Enable WPA2 Only Wireless Security enhanced 3 Next to Cipher Mode select TKIP AES or Both 4 Next to PSK EAP selec...

Page 56: ...Wireless Setup on the left side 2 Next to Security Mode select Enable WPA WPA2 Wireless Security enhanced 3 Next to Cipher Mode select TKIP AES or Both 4 Next to PSK EAP select PSK 5 Next to Network...

Page 57: ...router 192 168 0 1 Click on Wireless Settings on the left side 2 Next to Security Mode select Enable WPA Only Wireless Security enhanced Enable WPA2 Only Wireless Security enhanced or Enable WPA WPA2...

Page 58: ...a site survey option similar to the Windows XP utility as seen below Right click on the wireless computer icon in your system tray lower right corner next to the time Select View Available Wireless N...

Page 59: ...uring your wireless adapter If you are joining an existing network you will need to know the WEP key being used 2 Highlight the wireless network SSID you would like to connect to and click Connect 1 O...

Page 60: ...work Connection box will appear Enter the same WEP key that is on your router and click Connect It may take 20 30 seconds to connect to the wireless network If the connection fails please verify that...

Page 61: ...iguring your wireless adapter If you are joining an existing network you will need to know the WEP key being used 2 Highlight the wireless network SSID you would like to connect to and click Connect 1...

Page 62: ...twork Connection box will appear Enter the WPA PSK passphrase and click Connect It may take 20 30 seconds to connect to the wireless network If the connection fails please verify that the WPA PSK sett...

Page 63: ...enjoy the benefits of Wi Fi protection the Router must be both enabled and configured There are three basic methods to accomplish this use Windows Vista s built in support for WCN 2 0 use software pr...

Page 64: ...thod is ideal if there is no access to a GUI If you are using the Router s Wi Fi Security push button option simultaneously depress the push button located on the side of the Router and the button on...

Page 65: ...he Computer Name and Joining a Workgroup Changing the Computer Name and Joining a Workgroup The following are step by step directions to change the computer name and join a workgroup 2 Click on the Ad...

Page 66: ...mputer Name tab in the System Properties window and enter a description of your computer in the textbox When you are finished click the Change button 4 Go to the Computer Name Domain Changes window an...

Page 67: ...Vista The following are step by step directions to configure the IP address in Windows Vista 2 Go to the Network and Internet window and click the appropriate Local Area Connection icon 1 Click on Pr...

Page 68: ...king tab in the Local Area Connection Properties window 5 Click the Use the following IP address option in the General tab in the Local Area Connections Properties window and enter the desired IP addr...

Page 69: ...Right click the Local Area Connection icon and then select Status from the drop down menu 7 Go to the Local Area Connection Status window and click the Details button 8 Confirm your new settings on th...

Page 70: ...are step by step directions to set up a wireless connection 2 Go to the Set up a connection or network window and choose the Set up a wireless router or access point Set up a new wireless network for...

Page 71: ...ction Wirelessly 3 Click the Next button on the Set up a wireless router or access point window 4 The following window displays the system progress 5 This window confirms that you want to create wirel...

Page 72: ...wizard Click the Next button 7 Enter a passphrase on the Help make your network more secure with a passphrase window in the Set up a wireless router or access point wizard Click the Show advanced net...

Page 73: ...button 10 Select the desired file and printer sharing option on the Choose file and printer sharing options window in the Set up a wireless router or access point wizard Click the Next button 11 Once...

Page 74: ...Copying settings to the USB drive window in the Set up a wireless router or access point wizard opens to indicate the system progress 13 Once you are finished the To add a device or computer follow t...

Page 75: ...Network WEP WPA PSK WPA2 PSK Connecting to a Secured Wireless Network WEP WPA PSK WPA2 PSK The following are step by step directions to set up a wireless connection 2 Click the Manage network connect...

Page 76: ...k to connect to in the Select a network to connect to window in the Connect to a network wizard and then click the Connect button 5 The following Connect to a network wizard window displays the system...

Page 77: ...o the network and or start the new connection automatically When you are finished click the Close button 8 The successful connection is displayed at the bottom of the Windows start up menu 6 Enter the...

Page 78: ...10 Connecting to a Secured Wireless Network WEP WPA PSK WPA2 PSK 10 To test the new IP address use the Ping feature of the command prompt 9 Confirm your new settings by calling up the command prompt a...

Page 79: ...red Wireless Network Connecting to an Unsecured Wireless Network The following are step by step directions to set up an unsecured wireless connection 2 Go to the Network and Sharing Center window and...

Page 80: ...ork Connection entry and then select Connect Disconnect from the drop down menu 4 Select a network to connect to in the Select a network to connect to window in the Connect to a network wizard and the...

Page 81: ...splays the system progress 7 The following Successfully connected to dlink300 window in the Connect to a network wizard is displayed Choose to save to the network and or start the new connection autom...

Page 82: ...Section 11 Connecting to an Unsecured Wireless Network 9 Confirm your new settings by calling up the command prompt and then entering the ipconfig command 10 To test the new IP address use the Ping f...

Page 83: ...ust be on the same IP subnet to connect to the web based utility Make sure you have an updated Java enabled web browser We recommend the following Internet Explorer 6 0 or higher Netscape 8 or higher...

Page 84: ...is should open the login page for your the web management If you still cannot access the configuration unplug the power to the router for 10 seconds and plug back in Wait about 30 seconds and try acce...

Page 85: ...increments of ten Ex 1492 1482 1472 etc Note AOL DSL users must use MTU of 1400 To find the proper MTU Size you ll have to do a special ping of the destination you re trying to go to A destination cou...

Page 86: ...28 1480 Once you find your MTU you can now configure your router with the proper MTU size To change the MTU rate on your router follow the steps below Open your browser enter the IP address of your r...

Page 87: ...less LANs are used increasingly in both home and office environments and public areas such as airports coffee shops and universities Innovative ways to utilize WLAN technology are helping people to wo...

Page 88: ...ta from one point A to point B But wireless technology has restrictions as to how you can access the network You must be within the wireless network range area to be able to connect your computer Ther...

Page 89: ...nes laptops speakers and other devices that operate on batteries Who uses wireless Wireless technology as become so popular in recent years that almost everyone is using it whether it s for home offic...

Page 90: ...s and tips to help you through the process of setting up a wireless network Tips Here are a few things to keep in mind when you install a wireless network Centralize your router or Access Point Make s...

Page 91: ...r Refer to product manual for detail information on how to set it up There are basically two modes of networking Infrastructure All wireless clients will connect to an access point or wireless router...

Page 92: ...un In the run box type cmd and click OK At the prompt type ipconfig and press Enter This will display the IP address subnet mask and the default gateway of your adapter If the address is 0 0 0 0 check...

Page 93: ...ep 3 Highlight Internet Protocol TCP IP and click Properties Step 4 Click Use the following IP address and enter an IP address that is on the same subnet as your network or the LAN IP address on your...

Page 94: ...64QAM BPSK QPSK with OFDM 802 11 n 16QAM 64QAM BPSK QPSK with OFDM Receiver Sensitivity 802 11n HT20 300Mbps OFDM 10 PER 68dBm HT40 300Mbps OFDM 10 PER 64dBm 802 11b and 802 11g 54Mbps OFDM 10 PER 70...

Page 95: ...ng URL Filtering Domain Blocking Scheduling Operating Temperature 32 F to 129 F 0 C to 40 C Humidity 95 maximum non condensing Maximum wireless signal rate derived from IEEE Standard 802 11b 802 11g a...

Page 96: ...the product e g DIR 605 Hardware Revision located on the label on the bottom of the router e g rev A2 Serial Number s n number located on the label on the bottom of the router You can find software up...

Page 97: ...r this Limited Warranty will be at D Link s option to repair or replace the defective Hardware during the Warranty Period at no charge to the original owner or to refund the actual purchase price paid...

Page 98: ...ee for the non conforming Software will be refunded by D Link provided that the non conforming Software and all copies thereof is first returned to D Link The license granted respecting any Software f...

Page 99: ...return shipping charges for any product that is not packaged and shipped in accordance with the foregoing requirements or that is determined by D Link not to be defective or non conforming What Is Not...

Page 100: ...HE SOLE REMEDY FOR A BREACH OF THE FOREGOING LIMITED WARRANTY IS REPAIR REPLACEMENT OR REFUND OF THE DEFECTIVE OR NONCONFORMING PRODUCT THE MAXIMUM LIABILITY OF D LINK UNDER THIS WARRANTY IS LIMITED T...

Page 101: ...ent or relocate the receiving antenna Increase the separation between the equipment and receiver Connect the equipment into an outlet on a circuit different from that to which the receiver is connecte...

Page 102: ...nk DIR 605 User Manual Appendix F Registration Version 2 0 11 20 2008 Product registration is entirely voluntary and failure to complete or return this form will not diminish your warranty rights Regi...

Reviews: