background image


This manual provides a quick introduction to network technology.  Please 
take a moment to read through this manual and get acquainted with your  
DI-804V.   


Front View 


LED Indicators 

LAN (1-4)  LINK (Green)  Green LED will LIGHT when link is 

established.


Link/Act ACT 

(Green) Green


LED will BLINK when packet is 

transmitting or receiving.


Serial (Green)  Green


LED will LIGHT when a good link is 

established.


WAN (Green)  Green


LED will LIGHT when a good link is 

established.


Status (Yellow)  Yellow


LED will BLINK when started up 

and when firmware is upgraded. 

Power (Red) 

Red


LED will LIGHT when powered ON.


Summary of Contents for DI-804V

Page 1: ...D Link DI 804V Broadband VPN Router Manual Rev 031902 Building Networks for People ...

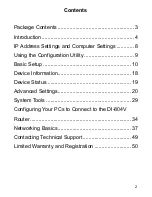
Page 2: ...ettings 8 Using the Configuration Utility 9 Basic Setup 10 Device Information 18 Device Status 19 Advanced Settings 20 System Tools 29 Configuring Your PCs to Connect to the DI 804V Router 34 Networking Basics 37 Contacting Technical Support 49 Limited Warranty and Registration 50 ...

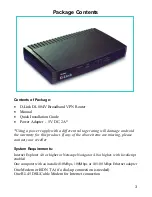
Page 3: ...d void the warranty for this product If any of the above items are missing please contact your reseller System Requirements Internet Explorer 4 0 or higher or Netscape Navigator 4 0 or higher with JavaScript enabled One computer with an installed 10Mbps 100Mbps or 10 100 Mbps Ethernet adapter One Modem or ISDN TA if a dial up connection is needed One RJ 45 DSL Cable Modem for Internet connection ...

Page 4: ...cess the Internet using just one Internet account The DI 804V has 4 LAN ports That means that 4 computers can share the benefits of the DI 804V equipped network For the price of one Internet account the DHCP capable DI 804V will automatically provide unique IP Addresses for all the computers on the network DHCP stands for Dynamic Host Configuration Protocol It is a protocol for assigning IP Addres...

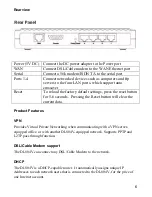
Page 5: ...K Green Green LED will LIGHT when link is established Link Act ACT Green Green LED will BLINK when packet is transmitting or receiving Serial Green Green LED will LIGHT when a good link is established WAN Green Green LED will LIGHT when a good link is established Status Yellow Yellow LED will BLINK when started up and when firmware is upgraded Power Red Red LED will LIGHT when powered ON ...

Page 6: ...ss the reset button for 5 6 seconds Pressing the Reset button will clear the current data Product Features VPN Provides Virtual Private Networking when communicating with a VPN server equipped office or with another DI 804V equipped network Supports PPTP and L2TP pass through function DSL Cable Modem support The DI 804V can connect any DSL Cable Modem to the network DHCP The DI 804V is a DHCP capa...

Page 7: ... CPU Engine With the most advanced 32 bit RISC CPU Engine DI 804V guarantees full compatibility with future DSL Cable technologies IPSec Security DES 3DES MD5 SHA 1 Idle Timer Set a specified idle time before automatically disconnecting Dial on Demand Eliminates the need for Dial up Automatically logs in to your ISP Serial port May connect to a 56k modem or ISDN TA should a Cable DSL connection be...

Page 8: ...like to use PPPoE you will need the following values from your ISP in order to install your router User Name Password The static IP settings for the PC Your PC s fixed IP address Your PC s subnet mask Your PC s default gateway Your PC s primary DNS IP address Note The router s default IP address setting is 192 168 0 1 Dynamic IP Settings The dynamic IP settings for the PC It is recommended that yo...

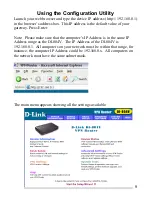
Page 9: ... Press Enter Note Please make sure that the computer s IP Address is in the same IP Address range as the DI 804V The IP Address of the DI 804V is 192 168 0 1 All computers on your network must be within that range for instance the computer IP Address could be 192 168 0 x All computers on the network must have the same subnet mask The main menu appears showing all the settings available ...

Page 10: ...ppear Leave the password box empty and type admin the default username in the username box Click OK The Setup Wizard s page will appear Note If you choose to input a password at any time please remember it If you should lose the password you will need to reset the unit After you reset the DI 804V all your settings will be lost and will need to be re input ...

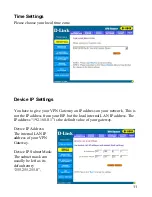
Page 11: ...s on your network This is not the IP address from your ISP but the local internal LAN IP address The IP address 192 168 0 1 is the default value of your gateway Device IP Address The internal LAN IP address of your VPN Gateway Device IP Subnet Mask The subnet mask can usually be left as its default entry 255 255 255 0 ...

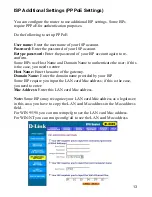
Page 12: ...e it uses If your ISP uses a static IP address it means that the IP address of your router is always the same Most ISPs use dynamic IP addresses They assign you a new IP address every time you connect to the Internet If you have a static IP address do the following Enter the IP address that your ISP provided Enter the IP subnet mask Enter the ISP gateway address Enter the DNS IP address ...

Page 13: ...Domain Name to authenticate the user if this is the case you need to enter Host Name Enter the name of the gateway Domain Name Enter the domain name provided by your ISP Some ISP require you input the LAN card Mac address if this is the case you need to enter Mac Address Enter this LAN card Mac address Note Some ISPs may recognize your LAN card Mac address as a legal user in this case you have to ...

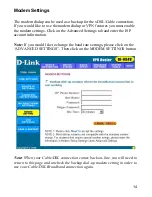
Page 14: ...the Advanced Settings tab and enter the ISP account information Note If you would like to change the baud rate settings please click on the ADVANCED SETTINGS Then click on the MODEM SETTINGS button Note When your Cable DSL connection comes back on line you will need to return to this page and uncheck the backup dial up modem setting in order to use your Cable DSL Broadband connection again ...

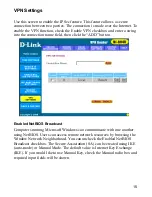
Page 15: ...DD button Enabled NetBIOS Broadcast Computers running Microsoft Windows can communicate with one another using NetBIOS Users can access remote network resources by browsing the Window Network Neighborhood You can uncheck the Enabled NetBIOS Broadcast checkbox The Secure Association SA can be created using IKE auto mode or Manual Mode The default value is Internet Key Exchange IKE If you would like...

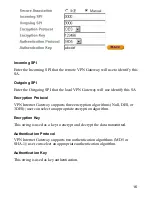
Page 16: ...t Gateway supports three encryption algorithms Null DES or 3DES user can select an appropriate encryption algorithm Encryption Key This string is used as a key to encrypt and decrypt the data transmitted Authentication Protocol VPN Internet Gateway supports two authentication algorithms MD5 or SHA 1 user can select an appropriate authentication algorithm Authentication Key This string is used as k...

Page 17: ...pages please click Save Restart to save the settings and restart the device After the restart the device will function according to the saved settings During the startup process the LED of the device will blink Please wait until the blinking of the device stops before proceeding ...

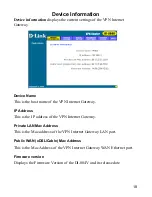
Page 18: ...ternet Gateway IP Address This is the IP address of the VPN Internet Gateway Private LAN Mac Address This is the Mac address of the VPN Internet Gateway LAN port Public WAN xDSL Cable Mac Address This is the Mac Address of the VPN Internet Gateway WAN Ethernet port Firmware version Displays the Firmware Version of the DI 804V and its release date ...

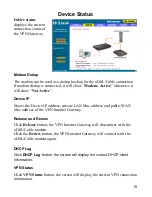
Page 19: ...Device IP address private LAN Mac address and public WAN Mac address of the VPN Internet Gateway Release and Renew Click Release button the VPN Internet Gateway will disconnect with the xDSL Cable modem Click the Renew button the VPN Internet Gateway will connect with the xDSL Cable modem again DHCP Log Click DHCP Log button the screen will display the current DHCP client information VPN Status Cl...

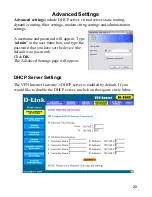
Page 20: ...settings A username and password will appear Type admin in the user name box and type the password that you have set the device the default is no password Click OK The Advanced Settings page will appear DHCP Server Settings The VPN Internet Gateway s DHCP server is enabled by default If you would like to disable the DHCP server unclick on the square circle below ...

Page 21: ... is turned on Virtual Server Settings Virtual server settings allow clients on the Internet to access your LAN via the Internet You can use the IP mapping function to access an FTP server or Telnet server etc remotely through Internet DMZ function can be applied to a single client behind the VPN Gateway to expose it to the Internet and ensure complete Internet application compatibility even if spe...

Page 22: ... The destination IP is the address of the remote network to which you want to assign a static route Subnet Mask The subnet mask of your network IP address Gateway IP Address The IP address of the interface used to link to the remote network Dynamic Routing Dynamic Routing Settings allow the VPN Internet Gateway to route IP packets to another network automatically The RIP protocol is applied and br...

Page 23: ... whether local user has the permission to access Internet To activate this feature check LAN Side Filter Enabled Then you can define the filtering policy by entering an IP address range network port number and select the protocol s For example to prevent the local user of IP address range from 101 to 200 to access port 80 HTTP the settings are as follows LAN Side Filter Enabled Enabled Default LAN...

Page 24: ...Then you can define the filtering policy by entering IP address range the port range and select the protocol s For example to prevent the remote user of IP address range 211 21 0 1 to 211 29 0 1 to access virtual WEB server port 80 the setting are as follows WAN Side Filter Enabled Enabled Default WAN Side Filter Pass Filter Block Protocol TCP IP Address Range 211 21 0 1 to 211 29 0 1 Destination ...

Page 25: ...a new password This password will be required the next time you configure your VPN Gateway To enter a password type your password in the new password field and type it again in the retype password field Note it is important to remember your password If for any reason you lose or forget your password press the small reset button located on the back of the device for 5 to 6 seconds Reset action will...

Page 26: ...dministration host is 0 0 0 0 IP address of 0 0 0 0 means that any PC on the network can remote access and manage the VPN Internet Gateway If you use this function you have to enable the feature Allow remote user to configure the device first Once you have enabled this function type the VPN Internet Gateway WAN IP address http 192 168 100 1 1023 into the browser of any or specific PC on the networ...

Page 27: ...Gateway LAN IP address with port number http 192 168 0 1 1023 System Parameters System Parameters allows user to setup the MTU value Maximum Transmission Unit The default MTU value is 1500 Bytes User can setup a proper MTU for your network device For some areas the ISPs set the limit packet size for PPPoE connection User has to change MTU setting for surfing the net ...

Page 28: ...s and restart the device If you would like to configure the setting again you can browse those functions then click them After the restart the device will function according to the saved settings Save Restart lets you save the input settings to the VPN Internet Gateway so as to be retrieved at a later time and then restart it ...

Page 29: ...Gateway Intruder Detection Log The event messages show the possible hacker attacks that have occurred on your VPN Gateway Up to 32 hacker attacks may be logged in this manner Display Routing Table The Display Routing Table shows the current static routing configuration ...

Page 30: ...30 System Diagnostics System diagnostics shows your VPN Gateway s information It will perform a check up on your VPN Gateway to make sure that everything is functioning properly ...

Page 31: ...ave Settings This allows you to save the configuration to a file If you would like to do this click Save File to save your current settings to a file Then click save this file to disk in the browsing wizard ...

Page 32: ...Load Settings Load Default Settings This allows you to load the original default settings of your VPN Internet Gateway Load Settings Load Settings From File This allows you to load the settings from a file ...

Page 33: ... Upgrade Firmware The upgrade firmware option allows you to upgrade the latest firmware to your VPN Internet Gateway Reset Device Resetting the device will restart it Click on the START button to restart ...

Page 34: ... configure your PC to request an IP address from the gateway Click the Start button select Settings select Control Panel Double click the Network icon In the configuration tab select the TCP IP protocol line that has been associated with your network card adapter If there is no TCP IP line listed you will need to install TCP IP now ...

Page 35: ...out a computer s IP configuration MAC address and default gateway WINIPCFG for Windows 95 98 Inside the windows 95 98 Start button select Run and type winipcfg In the example below this computer has an IP address of 192 168 0 100 and the default gateway is 192 168 0 1 The default gateway should be the network device IP address The MAC address in windows 95 98 is called the Adapter Address NOTE You...

Page 36: ...36 IPCONFIG for Windows 2000 NT XP In the DOS command prompt type IPCONFIG and press Enter Your PC IP information will be displayed as shown below ...

Page 37: ...or work using Microsoft Windows XP Note Please refer to websites such as http www homenethelp com and http www microsoft com windows2000 for information about networking computers using Windows 2000 ME or 98 Go to START CONTROL PANEL NETWORK CONNECTIONS Select Set up a home or small office network When this screen appears Click Next ...

Page 38: ...the instructions in this window Click Next In the following window select the best description of your computer If your computer connects to the Internet through a gateway router select the second option as shown Click Next ...

Page 39: ...39 Enter a Computer description and a Computer name optional Click Next Enter a Workgroup name All computers on your network should have the same Workgroup name Click Next ...

Page 40: ...40 Please wait while the wizard applies the changes When the changes are complete Click Next Please wait while the wizard configures the computer This may take a few minutes ...

Page 41: ...on In this example Create a Network Setup Disk has been selected You will run this disk on each of the computers on your network Click Next Insert a disk into the Floppy Disk Drive in this case drive A Format the disk if you wish and Click Next ...

Page 42: ...es Please read the information under Here s how in the screen below After you complete the Network Setup Wizard you will use the Network Setup Disk to run the Network Setup Wizard once on each of the computers on your network To continue Click Next ...

Page 43: ...ll take effect when you restart the computer Click Yes to restart the computer You have completed configuring this computer Next you will need to run the Network Setup Disk on all the other computers on your network After running the Network Setup Disk on all your computers your new wireless network will be ready to use ...

Page 44: ...these directions In Windows XP Click START in the lower left corner of the screen Right click on My Computer Select Properties Select the Computer Name Tab in the System Properties window You may enter a Computer description if you wish this field is optional To rename the computer and join a domain Click Change ...

Page 45: ...45 In this window enter the Computer name Select Workgroup and enter the name of the Workgroup All computers on your network must have the same Workgroup name Click OK ...

Page 46: ...ng DHCP Dynamic Host Configuration Protocol technology If you are using a DHCP capable Gateway Router you will not need to assign Static IP Addresses If you are not using a DHCP capable Gateway Router or you need to assign a Static IP Address please follow these instructions Go to START Double click on Control Panel Double click on Network Connections ...

Page 47: ...47 Right click on Local Area Connections Double click Properties Highlight Internet Protocol TCP IP Click Properties ...

Page 48: ... 168 0 2 the other computers should have IP Addresses that are sequential like 192 168 0 3 and 192 168 0 4 The subnet mask must be the same for all the computers on the network Input your DNS server addresses The DNS server information will be provided by your ISP Internet Service Provider Click OK You have completed the assignment of a Static IP Address You do not need to assign a Static IP Addre...

Page 49: ... period on this product U S customers can contact D Link technical support through our web site or by phone D Link Technical Support over the Telephone 800 758 5489 24 hours a day seven days a week D Link Technical Support over the Internet http support dlink com When contacting technical support please provide the following information Serial number of the unit Model number or product name Softwa...

Page 50: ...ted Software Warranty D Link warrants that the software portion of the product Software will substantially conform to D Link s then current functional specifications for the Software as set forth in the applicable documentation from the date of original delivery of the Software for a period of ninety 90 days Warranty Period if the Software is properly installed on approved hardware and operated as...

Page 51: ...RED UNDER THE LIMITED WARRANTY PROVIDED HEREIN THE ENTIRE RISK AS TO THE QUALITY SELECTION AND PERFORMANCE OF THE PRODUCT IS WITH THE PURCHASER OF THE PRODUCT Limitation of Liability TO THE MAXIMUM EXTENT PERMITTED BY LAW D LINK IS NOT LIABLE UNDER ANY CONTRACT NEGLIGENCE STRICT LIABILITY OR OTHER LEGAL OR EQUITABLE THEORY FOR ANY LOSS OF USE OF THE PRODUCT INCONVENIENCE OR DAMAGES OF ANY CHARACTE...

Page 52: ... or more of the following measures Reorient or relocate the receiving antenna Increase the separation between the equipment and receiver Connect the equipment into an outlet on a circuit different from that to which the receiver is connected Consult the dealer or an experienced radio TV technician for help Register Your D Link Product Online at http www dlink com sales reg ...

Reviews: