background image

3

Restart Your Computer

Connecting Additional Computers  

To The DI-634M 

When you have completed the steps in this 

Quick Installation Guide,

 your connected 

network should look similar to this:

Using additional Ethernet (CAT5 UTP) cables, connect your Ethernet-equipped computers 

to the remaining Ethernet LAN ports on the back panel of the DI-634M.

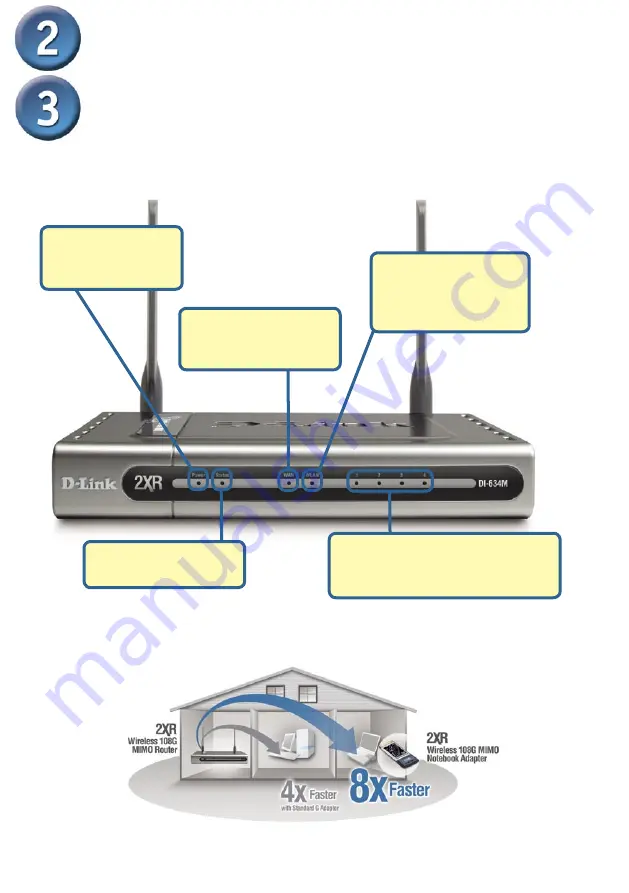
LOCAL NETWORK LEDs

 – a solid light 

on the port indicates a connection to an 

Ethernet enabled computer on ports 1-4.  
This LED blinks during data transmission.

Power LED 

– a solid 

light indicates a proper 

connection to the power 

supply.

WLAN LED 

– a solid light 

indicates that the wireless 

segment is ready.  This LED 

blinks during wireless data 

transmission.

Status LED 

– a blinking light 

indicates that the DI-624 is 

functioning properly. 

WAN LED 

– a solid light 

indicates connection on the 

WAN port.  This LED blinks 

during data transmission. 

Summary of Contents for DI-634M

Page 1: ...g the DI 634M 108G MIMO Wireless Router The DI 634M acts as a DHCP server and will assign all the necessary IP address information on your network See Appendix at the end of this Quick Installation Gu...

Page 2: ...tion If the WAN LED is not illuminated please go back to step B1 and repeat the instructions C Insert an Ethernet cable to LAN port 1 on the back panel of the DI 634M and an available Ethernet port on...

Page 3: ...DI 634M LOCAL NETWORK LEDs a solid light on the port indicates a connection to an Ethernet enabled computer on ports 1 4 This LED blinks during data transmission Power LED a solid light indicates a p...

Page 4: ...Using The Setup Wizard The logon pop up screen will appear Open your Web browser and type http 192 168 0 1 into the URL address box Then press the Enter or Return key Type admin for the username and l...

Page 5: ...Setup Wizard continued You will see the following screens Set up your new password You have the option to establish a password Click Next Click Next Choose your time zone from the drop down list Click...

Page 6: ...u will be prompted to select the type of Internet connection for your router If you are unsure of which setting to select please contact your Internet Service Provider Click Next Click Next This setup...

Page 7: ...te all the required elds Click Next Please continue to Wireless Setup If your ISP uses PPPoE Point to Point Protocol over Ethernet and this option is selected then this screen will appear Used mainly...

Page 8: ...y default the encryption is disabled You can change the encryption settings for more secure wireless communication The Setup Wizard continued The default wireless settings for your 802 11g wireless ne...

Page 9: ...efer to the Advanced Tools or Status tabs on the web management interface or to the Manual located on the CD You will be returned to the Home tab Close the web browser window and relaunch your Web bro...

Page 10: ...634M Wireless Broadband Router APPENDIX continued Restart your computer if necessary Click OK Select Obtain an IP address automatically Click Internet Protocol TCP IP Click Properties For Microsoft Wi...

Page 11: ...he Router s IP address and the Ethernet adapter address will appear Select Built in Ethernet in the Show pull down menu Click on Network Click on Apply Now Select Using DHCP in the Con gure pull down...

Page 12: ...al support through our website or by phone Tech Support for customers within the United States D Link Technical Support over the Telephone 877 453 5465 24 hours a day seven days a week D Link Technica...

Reviews: