background image


5


Using The Setup Wizard


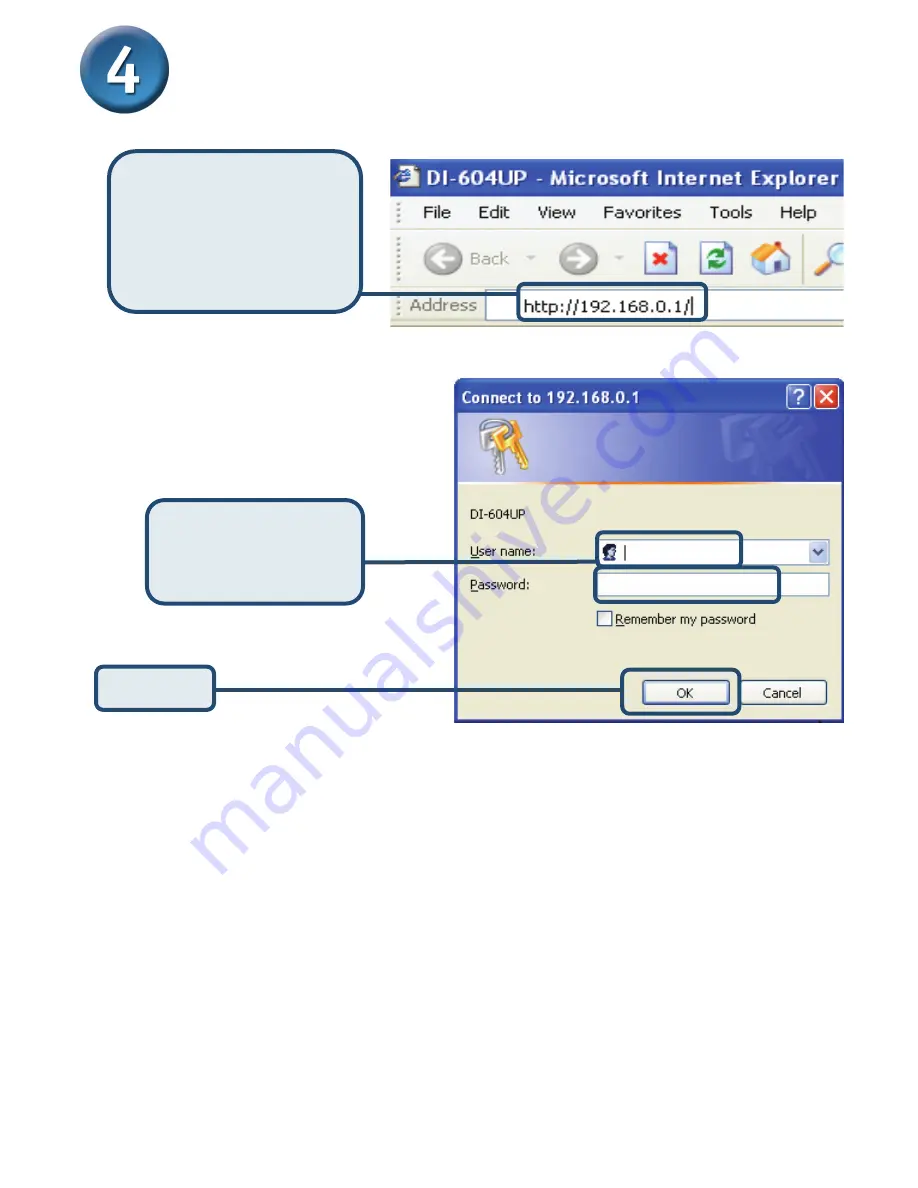
The logon pop-up screen will appear. 


Once you have logged in, the 

Home

 screen will appear. 


Open your Web 
browser

 and type 

“http://192.168.0.1”

 into 

the URL address box. 
Then press the 

Enter

 or 

Return

 key.


Click


OK


Type


“admin”

 for 

the username and 
leave the password 
field blank.


Summary of Contents for DI-604UP

Page 1: ...h network adapter to automatically obtain an IP address Check Your Package Contents These are the items included with your DI 604UP purchase If any of the above items are missing please contact your r...

Page 2: ...of an Ethernet cable to LAN port 1 on the back panel of the DI 604UP and the other end to an available Ethernet port on the network adapter in the computer you will use to configure the DI 604UP The...

Page 3: ...k A valid USB connection will cause the corresponding USB LED at the front to light For more information regarding USB connections and device implementation see the DI 604UP user guide LAN Port LEDs E...

Page 4: ...teps in this Quick Installation Guide your connected network should look similar to this Cable or DSL Modem connected to the WAN port DI 604UP Broadband Router Computers connected to the LAN Ports Pri...

Page 5: ...en will appear Once you have logged in the Home screen will appear Open your Web browser and type http 192 168 0 1 into the URL address box Then press the Enter or Return key Click OK Type admin for t...

Page 6: ...6 You will see the following screens Step 1 Set up your new password You have the option to establish a password Step 2 Choose your time zone Click Run Wizard Click Next Click Next...

Page 7: ...pe of Internet connection for your router If you selected Dynamic IP Address this screen will appear Click Next Click Next If you are unsure of which setting to select please contact your Internet Ser...

Page 8: ...network adapter has a discrete Media Access Control MAC address Note that some computers and peripherals may already include built in network adapters Click Next Click Next Enter the IP address infor...

Page 9: ...lick Next Please be sure to remove any existing PPPoE client software installed on your computers Enter in the username and password provided to you by your ISP and retype that same password to verify...

Page 10: ...screen will appear If your ISP uses L2PT and this option is selected then this screen will appear Enter the IP address information originally provided to you by your ISP Click Next Enter the IP addres...

Page 11: ...rts Multiple PPPoE and this option is selected then this window will appear Enter in the username and password provided to you by your ISP and retype that same password to verify it Click Next Enter t...

Page 12: ...12 Your Setup is Complete You will be returned to the Home tab Click Continue Click Restart...

Page 13: ...tion refer to the Advanced Tools or Status tabs on the web management interface or to the manual located on the CD ROM Click Exit Relaunch your Web browser i e Internet Explorer or Netscape Navigator...

Page 14: ...IP address automatically for the DI 604UP Broadband Router For Microsoft Windows XP Go to Start right click on My Network Places select Properties Double click on the Network Connection associated wit...

Page 15: ...em Preferences The IP address information the Subnet Mask the Router s IP address and the Ethernet adapter address will appear Click on Network Select Built in Ethernet in the Show pull down menu Sele...

Page 16: ...r documentation and software updates for D Link products Canadian customers can contact D Link Technical Support through our website or by phone Tech Support for customers within Canada Telephone 800...

Reviews: