background image

15

D-Link DHP-541 User Manual

Section 3 - Configuration

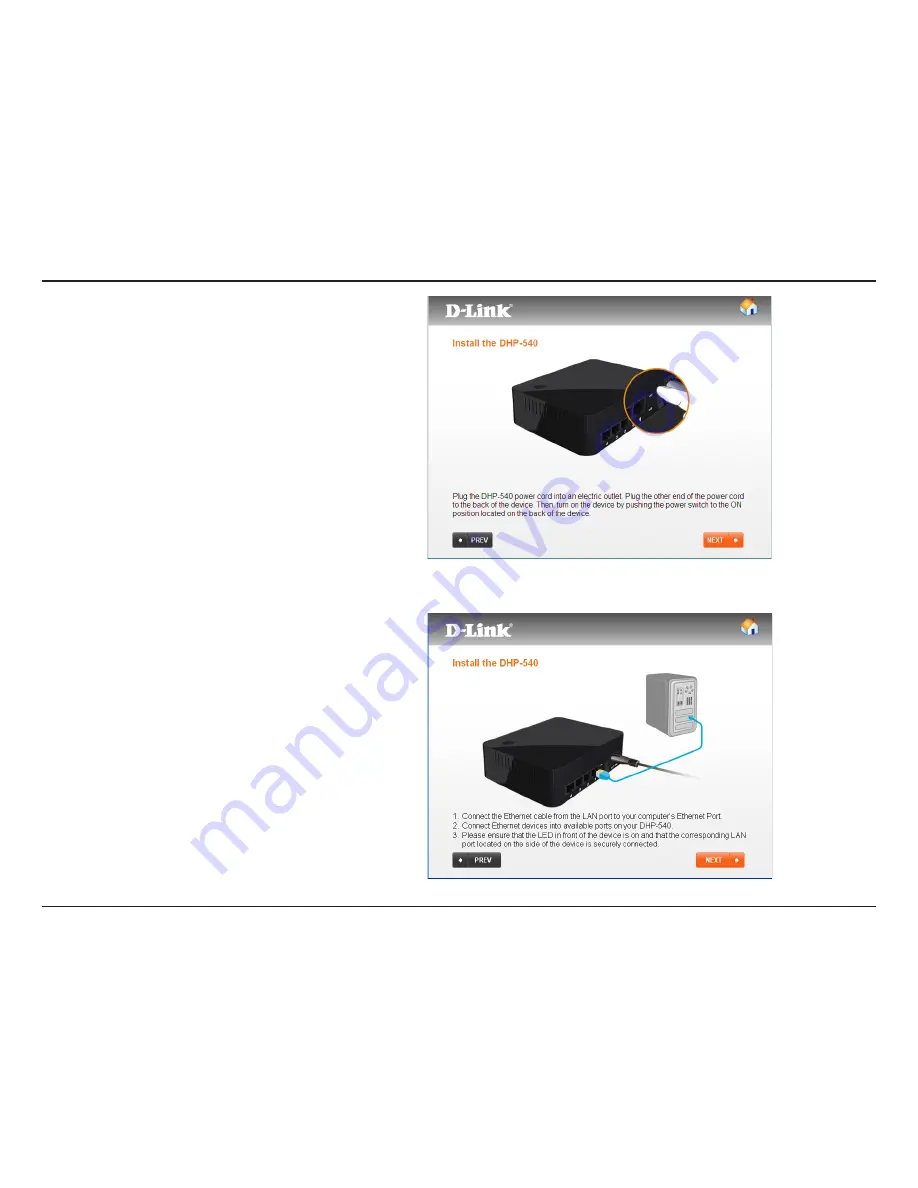
Plug the DHP-540 power cord into an electric outlet. Plug the 

other  end  of  the  power  cord  to  the  back  of  the  device  and 

then turn on the device by pushing the power switch to the 

ON position located on the back of the device. Power source is 

confirmed when the Power LED is illuminated.

Click 

Next 

to continue

.

1.  Connect  the  Ethernet  cable  from  the  LAN  port  to  your 

computer’s Ethernet Port.

2.  Please ensure that the LED in front of the device is on.

Click 

Next

 to continue.

Summary of Contents for DHP-541

Page 1: ......

Page 2: ... or registered trademarks of D Link Corporation or its subsidiaries in the United States or other countries All other company or product names mentioned herein are trademarks or registered trademarks of their respective companies Copyright 2011 by D Link Systems Inc All rights reserved This publication may not be reproduced in whole or in part without prior expressed written permission from D Link...

Page 3: ...nection 7 DHP 540 Hardware Overview 8 LEDs 8 Connection 9 Hardware Installation 10 Push Button Security 11 Using the Setup Wizard 12 Configuration 13 Advanced Settings 19 Device Info 20 Network Info 21 Diagnostics 22 Security 23 Documentation 25 Troubleshooting 26 DHP 540 Technical Specifications 27 DHP 502AV Technical Specifications 28 Contacting Technical Support 29 Warranty 30 Registration 35 T...

Page 4: ...D Link DHP 540 PowerLine AV 500 4 Port Gigabit Switch Two CAT5 Ethernet Cables CD ROM with Software and User Manual One Power Cord Quick Install Guide System Requirements Product Overview Package Contents Windows 7 Windows Vista XP with Service Pack 3 PC with 233MHz Processor 64MB Memory Ethernet Adapter 1000Mbit s ...

Page 5: ...from devices that emit electrical noise such as vacuum cleaners and hair dryers may adversely affect the performance of this product This product may interfere with devices such as lighting systems that have a dimmer switch short wave radios or other PowerLine devices that do not follow the HomePlug AV standard D Link announces the PowerLine AV 500 4 Port Gigabit Switch Starter Kit which uses the ...

Page 6: ...ED Solid The device is connected to a PowerLine network Blinking The device is transmitting data Off The device has not found any other compatible PowerLine devices using the same encryption key The color indicates the PowerLine link rate Green The PowerLine link rate is faster than 80 Mbps Amber The PowerLine link rate is between 50 Mbps and 80 Mbps Red The PowerLine link rate is less than 50 Mbp...

Page 7: ...verview Connection 3 1 Ethernet Port Connect the CAT5 Ethernet cable to the DHP 502AV Ethernet port 2 Reset Button Press and hold the button for one second to reset to factory default 3 Simple Connect Button Press to secure your network Refer to page 10 for more information 1 2 ...

Page 8: ...work Blinking The device is transmitting data Off The device has not found any other compatible PowerLine devices using the same encryption key The color indicates the PowerLine link rate Green The PowerLine link rate is faster than 80 Mbps Amber The PowerLine link rate is between 50 Mbps and 80 Mbps Red The PowerLine link rate is less than 50 Mbps 3 LAN LEDs 1 4 Solid The Ethernet port is linked ...

Page 9: ... DHP 540 Hardware Overview Connection 1 Ethernet Ports 1 4 Connect the CAT5 Ethernet cable to the selected Ethernet port in accordance to priority 2 On Off Button Press to turn the power on or off 3 Power Receptor Receptor for the supplied power cord 3 1 2 ...

Page 10: ... into an AC Wall outlet Connect the included Ethernet cable to the network cable connector located on the PowerLine AV 500 Network Adapter and attach the other end of the Ethernet cable to an Ethernet device e g router Power source is confirmed when the Power LED is illuminated Step 2 Connect the supplied power cord into the power receptor located on the back of the DHP 540 switch and press the po...

Page 11: ...hetopoftheswitchfornomorethantwoseconds ThePowerLED will start blinking after you release the button The switch will create a private randomly generated encryption key that the PowerLine AV 500 devices in your network will use Step 2 PowerLine AV 500 Network Adapter DHP 502AV Within two minutes of pushing the Simple Connect button of the switch press the Security Button on the adapter for no more ...

Page 12: ... quickly through the installation process Insert the D Link DHP 541 CD into your CD ROM drive If the CD Autorun function does not automatically start on your computer click Start Run In the Run command box type D autorun exe where D represents the drive letter of your CD ROM If it does start proceed to the next screen Click on Install to begin ...

Page 13: ...y installation wizard double click the D Link PowerLine AV Utility icon on your desktop to start the configuration of the DHP 541 Double click the D Link PowerLine AV Utility icon The D Link PowerLine AV Utility allows you the option to configure your PowerLine network settings and will display PowerLine device information ...

Page 14: ... Manual Section 3 Configuration The setup wizard is designed to assist the installation of your PowerLinenetwork ClicktheSetupWizardiconontheleftcorner of utility to start the installation process Click the Setup Wizard icon ...

Page 15: ...e device and then turn on the device by pushing the power switch to the ON position located on the back of the device Power source is confirmed when the Power LED is illuminated Click Next to continue 1 Connect the Ethernet cable from the LAN port to your computer s Ethernet Port 2 Please ensure that the LED in front of the device is on Click Next to continue ...

Page 16: ...esstheSimpleConnectButtonontop of the DHP 540 switch for 2 seconds The power LED will begin flashing Within 2 minutes press the Simple Connect Button on the DHP 502AV adapter Plug in the DHP 502AV adapter into an outlet Power source is confirmed when the Power LED is illuminated ...

Page 17: ...17 D Link DHP 541 User Manual Section 3 Configuration Your PowerLine network is now secured click Next to continue Please wait while the your PowerLine network is being secured ...

Page 18: ...18 D Link DHP 541 User Manual Section 3 Configuration Click Finish to complete the installation ...

Page 19: ... 3 Configuration Advanced Settings Click the Advanced Settings icon The Advanced Settings section will allow you to reset your device back to default settings upgrade firmware secure your network and display device and network information ...

Page 20: ...ce Name MAC address Firmware Version Reset Device Upgrade Firmware Displays the name of the devices that have been discovered The device s name is initially set by the utility itself Displays the MAC address of the connected PowerLine device Displaysthefirmwareversionoftheconnected PowerLine device See below for more Reset the device back to the factory default settings If you clicked Upgrade Firm...

Page 21: ...ice is local or remote Displays the PowerLine Mode Displays the link rate of the connected to the PowerLine device Displays the password of the devices that have beendiscovered Thedevice spasswordisinitially set by the utility itself Clicktoeditthesettingstothehighlighteddevice Click to scan your network for PowerLine devices Enter an encryption key to apply to your PowerLine devices Click to use ...

Page 22: ...22 D Link DHP 541 User Manual Section 3 Configuration Diagnostics This screen displays the current configuration information for your device and system ...

Page 23: ...he Set Device Password window Then click OK 3 Select the PowerLine devices that you would like to apply the encryption key setting Then type your private encryption key into the Encryption Key Setting field and click Set Selected Devices The utility will show a message once the setting has been completed ThePowerLinedevicesonthesamenetworkmustuseanidenticalencryptionkey Thedefaultencryptionkeyfore...

Page 24: ...o ways to add the new device to your PowerLine Network 1 You can use the PowerLine AV Utility to apply the customized encryption key in your record to the new device Then all devices can communicate with each other by using the customized encryption key 2 You can use PowerLine AV Utility to set all devices within the existing PowerLine Network and the new device back to the first default encryptio...

Page 25: ...er Manual Section 3 Configuration Documentation This screen allows you to view the user manual and quick install guide In order to properly view the documents you will need to use Adobe Reader Click the Documentation icon ...

Page 26: ...error is shown when I try to configure it Please make sure you have not unplugged the DHP 540 switch and the DHP 502AV adapter while configuring it I changed the connection cable to another Network adapter and now the utility does not work correctly Please restart the utility each time you disconnect the connection cable I m having a lot of problems configuring my network If you are having problem...

Page 27: ...le with IEEE 1901 HomePlug AV Power Consumption Compliance EuP Energy Using Product Directive CoC Code of Conduct on Energy Consumption of Broadband Equipment Data Rate Up to 500Mbps PHY rate QoS Integrated QoS prioritizes media and data Encryption 128 bit AES Data Encryption Operation Temperature 0 C 40 C Storage Temperature 10 C 70 C Humidity Operation 10 90 RH Storage 5 95 RH Powerline Modulati...

Page 28: ...le with IEEE 1901 HomePlug AV Power Consumption Compliance EuP Energy Using Product Directive CoC Code of Conduct on Energy Consumption of Broadband Equipment Data Rate Up to 500Mbps PHY rate QoS Integrated QoS prioritizes media and data Encryption 128 bit AES Data Encryption Operation Temperature 0 C 40 C Storage Temperature 10 C 70 C Humidity Operation 10 90 RH Storage 5 95 RH Powerline Modulati...

Page 29: ...541 Hardware Revision located on the label on the bottom of the product e g rev A1 Serial Number s n number located on the label on the bottom of the product You can find software updates and user documentation on the D Link website as well as frequently asked questions and answers to technical issues For customers within the United States Phone Support 877 453 5465 Internet Support http support d...

Page 30: ...ppliers under this Limited Warranty will be at D Link s option to repair or replace the defective Hardware during the Warranty Period at no charge to the original owner or to refund the actual purchase price paid Any repair or replacement will be rendered by D Link at an Authorized D Link Service Office The replacement hardware need not be new or have an identical make model or part D Link may at ...

Page 31: ...rminates Non Applicability of Warranty The Limited Warranty provided hereunder for Hardware and Software portions of D Link s products will not be applied to and does not cover any refurbished product and any product purchased through the inventory clearance or liquidation sale or other sales in which D Link the sellers or the liquidators expressly disclaim their warranty obligation pertaining to ...

Page 32: ... ship the product to you freight collect Expedited shipping is available upon request and provided shipping charges are prepaid by the customer D Link may reject or return any product that is not packaged and shipped in strict compliance with the foregoing requirements or for which an RMA number is not visible from the outside of the package The product owner agrees to pay D Link s reasonable hand...

Page 33: ...RANTY SERVICE OR ARISING OUT OF ANY BREACH OF THIS LIMITED WARRANTY EVEN IF D LINK HAS BEEN ADVISED OF THE POSSIBILITY OF SUCH DAMAGES THE SOLE REMEDY FOR A BREACH OF THE FOREGOING LIMITED WARRANTY IS REPAIR REPLACEMENT OR REFUND OF THE DEFECTIVE OR NONCONFORMING PRODUCT THE MAXIMUM LIABILITY OF D LINK UNDERTHISWARRANTY IS LIMITEDTOTHE PURCHASE PRICE OFTHE PRODUCT COVERED BYTHEWARRANTY THE FOREGOI...

Page 34: ...tructions may cause harmful interference to radio communication However there is no guarantee that interference will not occur in a particular installation If this equipment does cause harmful interference to radio or television reception which can be determined by turning the equipment off and on the user is encouraged to try to correct the interference by one or more of the following measures Re...

Page 35: ...pendix E Registration Version 1 0 June 22 2011 Product registration is entirely voluntary and failure to complete or return this form will not diminish your warranty rights Registration Register your product at registration dlink com ...

Reviews: