background image

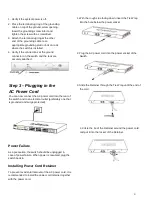
1. Verify if the system power is off.

2. Place the terminal lug ring of the grounding 

cable on top of the ground-screw opening, 
insert the grounding screw into it and 
tighten the screw with a screwdriver.

3. Attach the terminal lug ring at the other 

end of the grounding cable to an 
appropriate grounding stud or bolt on rack
where the switch is installed.

4. Verify if the connections at the ground 

connector on the switch and the rack are 
securely attached.

Step 3 – Plugging in the 
AC Power Cord

You can now connect the AC power cord into the rear of
the switch and to an electrical outlet (preferably one that
is grounded and surge protected).

Power Failure

As a precaution, the switch should be unplugged in 
case of power failure. When power is resumed, plug the
switch back in.

Installing Power Cord Retainer

To prevent accidental removal of the AC power cord, it is
recommended to install the power cord retainer together
with the power cord.

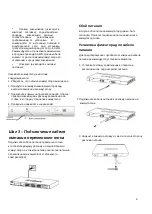
1. With the rough side facing down, insert the Tie Wrap 

into the hole below the power socket.

2. Plug the AC power cord into the power socket of the

Switch.

3. Slide the Retainer through the Tie Wrap until the end of

the cord.

4. Circle the tie of the Retainer around the power cord 
and put it into the locker of the Retainer.

3

Summary of Contents for DGS-1210-26/FL

Page 1: ...6 FL 24 10 100 1000Base T 2 1000Base X SFP Ports L2 Management Switch Управляемый L2 коммутатор с 24 портами 10 100 1000Base T и 2 портами 1000Base X SFP Quick Installation Guide Краткое руководство по установке ...

Page 2: ...evice must be attached on the bottom at each corner of the device s base Allow enough ventilation space between the device and the objects around it Rack Installation The switch can be mounted in an EIA standard size 19 inch rack which can be placed in a wiring closet with other equipment 1 To install attach the mounting brackets to the switch s side panels one on each side and secure them with th...

Page 3: ...d into the rear of the switch and to an electrical outlet preferably one that is grounded and surge protected Power Failure As a precaution the switch should be unplugged in case of power failure When power is resumed plug the switch back in Installing Power Cord Retainer To prevent accidental removal of the AC power cord it is recommended to install the power cord retainer together with the power...

Page 4: ...5 Fasten the tie of the Retainer until the power cord is secured 4 ...

Page 5: ... need the following equipment to begin the web configuration of your device A PC with a RJ 45 Ethernet connection Standard Ethernet cable Step 1 Connect the Ethernet cable to any of the ports in front panel of the switch and to the Ethernet port on the PC Step 2 In order to login and configure the switch via an Ethernet connection the PC must have an IP address in the same range as the switch For ...

Page 6: ... Programs D Link DNA and open the DNA D Link Network Assistant 6 Just connect the Switch to the same L2 network segment of your PC and use the DNA D Link Network Assistant to discover the Switch Option 3 in case the installation CD is not included Download DNA D Link Network Assistant from Google Play at https play google com store apps and follow the on screen instructions to install the utility ...

Page 7: ... характеристиках устройства Не вскрывайте корпус устройства Перед очисткой устройства от загрязнений и пыли отключите питание устройства Удаляйте пыль с помощью влажной салфетки Не используйте жидкие аэрозольные очистители или магнитные статические устройства для очистки Избегайте попадания влаги в устройство Устройство должно также быть заземлено если это предусмотрено конструкцией корпуса или ви...

Page 8: ... Убедитесь в наличии пространства для рассеивания тепла и вентиляции вокруг коммутатора Не размещайте тяжелые предметы на поверхности коммутатора Установка на стол или поверхность При установке коммутатора на стол или какую нибудь поверхность необходимо прикрепить входящие в комплект поставки резиновые ножки к нижней панели коммутатора расположив их по углам Обеспечьте достаточное пространство для...

Page 9: ...оположной стороне провода заземления к разъему заземления на стойке в которую установлен коммутатор 4 Проверьте надежность соединений Шаг 3 Подключение кабеля питания переменного тока Подключите кабель питания переменного тока к соответствующему разъему на задней панели коммутатора и к электрической розетке желательно с заземлением и защитой от статического электричества Сбой питания В случае сбоя...

Page 10: ...4 Оберните ленту зажима вокруг кабеля питания и вставьте ее в фиксирующий замок 5 Затяните ленту зажима чтобы зафиксировать кабель питания 10 ...

Page 11: ... 7 0 и выше Firefox Chrome или Safari Для настройки устройства необходимо следующее оборудование ПК с интерфейсом RJ 45 Стандартный Ethernet кабель Шаг 1 Подключите Ethernet кабель к любому порту на передней панели коммутатора и к Ethernet порту на ПК Шаг 2 Для выполнения входа в Web интерфейс коммутатора ПК должен быть назначен IP адрес из того же диапазона что и IP адрес коммутатора Например есл...

Page 12: ... DNA для обнаружения коммутаторов Вариант 3 при отсутствии компакт диска с утилитой DNA D Link Network Assistant в комплекте поставки 1 Скачайте необходимое программное обеспечение на сайте компании http www dlink ru ruproducts 1 в разделе Загрузки соответствующей модели коммутатора и распакуйте архив 2 Запустите установку программы двойным нажатием на установочный файл Setup exe 3 Следуйте инстру...

Page 13: ... коммутации Store and forward Макс скорость перенаправления 64 байтных пакетов 38 7 Mpps Размер таблицы MAC адресов 8K записей Объем оперативной памяти 256 МБ Буфер пакетов 512 кБ Флэш память 32 МБ Вес 2 06 кг Размеры Д x Ш x В 440 x 140 x 44 мм Питание 100 240 В переменного тока 50 60 Гц внутренний универсальный источник питания Потребляемая мощность В режиме ожидания 100 В 5 01 Вт 240 В 5 06 Вт ...

Page 14: ...PУCCКИЙ 14 ...

Reviews: