background image

Mount the Camera

Refer to the steps below to assist you with mounting the camera.

We  suggest  that  you  configure  the  camera  before  mounting.  If  you  plan  on 

passing the cables for the camera through the wall or ceiling, make sure you 

determine the position and angle of the camera you want 

before


drilling a hole 

for the cables in Step 6.

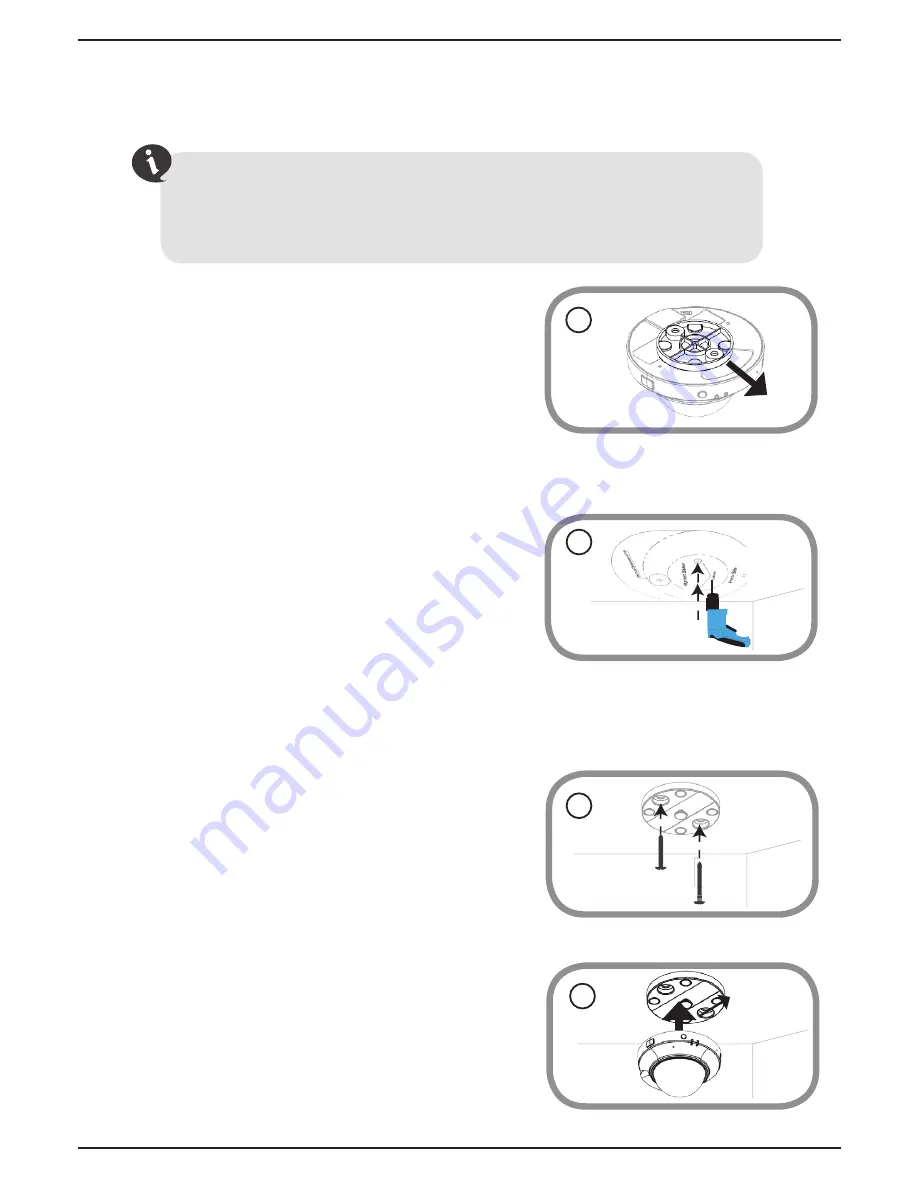
1.  The  camera  must  be  separated  from  the 

mounting base to expose the holes in the 

mounting base. Remove the camera head 

from the mounting base by firmly holding 

the  camera  with  the  D-Link  logo  facing 

you  and  then  sliding  the  mounting  base 

towards you.

1

2.  Place the mounting base alignment sticker 

where  you  want  to  position  the  camera. 

Depending on the material of the wall or 

ceiling, use proper tools to drill two holes 

where you placed the alignment sticker. If 

the wall is made out of concrete, drill the 

holes first, then insert the plastic anchors 

to support the screws.

2

4

4.  With the D-Link logo facing you, reattach 

the  camera  to  the  mounting  plate  by 

sliding  the  camera  towards  you  until  it 

locks into position, and replace the cover.

3.  Align  the  mounting  base  holes  with  the 

holes  in  the  wall  when  you  position  the 

mounting base. Use the supplied screws to 

attach the mounting base to the surface of 

the wall or ceiling.

3

8

EN

G

LI

S

H

Summary of Contents for DCS-6004L? DCS-6005L

Page 1: ...DCS 6004L DCS 6005L Quick Install Guide HDMiniDomeNetworkCamera CloudCamera...

Page 2: ...k Camera or DCS 6005L HD Wireless Mini Dome Network Camera Power Adapter Ethernet Extension RJ 45 Coupler Quick Install Guide Package Contents Mounting Plate Audio Out Cable Collar Ethernet Cable Note...

Page 3: ...to create a mydlink account Network Device and Service mydlink Requirements For mydlink and mydlink app requirements refer to http www mydlink com Hardware Overview 1 Status LED Indicates the camera s...

Page 4: ...tphone Tablet Laptop Laptop Desktop mydlink app Modem 1 mydlink Lite App Free Search for mydlink lite to download and install the app on your smartphone or tablet when connected to the Internet You ca...

Page 5: ...Ethernet you can skip this step Otherwise attach the external power supply to the power input connector located on the inside of the camera and connect it to a wall outlet or power strip Connect the...

Page 6: ...Users Extract unzip the files to a folder on your computer and then double click the autorun exe file Mac Users Download the Mac OS Setup Wizard Open the SetupWizard file and launch the application I...

Page 7: ...fault Please download it from http www java com In Mac OS X 10 7 x Java applets are disabled by default Click the Finder Applications Utilities Java Preferences and check the Enable applet plug in and...

Page 8: ...ou and then sliding the mounting base towards you 1 2 Place the mounting base alignment sticker where you want to position the camera Depending on the material of the wall or ceiling use proper tools...

Page 9: ...6 Optional Step With the camera in the desired position use a pencil to mark the hole for the cables Before drilling make sure the hole for the cables will be hidden by the camera Drill the hole and p...

Page 10: ...ff the camera base once the housing has been released 3 Use a Phillips screwdriver to loosen the retaining screw used to secure the viewing angle of the camera lens 4 Manually adjust the viewing angle...

Page 11: ...fer to your router s user manual 2 What Should I do if i forget my password You must reset your camera Unfortunately this will change your settings back to the factory default settings To reset your c...

Page 12: ...ink Corporation or its subsidiaries Other trademarks are the property of their respective owners Maximum wireless signal rate derived from IEEE Standard 802 11g and 802 11n specifications Actual data...

Reviews: