background image

D-Link DCS-4802E Quick Installation Guide

4

E

N

G

LI

S

H

Configuring the Camera

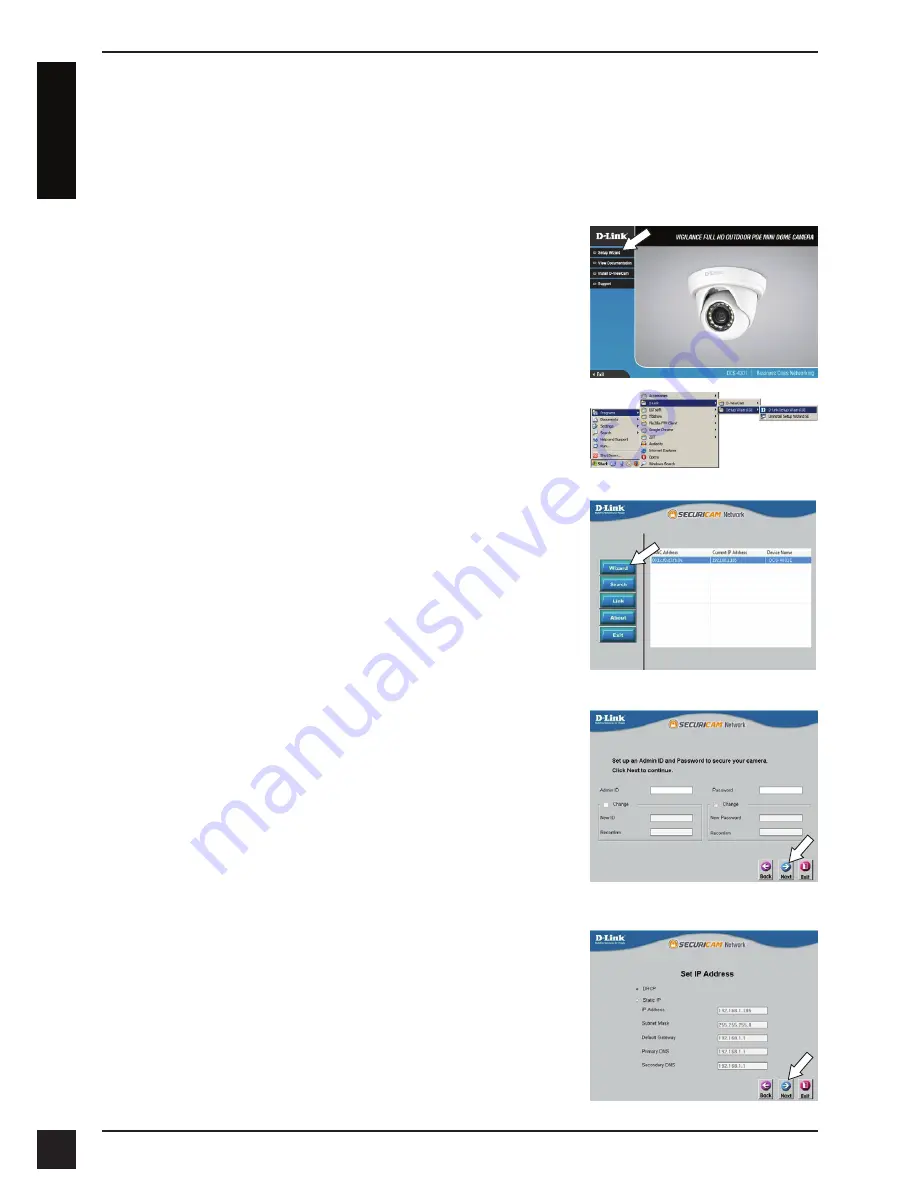
Insert the DCS-4802E CD into your computer's CD-ROM drive to begin the installation. 

If the Autorun function on your computer is disabled, or if the D-Link Launcher fails to 

start automatically, click the Start button and type 

D:\autorun.exe

 (where D: represents 

the drive letter of your CD-ROM drive) and press Enter.

Click on the 

D-Link Setup Wizard SE

 icon that was 

created in your Windows Start menu (

Start > D-Link > 

Setup Wizard SE

).

The Setup Wizard will appear and display the MAC 

address and IP address of your camera(s). If you have a 

DHCP server on your network, a valid IP Address will be 

displayed. If your network does not use a DHCP server, 

the network camera's default static IP 

192.168.0.20

 will be 

displayed.

Select your camera, then click the 

Wizard

 button to 

continue.

Click 

Setup Wizard

 and follow the instructions to install 

the Setup Wizard.

Enter the Admin ID and password. When logging in for 

the first time, the default Admin ID is 

admin

 with the 

password left blank.

Click the checkboxes if you wish to change the admin ID 

and password for the camera, and enter the new ID and 

password you wish to use.

Click 

Next

 to continue.

Select 

DHCP

 if your camera obtains an IP address 

automatically from a DHCP server such as a router.  

Select 

Static IP

 if you want to manually enter the IP 

settings for the camera.

Click 

Next

 to continue.

Summary of Contents for DCS-4802E

Page 1: ...on also available on CD and via the D Link Website Quick Installation Guide Vigilance Full HD Outdoor PoE Mini Dome Camera Quick Installation Guide Installationsanleitung Guide d installation Guía de instalación Guida di Installazione Краткое руководство по установке Guia de Instalação Rápida 快速安裝指南 Petunjuk Pemasangan Cepat ...

Page 2: ......

Page 3: ...ded in this package or you can download it from the D Link support website Package Contents DCS 4802E Vigilance Full HD Outdoor PoE Mini Dome Camera Cable Waterproofing Connector Rubber Power Connector Plug Mounting Kit Manual and Software on CD ROM Quick Installation Guide If any of the above items are missing please contact your reseller Safety Notice Installation and servicing should be done by...

Page 4: ...Light Sensor Detects lighting conditions Reset Button Resets camera back to the factory default settings Ethernet Jack RJ 45 connector for Ethernet which can also be used to power the camera using Power over Ethernet PoE Power Connector Connects to an optional 12 V 1 5 A power adapter not included Camera Lens Camera Base Cover ...

Page 5: ...e camera using PoE Class 2 Connect an Ethernet cable to the Ethernet jack on the camera Connect the other end of the cable to your PoE switch or PoE injector Powering the camera with a power adapter not included Connect a 12 V 1 5 A power adapter to the power connector Connect an Ethernet cable to the Ethernet jack on the camera Connect the other end of the cable to your network ...

Page 6: ...ve a DHCP server on your network a valid IP Address will be displayed If your network does not use a DHCP server the network camera s default static IP 192 168 0 20 will be displayed Select your camera then click the Wizard button to continue Click Setup Wizard and follow the instructions to install the Setup Wizard Enter the Admin ID and password When logging in for the first time the default Adm...

Page 7: ...etup Wizard will automatically open your web browser to the IP address of the camera This section displays your camera s live video You can select your video profile and view or operate the camera For additional information about web configuration please refer to the user manual included on the CD ROM or the D Link website Enter your username default is admin and your password default is blank Cli...

Page 8: ...en insert the wall anchors into the holes If you are running the camera cables through the wall or ceiling drill a hole in the center and pull the cables through the hole If not then guide the camera cables through the cable channel on the base after mounting to the wall or ceiling Use the screws provided to mount the camera to the wall or ceiling Attach the camera base cover by lining up the cabl...

Page 9: ...ed for this procedure Waterproofing Your Installation Place the washer around the base of the Ethernet connector as shown Connect the RJ 45 plug into the Ethernet connector then screw the waterproof connector to the Ethernet connector by turning it about a half turn clockwise Thread bare Ethernet cable through the waterproof connector as shown then crimp an RJ 45 plug onto the cable ...

Page 10: ...o power your camera wind waterproof tape around the connection in an overlapping manner to cover it Additional Information Additional help and product information is available online at http www dlink com Warranty Information Please visit http warranty dlink com for warranty information for your region Turn the back part of the waterproof connector clockwise until there is a tight seal around the ...

Page 11: ...D Link DCS 4802E Quick Installation Guide 9 Notes ...

Page 12: ...Ver 1 00 WW 2015 07 14 ...

Reviews: