background image

  3

E

N

G

LI

S

H

2.  Open a web browser and type in the default 

host name of the DBA-2820P and press 

Enter

.  

The default host name is 

DBA-2820P-XXXX 

where 

XXXX 

represents the last 4 characters 

of the MAC address listed on the device label 

located on the bottom of the device.

3.  When prompted, enter the default login 

credentials:  

User name: 

admin


Password: 

admin

Connecting Wirelessly

1.  Connect the management computer to the 

default SSID of the DBA-2820P. The SSID will be 

in the format 

DBA-2820P-XXXX

 where 

XXXX 

represents the last 4 characters of the MAC 

address listed on the device label located on the 

bottom of the device.

2.  Open a web browser and type in the default 

host name of the DBA-2820P and press 

Enter

.  

The default host name is 

DBA-2820P-XXXX


where 

XXXX

 represents the last 4 characters 

of the MAC address listed on the device label 

located on the bottom of the device.

3.  When prompted, enter the default login 

credentials:  

User name: 

admin


Password: 

admin

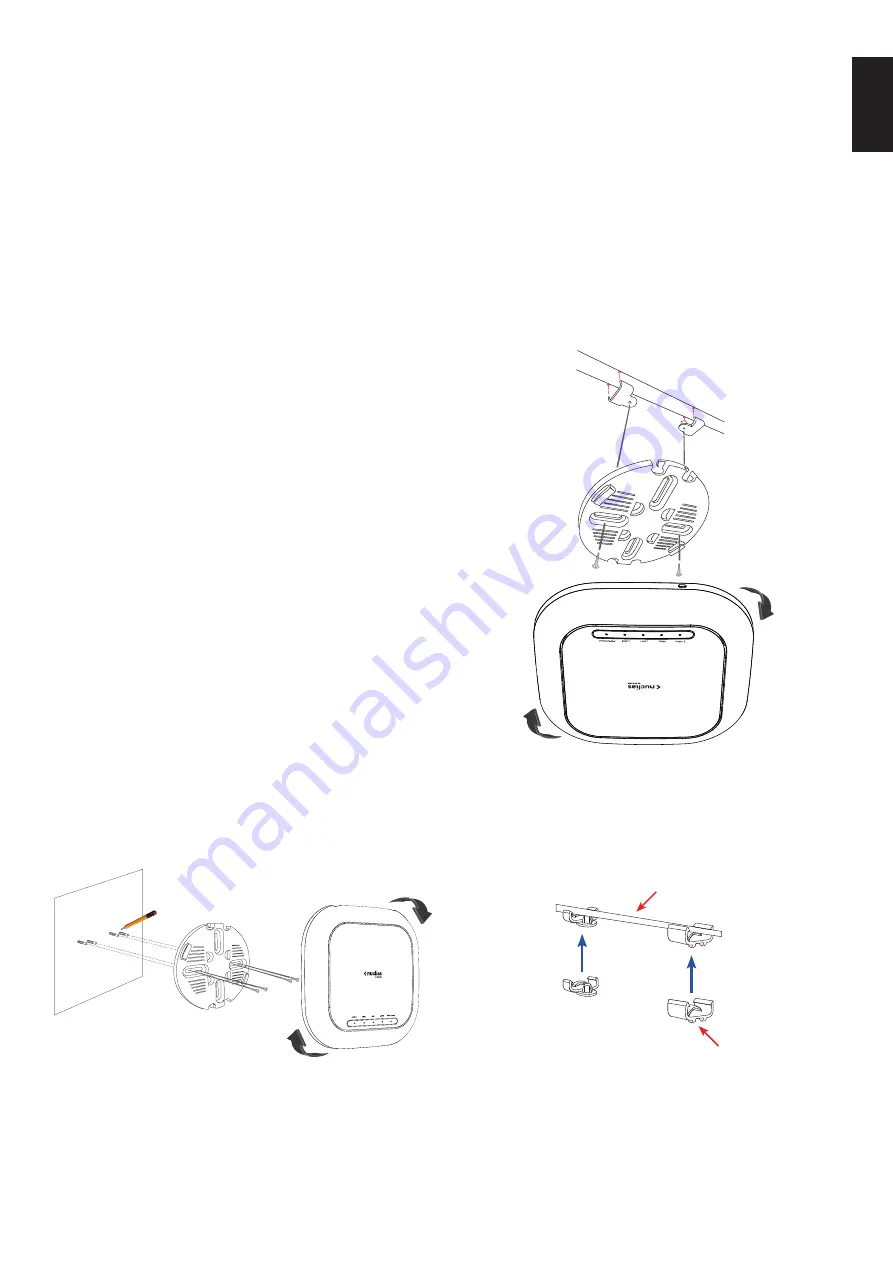
Mounting the Access Point

The DBA-2820P can be mounted on a wall or ceiling 

for optimal coverage. 

Mounting on a Solid Wall or Ceiling

Figure 5: Attaching the Lock Plate

1.  Use the mounting plate to mark the location 

where to drill the holes in the wall or ceiling.

2.  Drill holes on the markings and place the 

included anchors into the drilled holes.

3.  Align and place the mounting plate on top of the 

anchors and use the included screws to secure 

the mounting plate to the surface.

4.  Connect the Ethernet cable and power adapter 

(optional) to the device. 

5.  Attach the DBA-2820P to the mounting plate by 

placing it onto the plate and rotating clockwise 

until the device locks into place.

Mounting on a Ceiling Crossbar

Figure 6: Attaching the Lock Plate

1.  Clip the two included ceiling brackets onto the 

ceiling crossbar. Make sure both brackets are 

positioned in line with each other.

Ceiling bracket

Ceiling crossbar

Figure 7: Attaching the Ceiling Brackets

Summary of Contents for DBA-2820P

Page 1: ...Documentation is also available on the D Link website This document will guide you through the basic installation process for your new access point DBA 2820P Quick Installation Guide Access Point ...

Page 2: ...2 ENGLISH ...

Page 3: ...LED Description Before You Begin This installation guide provides instructions for installing the DBA 2820P on your network Additional documentation is also available on the D Link support website D LinkNucliasAccessPointPortalManual For additional information and instructions on how to configure the device using the D Link Nuclias cloud DBA 2820P User Manual For additional informationandinstructi...

Page 4: ... on the DBA 2820P and plug the adapter into a nearby power outlet Configuring the Access Point Using D Link Nuclias Note To use D Link Nuclias the DBA 2820P must be connected to the Internet The DBA 2820P is designed to be managed through the D Link Nuclias cloud Refer to the D Link Nuclias AccessPointPortalManualfordetailedconfiguration instructions Switch or Router Switch or Router Management DB...

Page 5: ...the bottom of the device 3 When prompted enter the default login credentials User name admin Password admin Mounting the Access Point The DBA 2820P can be mounted on a wall or ceiling for optimal coverage Mounting on a Solid Wall or Ceiling Figure 5 Attaching the Lock Plate 1 Use the mounting plate to mark the location where to drill the holes in the wall or ceiling 2 Drill holes on the markings a...

Page 6: ...than 15 seconds then release to reset the device to its factory default settings and force the device to load an alternate firmware Troubleshooting The DBA 2820P receives its configuration settings and is managed through the D Link Nuclias cloud If you are experiencing problems connecting to the D Link Nuclias cloud check your Internet connection Ifyoustillcannotconnecttotheservice additional conf...

Page 7: ...cuit different from that to which the receiver is connected Consult the dealer or an experienced radio TV technician for help Non modifications Statement Any changes or modifications not expressly approved by the party responsible for compliance could void the user s authority to operate this equipment Caution This device complies with Part 15 of the FCC Rules Operation is subject to the following...

Page 8: ... est susceptible d en compromettre le fonctionnement i the device for operation in the band 5150 5250 MHz is only for indoor use to reduce the potential for harmful interference to co channel mobile satellite systems i les dispositifs fonctionnant dans la bande 5150 5250 MHz sont réservés uniquement pour une utilisation à l intérieur afin de réduire les risques de brouillage préjudiciable aux syst...

Page 9: ...eceiver in a domestic environment it may cause radio interference Install and use the equipment according to the instruction manual 電波法により5GHz帯は屋内使用に限ります Product and Warranty Information To find out more about D Link products or marketing information please visit the website http www dlink com The D Link Limited Lifetime Warranty information is available at http warranty dlink com ...

Page 10: ...NOTES ...

Page 11: ...NOTES ...

Page 12: ...NOTES ...

Page 13: ...NOTES ...

Page 14: ...NOTES ...

Page 15: ...NOTES ...

Page 16: ...Ver 1 00 WW _90x130 2019 05 28 290726002820A10 ...

Reviews: