background image

EN

G

LI

SH

Mounting the Access Point

The DBA-1520P can be mounted on a wall or ceiling for 

optimal coverage. 

Mounting on a Solid Wall or Ceiling

1.  (

Optional

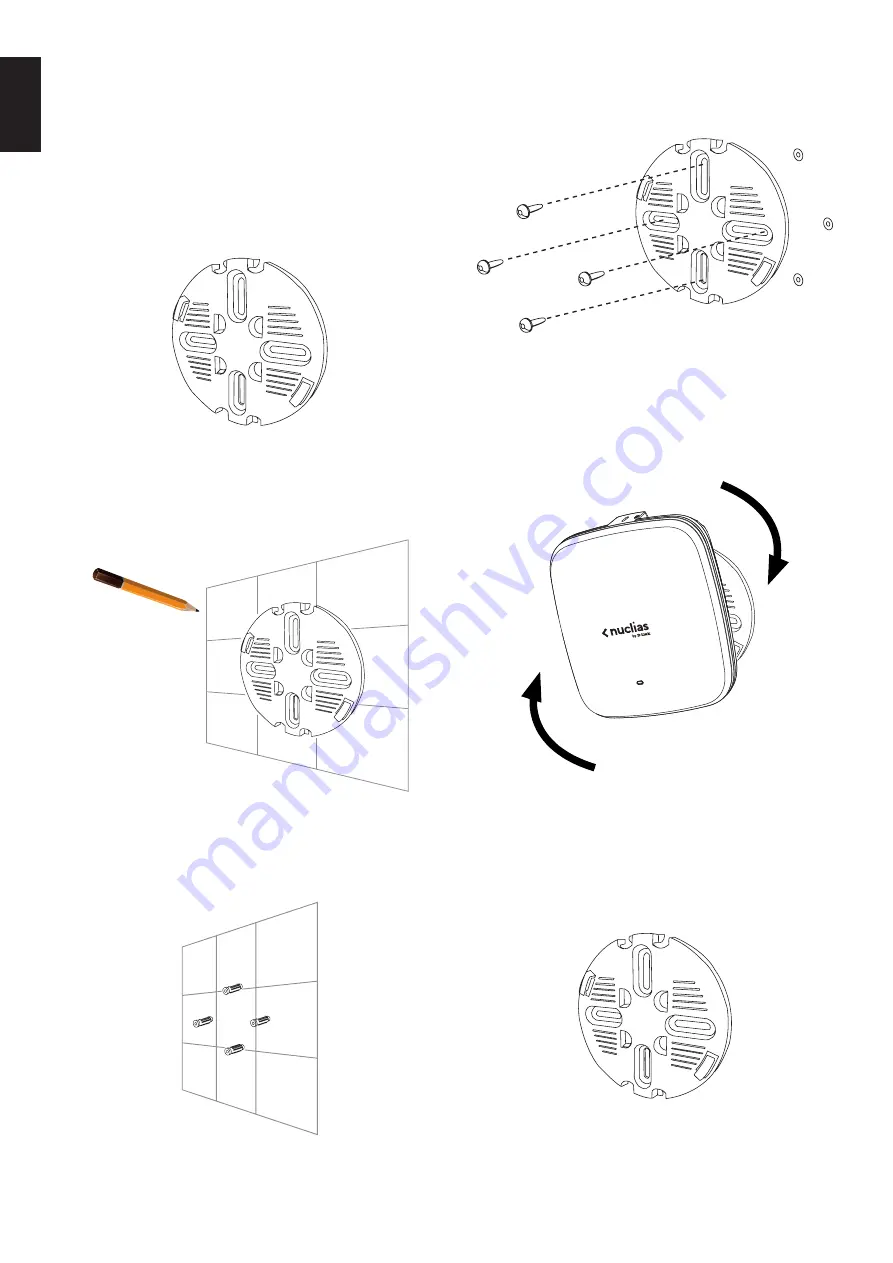
) Attach the included lock plate to the 

mounting plate using the included screws.

Figure 4: Attaching the Lock Plate

2.  Use the mounting plate to mark the location where 

to drill the holes in the wall or ceiling.

Figure 5: Mounting Panel Marking

3.  Drill holes on the markings and place the included 

anchors into the drilled holes.

Figure 6: Placing Anchors

4.  Align and place the mounting plate on top of the 

anchors and use the included screws to secure the 

mounting plate to the surface.

Figure 7: Securing the Mounting Plate 

5.  Connect the Ethernet cable and power adapter 

(optional)

 to the device. 

6.  Slide the DBA-1520P onto the mounting plate.

Figure 8: Placing The Access Point

Mounting on a Ceiling Crossbar

1.  (

Optional

) Attach the included lock plate to the 

mounting plate using the included screws.

Figure 9: Attaching the Lock Plate

Summary of Contents for DBA-1520P

Page 1: ...ailable on the D Link website This document will guide you through the basic installation process for your new D Link Business Cloud Wave 2 Access Point DBA 1520P Quick Installation Guide Access Point Quick Installation Guide ...

Page 2: ...n This installation guide provides instructions for installing the DBA 1520P on your network Additional documentation is also available on the D Link support website D Link Nuclias User Manual For additional informationandinstructionsonhowtoconfigure the device using the D Link Nuclias cloud Package Contents This DBA 1520P package should include the following items 1 x DBA 1520P 1 x Power adapter ...

Page 3: ...clias cloud you may need to manually configure the DBA 1520P using its web user interface UI Refer to the Nuclias Cloud Manual for detailed configuration instructions Use one of the following methods to access the web user interface Connecting through Ethernet Note The management PC must be in the same subnet as the DBA 1520P 1 UseanEthernetcabletoconnecttheDBA 1520P to the management PC or to the...

Page 4: ...rill holes on the markings and place the included anchors into the drilled holes Figure 6 Placing Anchors 4 Align and place the mounting plate on top of the anchors and use the included screws to secure the mounting plate to the surface Figure 7 Securing the Mounting Plate 5 Connect the Ethernet cable and power adapter optional to the device 6 Slide the DBA 1520P onto the mounting plate Figure 8 P...

Page 5: ...elease to reset the device to its factory default settings Press and hold down the reset button for morethan15secondsandreleasetoresetthedevice to its factory default settings and force the device to load an alternate firmware Troubleshooting The DBA 1520P receives its configuration settings and is managed through the D Link Nuclias cloud If you are experiencing problems connecting to the D Link N...

Page 6: ...tion Any changes or modifications not expressly approved by the party responsible for compliance could void the user s authority to operate this equipment This transmitter must not be co located or operating in conjunction with any other antenna or transmitter Operations in the 5 15 5 25GHz band are restricted to indoor usage only Radiation Exposure Statement This equipment complies with FCC radia...

Page 7: ...Declaration d exposition aux radiations Cet équipement est conforme aux limites d exposition aux rayonnements ISED établies pour un environnement non contrôlé Cet équipement doit être installé et utilisé à plus de 38cm entre le radiateur et votre corps CE Mark Warning This is a Class B product In a domestic environment this product may cause radio interference in which case the user may be require...

Page 8: ...nd Warranty Information To find out more about D Link products or marketing information please visit the website http www dlink com The D Link Limited Lifetime Warranty information is available at http warranty dlink com ...

Page 9: ...Ver 1 00 WW _130x183 2020 01 03 ...

Reviews: