background image

48

Networking Basics

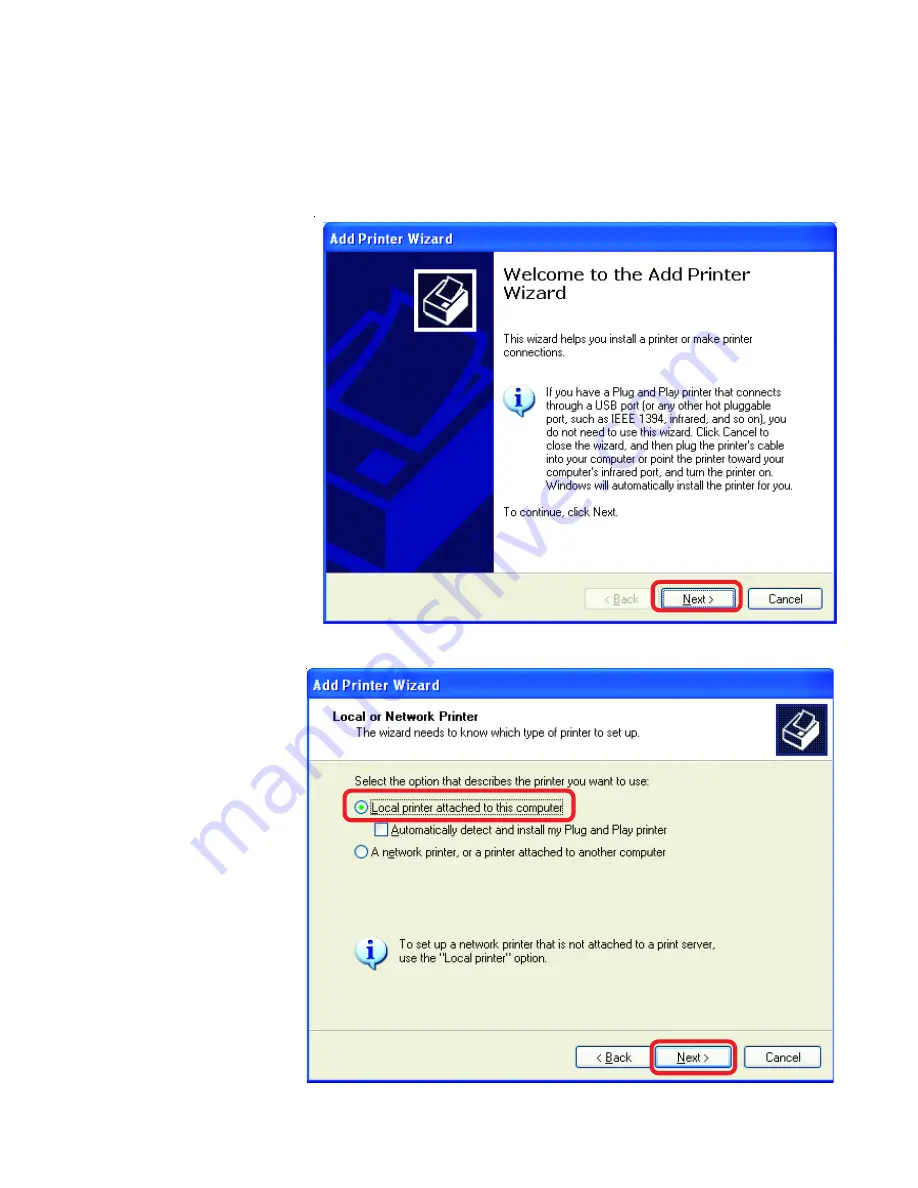
Sharing an LPR printer

To share an 

LPR printer

 (using a print server,) you will need a Print Server such as

the 

DP-101P+

.  Please make sure that you have run the 

Network Setup Wizard

 on

all the computers on your network. To share an 

LPR printer

, please follow these

directions:

Go to 

Start

 >

Printers and

Faxes

Click on 

Add

a Printer

The screen to the

right will appear

Click 

Next

Select

Local

Printer...

Click 

Next

Summary of Contents for AirPro DWL-6000AP

Page 1: ...DWL 6000AP 2 4 GHz 5 GHz Multimode Manual Building Networks for People D Link AirPro Wireless Access Point TM...

Page 2: ...ntents 3 Introduction 4 Wireless Basics 6 Getting Started 10 Using the Configuration Menu 12 Networking Basics 21 Troubleshooting 50 Technical Specifications 56 Contacting Technical Support 59 Warrant...

Page 3: ...age rating than the one included with the DWL 6000AP will cause damage and void the warranty for this product If any of the above items are missing please contact your reseller System Requirements For...

Page 4: ...ss and forward additional IP addresses to multiple clients for a seamless Ethernet network connection and shared Internet access Armed with powerful management and security capabilities the D Link Air...

Page 5: ...e is required when connecting directly to an ethernet adapter on a computer Supports Data Transfer Rates of up to 108 Mbps at 5GHz in Turbo mode Supports Data Transfer Rates of up to 22 Mbps at 2 4GHz...

Page 6: ...on MAC layer ACL Access Control List allows 16 MAC entries Enable Disable SSID Broadcast PSPF Public Switch Packet Filter segregates the wireless segment from the LAN Supports TPC and DFS function for...

Page 7: ...reless connectivity within your home business or public access wireless networks Strictly adhering to the IEEE standard the D Link AirPro wireless family of products will allow you to securely access...

Page 8: ...AN Management decisions based on real time information can significantly improve worker efficiency Low Implementation Costs WLANs Wireless Local Area Networks are easy to set up manage change and relo...

Page 9: ...t over your network without noticeable delays This technology works by transmitting high speed digital data over a radio wave utilizing OFDM Orthogonal Frequency Division Multiplexing technology OFDM...

Page 10: ...dential Gateways routers and computers A wall that is 1 5 feet thick 5 meters at a 45 degree angle appears to be almost 3 feet 1 meter thick At a 2 degree angle it looks over 42 feet 14 meters thick T...

Page 11: ...Address range as all the computers in the network and the Subnet mask must be exactly the same for all the computers in the network For example If the first computer is assigned an IP Address of 192...

Page 12: ...the D Link AirPro DWL A520 wireless PCI adapter into an available PCI slot See the Quick Installation Guide included with the DWL A520 Install the drivers for the wireless cardbus adapter D Link AirP...

Page 13: ...bnet mask 255 255 255 0 If you are not using a D Link router in your network you will need to assign a Static IP Address to the computer that you are using to configure the DWL 6000AP within the IP Ad...

Page 14: ...ser Type in the IP Address of the Access Point Note if you have changed the default IP Address assigned to the DWL 6000AP make sure to enter the correct IP Address Type admin lower case in the User Na...

Page 15: ...default channel for 802 11b Select a different channel if you want to change the default setting All devices on the network must be set to the same channel to communicate on the network Current wirele...

Page 16: ...quency range will be displayed Channel The default channel for 802 11a is 36 The default channel for 802 11b is 6 Data Rate Select the transmission rate for the network Beacon Interval Beacons are pac...

Page 17: ...at when entering the MAC address xx xx xx xx xx xx Fragment Length This value should remain at its default setting of 2346 If you experience a high packet error rate you may slightly increase your Fra...

Page 18: ...screen in order for this communication to be successful Ethernet to WLAN Access Click on Enabled to enable communication between the wireless segment and the Ethernet segment on your network Deselect...

Page 19: ...ct HEX Hexadecimal or ASCII WEP Key Size Select 64 128 or 256 bit for 802 11b 64 128 152 bit for 802 11a Valid Key Select the key that you will use from one of the four keys in the Key Table Key Table...

Page 20: ...me if you need assistance Click Apply if you have made any changes Using the Configuration Menu Tools Admin If you have made changes to the configuration settings click Restart in this window to apply...

Page 21: ...ort dlink com Click OK after you have selected the file click OK Telnet Settings Status Select Enabled or Disabled Timeout Select the Timeout period after which your Telnet session will log off Apply...

Page 22: ...ation settings of your computer TFTP Program To run the D Link TFTP program insert the DWL 6000AP CD ROM and click on Run TFTP Program Or go to Start Run and type d tftpd exe where d refers to the CD...

Page 23: ...nd transmitted communications through the Ethernet port and wireless connec tions associated with the Access Point Using the Configuration Menu Status Stats The Help menu is displayed here You can als...

Page 24: ...soft Windows XP Note Please refer to websites such as http www homenethelp com and http www microsoft com windows2000 for information about networking computers using Windows 2000 ME or 98 Go to Start...

Page 25: ...ctions in this window Networking Basics Click Next In the following window select the best description of your computer If your computer connects to the internet through a gateway router select the se...

Page 26: ...26 Enter a Computer description and a Computer name optional Networking Basics Click Next Enter a Workgroup name All computers on your network should have the same Workgroup name Click Next...

Page 27: ...wait while the Network Setup Wizard applies the changes Networking Basics When the changes are complete click Next Please wait while the Network Setup Wizard configures the computer This may take a fe...

Page 28: ...at fits your needs In this example Create a Network Setup Disk has been selected You will run this disk on each of the computers on your network Click Next Insert a disk into the Floppy Disk Drive in...

Page 29: ...he information under Here s how in the screen below After you com plete the Network Setup Wizard you will use the Network Setup Disk to run the Network Setup Wizard once on each of the computers on yo...

Page 30: ...ings will take effect when you restart the computer Click Yes to restart the computer You have completed configuring this computer Next you will need to run the Network Setup Disk on all the other com...

Page 31: ...dows XP Click Start in the lower left corner of the screen Right click on My Computer Select Properties and click Select the Computer Name Tab in the System Properties window You may enter a Com puter...

Page 32: ...same Workgroup name Click OK Checking the IP Address in Windows XP The wireless adapter equipped computers in your network must be in the same IP Ad dress range see Getting Started in this manual for...

Page 33: ...puters on the network using DHCP Dynamic Host Configura tion Protocol technology If you are using a DHCP capable Gateway Router you will not need to assign Static IP Addresses If you are not using a D...

Page 34: ...34 Networking Basics Assigning a Static IP Address in Windows XP 2000 Double click on Network Connections Double click on Properties Right click on Local Area Connections...

Page 35: ...2 the other computers should have IP Addresses that are sequential like 192 168 0 3 and 192 168 0 4 The subnet mask must be the same for all the computers on the network Input your DNS server addresse...

Page 36: ...the Apple Menu and se lect System Preferences cClick on Network Select Built in Ethernet in the Show pull down menu Select Manually in the Configure pull down menu Input the Static IP Address the Subn...

Page 37: ...Go to the Apple Menu and select System Preferences Click on Network Select Built in Ethernet in the Show pull down menu Select Using DHCP in the Configure pull down menu Click Apply Now The IP Addres...

Page 38: ...ccess Point A good wireless connection will show four replies from the Wireless Router or Acess Point as shown Checking the Wireless Connection by Pinging in Windows Me and 98 Go to Start Run type com...

Page 39: ...or share a network printer a printer connected to your network through a Gateway Router use the Add Printer Wizard Please follow the directions below First make sure that you have run the Network Setu...

Page 40: ...ter A printer that is not shared on the network and is connected directly to one computer is called a local printer If you do not need to share your printer on a network follow these directions to add...

Page 41: ...o this computer Deselect Automati cally detect and install my Plug and Play printer if it has been selected Click Next Select Use the following port From the pull down menu select the correct port for...

Page 42: ...t If the correct driver is not displayed insert the CD or floppy disk that came with your printer and click Have Disk At this screen you can change the name of the printer optional Click Next Select Y...

Page 43: ...43 Networking Basics Adding a local printer This screen gives you information about your printer Click Finish When the test page has printed Click OK...

Page 44: ...ou have successfully added a local printer Sharing a network printer After you have run the Network Setup Wizard on all the computers on your net work you can run the Add Printer Wizard on all the com...

Page 45: ...45 Networking Basics Sharing a network printer Click on Add a printer Click Next Select Network Printer Click Next...

Page 46: ...46 Networking Basics Sharing a network printer Select Browse for a printer Click Next Select the printer you would like to share Click Next Click Finish...

Page 47: ...r installation You have completed adding the printer To share this printer on your network Remember the printer name Run the Add Printer Wizard on all the computers on your network Make sure you have...

Page 48: ...Server such as the DP 101P Please make sure that you have run the Network Setup Wizard on all the computers on your network To share an LPR printer please follow these directions Go to Start Printers...

Page 49: ...LPR printer Select Create a new port From the pull down menu select Standard TCP IP Port as shown Click Next Please read the instructions on this screen Click Next Enter the Printer IP Address and th...

Page 50: ...n LPR printer In this screen select Custom Click Settings Enter the Port Name and the Printer Name or IP Address Select LPR Enter a Queue Name if your Print Server Gateway has more than one port you w...

Page 51: ...g driver If the printer driver is already installed do the following Click Have Disk Insert the printer driver disk that came with your printer Select the printer you are adding from the list of Print...

Page 52: ...s on your network in order to share the printer Click Finish to complete the addition of the printer This screen will display informa tion about your printer Click Next Select Yes to print a test page...

Page 53: ...computers on the network must have a unique IP Address in the same range e g 192 168 0 x Any computers that have identical IP Addresses will not be visible on the network They must all have the same...

Page 54: ...ust have an IP Address in the same range e g 192 168 0 x Each device must have a unique IP Address no two devices may have the same IP Address The subnet mask must be the same for all the computers on...

Page 55: ...d properly You may be using different network adapters than those illustrated here but this procedure will remain the same regardless of the type of network adapters you are using Go to Start Right cl...

Page 56: ...k on Network Adapters Right click on D Link AirPro DWL A650 Wireless Cardbus Adapter Select Properties to check that the drivers are installed properly Look under Device Status to check that the devic...

Page 57: ...ltogether Try changing the Channel on your Access Point and Wireless adapter to a different Channel to avoid interference Keep your product away at least 3 6 feet from electrical devices that generate...

Page 58: ...oducts network together out of the box at the factory default settings To hard reset the D Link AirPro DWL 6000AP to Factory Default Settings please do the following Troubleshooting Locate the Reset b...

Page 59: ...ement Web Based Interface Network Architecture Supports Infrastructure Mode Diagnostic LED Power 100M Link Act 10M Link Act 11a WLAN 11b WLAN Range Indoors up to 328 feet 100 meters Outdoors up to 1 3...

Page 60: ...4Mbps up to 108 Mbps in Turbo Mode Data Security 64 128 152 bit WEP Wired Equivalent Privacy Encryption Access Control List Antenna Type 5dBi dipole antenna with diversity Power parameter software con...

Page 61: ...ired Equivalent Privacy Encryption Antenna Type 2dBi antenna with Diversity Available Channels Eleven channels for North America Three non overlapping Frequency Range 2 4 2 497 GHz Modulation Technolo...

Page 62: ...tes D Link Technical Support over the Telephone 877 453 5465 24 hours a day seven days a week D Link Technical Support over the Internet http support dlink com Technical Support for customers within C...

Page 63: ...specifications for the Software as set forth in the applicable documentation from the date of original retail purchase of the Software for a period of ninety 90 days Warranty Period provided that the...

Page 64: ...n and removal of the product for repair and shipping costs Operational adjustments covered in the operating manual for the product and normal maintenance Damage that occurs in shipment due to act of G...

Page 65: ...n This equipment generates uses and can radiate radio frequency energy and if not installed and used in accordance with the instructions may cause harmful interference to radio communication However t...

Reviews: