background image

7

Setting up your DP-G310 for 

network printing in Windows XP


(continued)

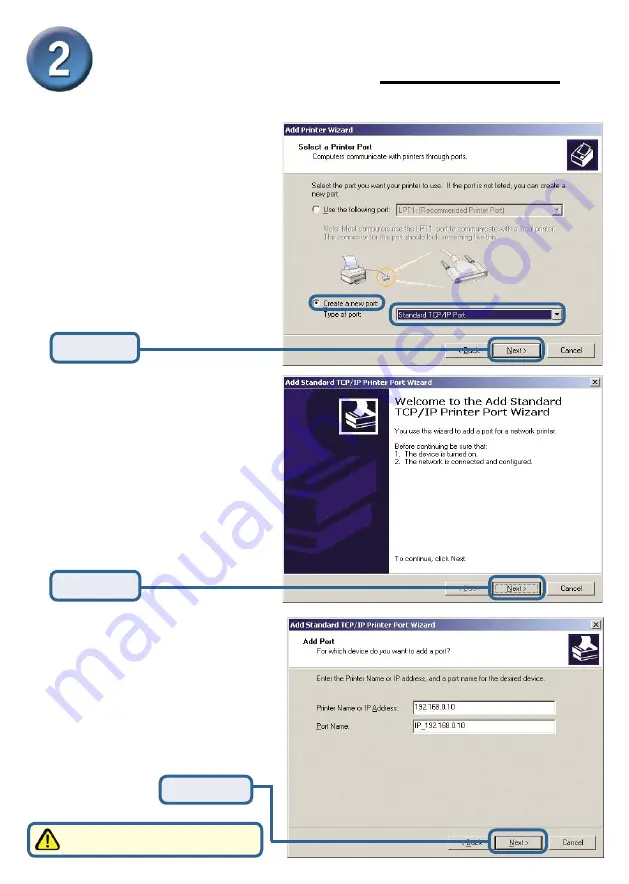
Select 

“Create a new port.”

At the pull-down menu, highlight 

“Standard TCP/IP Port.”

Click 

Next

Click 

Next

Type in the IP address of the 

print server.  (i.e. 192.168.0.10) 

The port name will automatically 

be filled in.

Click 

Next

This may take a few seconds

All manuals and user guides at all-guides.com

Summary of Contents for AirPlus G DP-G310

Page 1: ...Server Check Your Package Contents DP G310 AirPlusTM G 2 4GHz Wireless Print Server 5V DC 2 5A Power Adapter Using a power supply with a different voltage rating will damage this product and void its...

Page 2: ...inting please refer to manual pdf located on the CD ROM USB Port Receptor for AC Power Adapter Network Port First insert one end of a straight through CAT5 Ethernet RJ 45 cable into the Network Port s...

Page 3: ...ne of the wired PC s on your network to the same subnet as the print server For additional Windows operating system setup or information on the web management interface refer to the manual located on...

Page 4: ...b of the web con guration menu The following instructions use the print server s default IP address as an example Make the appropriate changes if you modify the DP G310 s IP address Click OK to apply...

Page 5: ...ryption level and the key here Click on the Con guration tab to view the current Wireless Settings 64 bit WEP encryption uses a 10 hexidecimal character key 128 bit WEP uses a 26 hexidecimal character...

Page 6: ...ntinued Click Next For Windows XP Go to Start Printers and Faxes Add a Printer or Go to Start Control Panel Printers and Faxes Double click on the Add Printer icon Please make sure to deselect Automat...

Page 7: ...eate a new port At the pull down menu highlight Standard TCP IP Port Click Next Click Next Type in the IP address of the print server i e 192 168 0 10 The port name will automatically be lled in Click...

Page 8: ...0 for network printing in Windows XP continued Click OK Input the port name of the port being used by the printer Select Custom Then click on Settings Click Settings Select LPR PS 121B28 U1 All manual...

Page 9: ...to nd your printer If it is not listed insert the driver CD or diskette that came with your printer Click on Have Disk Then scroll down and highlight the printer Click Next Click Finish At this scree...

Page 10: ...nter is now ready for printing with Windows XP on your network Click Finish Setting up your DP G310 for network printing in Windows XP continued Select Yes to print a test page Click Next All manuals...

Page 11: ...11 All manuals and user guides at all guides com...

Reviews: