background image

10 


Version 1.0 


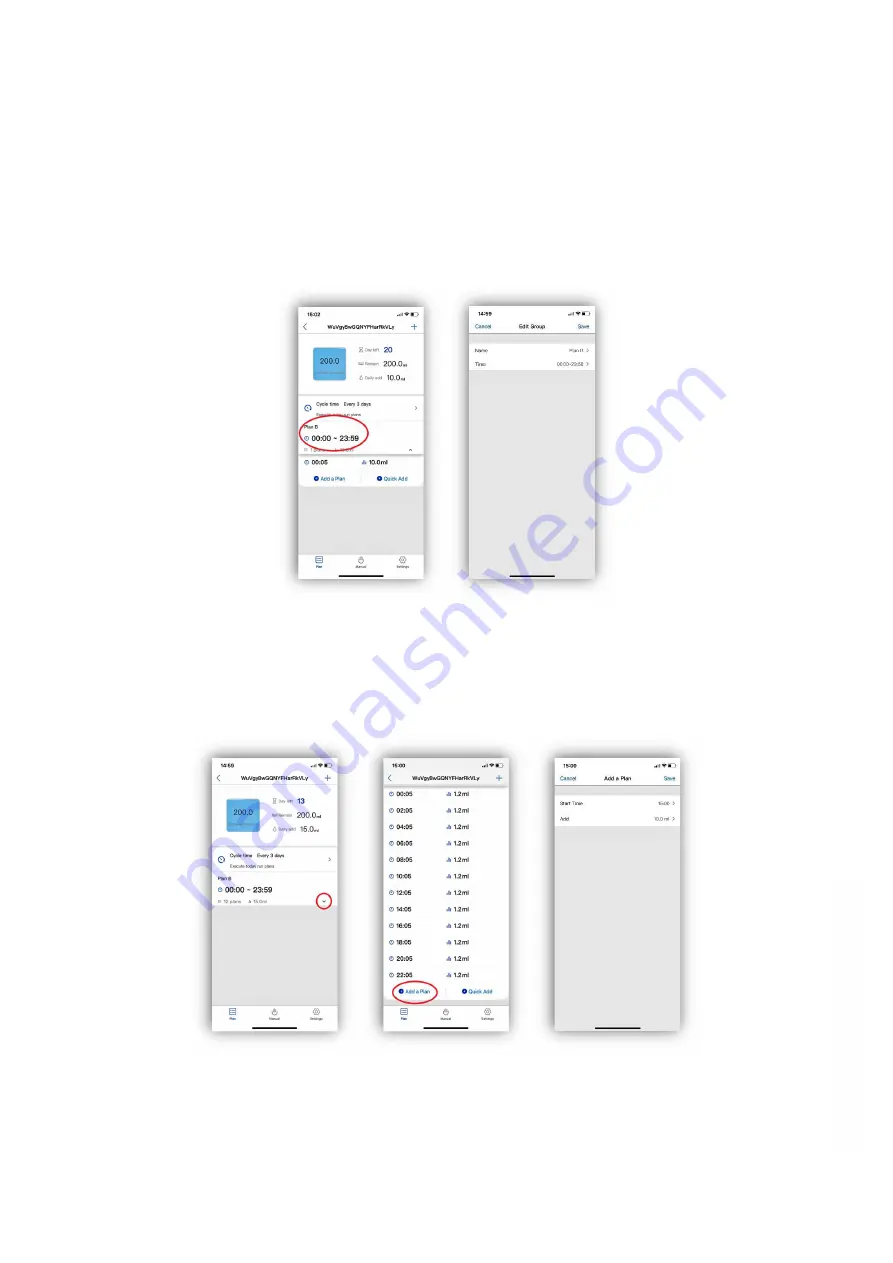
The plan group name and time can be altered by tapping on the plan group and then entering the 
new name or time as required. Select ‘Save’ to confirm the changes. The individual plan points will not 
be changed by doing this. If the plan points fall outside the new time set for the plan group they will 
have to be manually changed as described in this manual. To alter the plan points with the plan group 
period it is best to delete the existing group plan by swiping the plan to the left and set up a new one 
as described in this manual. 


Plan points can be added to an existing group by selecting ‘Add a plan’ in the pump page. Enter the 
time for the additional plan point, the amount to be dosed and tap ‘Save’. This will add to the total 
volume being dosed by that plan group and will be shown on the pump page. Any chemical 
interference set will be ignored by this point. The number of plan points available for each group will 
be determined by the overall time set for that group. 


w

w

w

.th

ea

qu

ari

um

so

lu

tio

n.c

om


Summary of Contents for P1 PRO

Page 1: ...P1 PRO DOSING PUMP USER MANUAL...

Page 2: ...he app 4 Register your cloud account 4 Connect your dosing pump to the cloud 5 Programming the dosing pump 6 Setting the dosing plans 6 Advanced plan adjustments 9 Manual addition 12 Calibration 13 Ad...

Page 3: ...Pharmed BPT pump tube offers long life heat resistance acid alkali resistance and ozone UV resistance Up to 24 dosing plans per day 1 99 day cycle or specified weekly dosing Pump head can be calibrate...

Page 4: ...t and the outlet height siphoning may occur In order to avoid siphoning the dosing pump should be placed in a position to ensure that the height difference between the inlet and the outlet is within 0...

Page 5: ...the Google Play store search for Kamoer Remote find the app download of the corresponding icon Kamoer Remote app supports Android 4 4 and above and supports iOS 9 1 and above Register your cloud acco...

Page 6: ...o connect the dosing pump through a wireless router to the cloud Open the app click the button in the upper right corner of the device to add the device Under the D D H2Ocean heading select the P1 PRO...

Page 7: ...e dosing plan Tap on Cycle time and choose if you want to set up the schedule dosing frequency By Days or Weekly By Days will set the pump to dose every X days e g every 3 days This can be set from ev...

Page 8: ...much it will add on each dose From here set the Anti chemical interference can also be set If you are using multiple P1 PRO dosing pumps this can be used to prevent them dosing at the same time The t...

Page 9: ...e pump has been set to dose every three days a total of 10ml split into 24 doses between 00 00 and 23 59 The dosing container has 999 6ml of solution left in it and should therefore last approximately...

Page 10: ...and dose amount as required select Save to confirm the change It is only possible to set a time within the period set for the plan group Plan points will always be displayed in time order If two point...

Page 11: ...n group period it is best to delete the existing group plan by swiping the plan to the left and set up a new one as described in this manual Plan points can be added to an existing group by selecting...

Page 12: ...roup will be overwritten Multiple plan groups can be added to the same pump This will allow different plans to be set in a single day To add a plan group tap on the symbol enter the group name and tim...

Page 13: ...on at the bottom middle of the screen This will open the manual settings page Tap on the number and enter the amount of liquid you would like to add The pump should now show the amount set for the man...

Page 14: ...ation When the dosing pump is initially set up the pump head has been replaced or if the unit has been in service for a period of time it is worth calibrating pump heads to ensure accuracy To calibrat...

Page 15: ...e pump will run for the time selected in the previous step Once the pump has stopped remove the outlet hose from the measuring cylinder and stand the measuring cylinder on a flat surface Use the scale...

Page 16: ...ollow the instructions on screen Do not close the app or power down the unit during this process Time setting The unit should automatically sync to the correct time when setup and keep the correct tim...

Page 17: ...nit is reset This will not remove the unit from the app or cloud Do not power off the unit during this process Remove Device To remove the device from the app tap on Remove Device and select remove Th...

Page 18: ...purchase D D The Aquarium Solution Ltd undertakes to repair or at our decision replace the defective part free of charge Our policy is one of continual technical improvement and we reserve the right...

Reviews: