background image

Chapter II Operation Guidelines 

2.1 Scanning Preparation  

1. Plug in the M3000 power adapter and switch ON the device by pressing the 
power switch at the rear of the base.


2. Connect the hand button or foot pedal to the port furnished at the base of 

M3000.


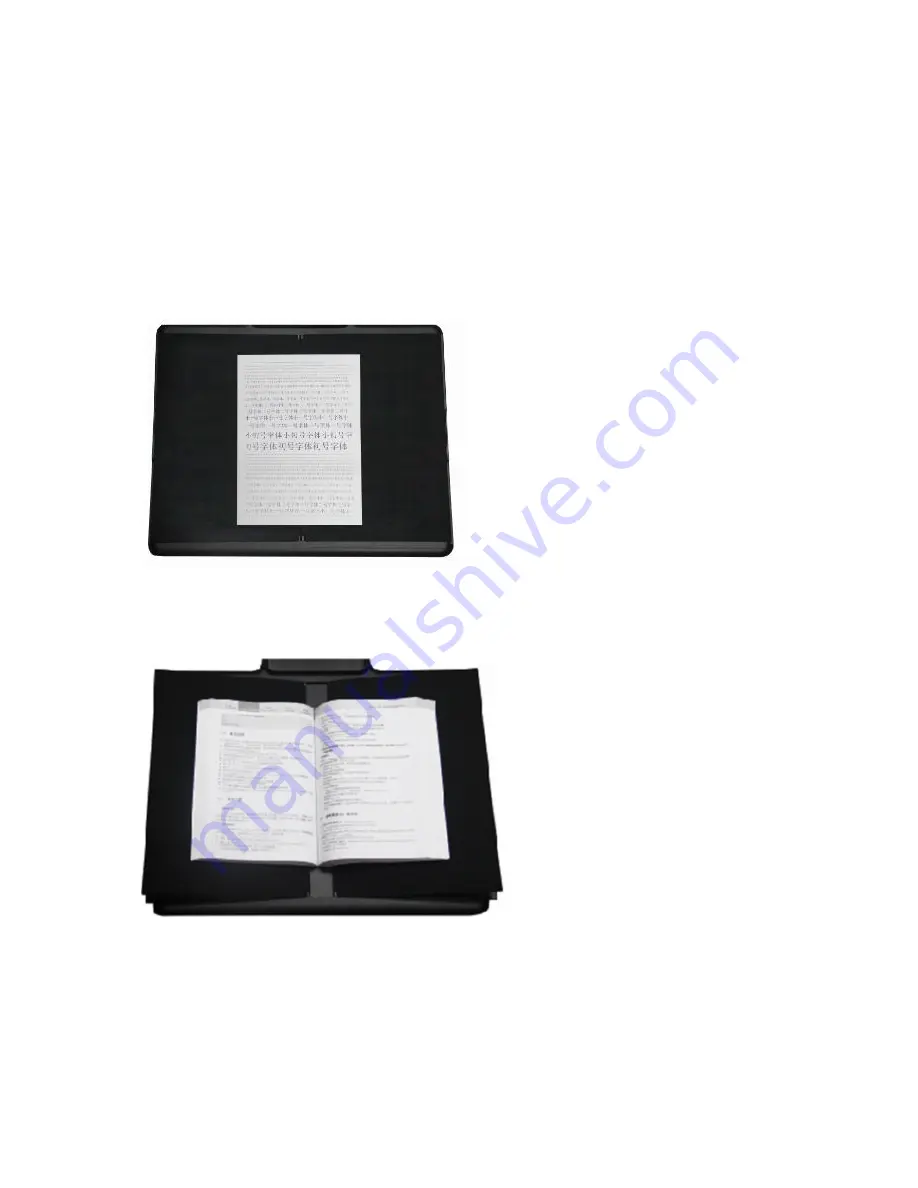
3. When using the Flat Single Page mode, the V-shaped book rest will not be 
required and can be folded up. The document can be placed in the center of the 

black pad.


When using the Facing Pages mode for scanning curved pages (of books or 
publications), the V-shaped book rest can be used. The book rest can be 

extended to the left or right according to the thickness of the book. The book 

can then be placed at the center of the book rest.


4. Check the LCD on the head portion to see if the black area of the V-shaped book 
rest covers the entire screen and ensure that the desk surface or random edges are 

not included within the scan. You may extend or retract the left and right sides of 

the V-shaped book rest to make adjustments. Make sure this step is carried out 

properly because it is essential for the smart algorithms. Improper adjustments may 
lead to errors in image processing. Prior to adjusting, place a book on the black 

area. The equipment will automatically hide areas that appear abnormal.


Summary of Contents for M3000 series

Page 1: ...CZUR TECH CO LTD Website http www czur com E mail support czur com Skype support czur com Room 1701 Oriental Science and Technology Building No 16 Keyuan Road Nanshan District Shenzhen China...

Page 2: ...USER MANUAL M3000 Series...

Page 3: ...ND ACCESSORIES 9 CHAPTER II OPERATION GUIDELINES 10 2 1 SCANNING PREPARATION 10 2 2 WORK MODE 11 2 2 1 Computer Mode USB PC 11 2 2 2 Visual Presenter Mode USB PC 12 2 3 HARDWARE UPDATE 12 CHAPTER 3 FR...

Page 4: ...functions PC applications optical character recognition OCR software and high speed computing are combined to give the definitive high speed scanning and HD presentation experience The M3000 is not o...

Page 5: ...and align the lamp and camera to the slot provided at the side of the base Step 2 Per Figure 2 tilt the lamp and camera base slightly forward to insert the catch into the slot and then press the lamp...

Page 6: ...1 4 Product Appearance Scanner LCD Connection ports Top casing Hand button...

Page 7: ...s Computer mode USB PC X Y represents images awaiting upload number of uploaded images to the PC 18 High definition CMOS camera 19 20 LED light Supports scanning in dimly lit or dark environments 21 R...

Page 8: ...haped book rest Power configurations Input 100 to 240 V 50 60 Hz Output 9V 2A Input 100 to 240 V 50 60 Hz Output 9V 2A Features Smart scanning Available USB 2 0 Available USB 2 0 Flattening Curve 2nd...

Page 9: ...ion of the device including the base 1 3 USB data cable USB 1 5 meter long cable 1 4 Adapter Input 100 240V AC 50 60 Hz 0 6A Output 9V 2A 1 5 Hand button USB 1 2 meter long cable 1 6 Foot pedal USB 2...

Page 10: ...can be used The book rest can be extended to the left or right according to the thickness of the book The book can then be placed at the center of the book rest 4 Check the LCD on the head portion to...

Page 11: ...he M3000 supplemental light to remove the shadow of the scanner s head portion 2 2 Work Mode 2 2 1 Computer Mode USB PC Visit the official website http www czur com and click on the Support tab select...

Page 12: ...r switch is at the ON position Try switching OFF the device and switch it ON again Check if the errors occurred during the M3000 firmware upgrading process Contact our customer service representative...

Page 13: ...ed image exhibits distorted or warped images or stretched texts Check the LCD on the head portion to see if the black area of the V shaped book rest covers the entire screen and ensure that the desk s...

Page 14: ...er attempts to replace components by himself herself 4 Damages caused by natural disasters accidents or human factors 5 Damages caused by inappropriate storage including damages caused by rats or liqu...

Reviews: