11
6.3 Remote Control
1
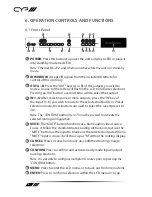
POWER:
Press this button to switch the
unit between On and Stand-by mode.
2
OUT A~B:
Press the button (A or B) of the
output(s) you wish to route a source to.
Pressing an OUT button a second time will
de-select that output.
3
INFO:
Press to show the current input/
output routing and detected resolution on
each output’s OSD.
4
MUTE:
Press this button to route a blank
audio/video source to the selected
output(s).
5
MENU:
Press to enter the LCD menu, or to back out from menu items.
6
LOCK:
Press to lock all button functions on the front panel. Press and
hold for 3 seconds to release the lock function.
7
ALL:
Press to select all outputs simultaneously for routing. Press it a
second time to de-select all outputs.
CONFIRM:
Press to confirm and activate newly made input/output
routing selections.
CANCEL:
Press to cancel/undo any un-confirmed routing change
selections.
PRESET:
Press to enter the preset recall menu in the LCD window.
Press the numbered “IN” button of the Preset you wish to activate
followed by the “TAKE” button to activate it.
8
IN 1~6:
After selecting one or more outputs, press the “IN” button of
the input (1~6) you wish to route to the selected output(s). In Preset
selection mode, these buttons are used to select the saved preset to
use.
9
ENTER:
Press to confirm a selection within the LCD menu or to go
deeper into a menu item.
+ & −:
Press to move up and down or adjust selections within the LCD
menus.
OUT A
OUT B
PRESET
ALL
CANCEL
IN 3
IN 5
IN 4
IN 1
IN 2
IN 6
CR-175
ENTER
INFO
MUTE
MENU
LOCK
CONFIRM
+
+
-
1
2
4
3
5
6
9
8
7


