background image

Defaults:

!

Default IP Address to access NetGenie: http://10.1.1.1

!

Default User Name: admin

!

Default Password: admin

After your first login, it is recommended that you change your default password for security reasons.

Appliance Reset Button: 

To reset appliance to factory default settings, keep the Reset Button pressed for 5 seconds. On  doing so, all 
past  upgrades and configurations will be lost.

Scenarios - 'Connecting through NetGenie’

Please check how you connect to the Internet and make note of it before making any changes. We have 
provided three (3) different usage scenarios. Check the relevant scenario applicable for you and follow given 
instructions.
To configure User-specific Internet access, refer the 'Internet Controls’ section.

In case you cannot connect to the Internet after configuring NetGenie, revert back to your original setup and 
contact NetGenie support at [email protected]

1

4

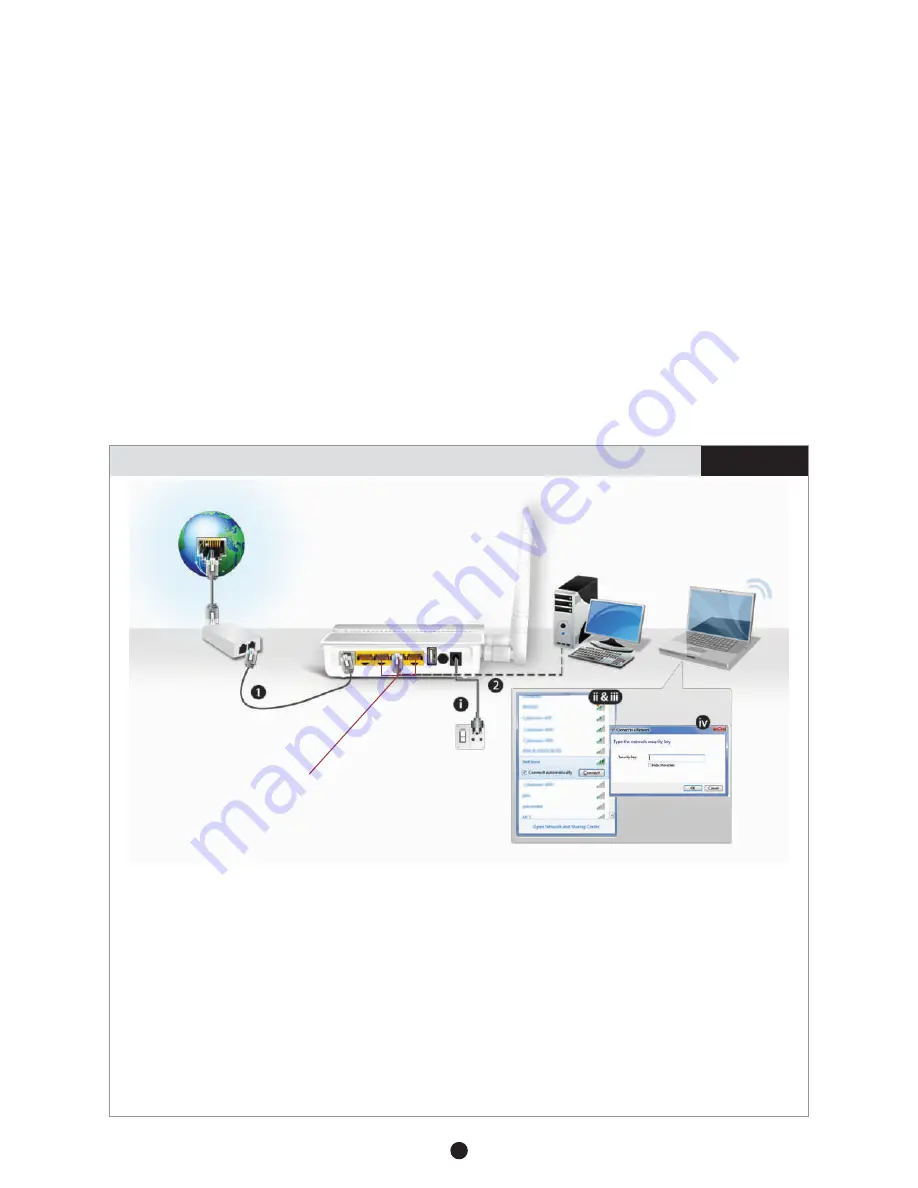
Secure Internet Connectivity through ADSL

Scenario 1

NetGenie Wireless ADSL2+

Integrated Security Appliance 

Connect your Computer/

LAN to any of the ports

Connect your Internet 

cable here

Laptop 

Desktop

NetGenie

Power Cable

Internet

 Splitter

1. Unplug the existing telephone broadband wire from your ADSL/Cable Modem and plug it into the 

NetGenie socket labelled as “DSL”.  

2. Use the RJ-45 Ethernet cable provided with the NetGenie appliance to connect your computer to any 

of the “LAN” NetGenie sockets and switch-on the NetGenie appliance. 

OR

i)  Switch-on your NetGenie appliance. Wait till the Power LED and “DSL” LED turns green and for the 

WLAN/WPS LED to turn green and stabilize.

ii) Start your laptop. Make sure that your Wireless Network Adapter is enabled. Your laptop will auto 

detect the wireless network (SSID) named “NetGenie - XXXX” (XXXX- alpha numeric characters).

iii) Click the Network icon in computer's system tray (bottom-right of your screen) from where you can 

view available wireless networks. Select “NetGenie - XXXX”.

iv) After selecting “NetGenie - XXXX”, you will be asked to enter the exact Security/Pass Key printed 

on the sticker at the back of your appliance (Refer to Getting your NetGenie Ready section).

Summary of Contents for NetGenie Soho

Page 1: ...e agreement the details and links of which are given on the last page of this Quick Start Guide By using thisAppliance it shall be presumed that you have read the said license and you agree to be bound by the terms and conditions of the same QUICK START GUIDE Wireless ADSL2 Integrated Security Appliance VPN Share your 3G USB modem Internet Protection from Bots Hackers Manage access to Websites App...

Page 2: ...able 8 Quick Start Guide Please contact your vendor immediately if you find anything missing NetGenie The Appliance INET DSL WLAN 1 2 3 4 Power LED LAN Your Computer Connectivity LED LAN WAN Internet Connectivity LED Wireless Wi Fi Connectivity LED DSL LED Internet Connectivity LED Connect Your RJ 11 Telephone Line here Connect Your PC LAN here Connect Your Direct Internet Cable i e RJ 45 WAN here...

Page 3: ...ting your NetGenie Ready Before you begin surfing the Internet using NetGenie you need to assemble the appliance 1 Look out for a sticker at the back of the appliance containing the default wireless network name technically known as SSID and a pass key specific for your appliance Please note down your pass key for future reference 2 Plug one end of the power adapter into the socket on the back of ...

Page 4: ...tGenie Wireless ADSL2 Integrated Security Appliance Connect your Computer LAN to any of the ports Connect your Internet cable here Laptop Desktop NetGenie Power Cable Internet Splitter 1 Unplug the existing telephone broadband wire from your ADSL Cable Modem and plug it into the NetGenie socket labelled as DSL 2 Use the RJ 45 Ethernet cable provided with the NetGenie appliance to connect your comp...

Page 5: ...ith NetGenie Splash Screen Your computer is now secured with the Quick Security feature automatically turned on 3 Open your browser and go to the default IP Address i e http 10 1 1 1 to access NetGenie Web Admin Console Use the default User Name and Password i e admin to log in 4 You need to configure network settings to connect to the Internet You can either run the NetGenie Network Configuration...

Page 6: ...i Click the network icon in computer s system tray bottom right of your screen and Select NetGenie XXXX iv After selecting NetGenie XXXX you will be asked to enter the exact Security Pass Key printed on the sticker at the back of your appliance 3 Enter the IPAddress http 10 1 1 1 in the address bar Use the default User Name and Password i e admin to log in 4 Go to Network Settings Internet 5 Selec...

Page 7: ... Settings and click Launch Network Configuration Wizard 4 Click Next to continue or Skip Wizard to configure the network settings manually through the NetGenie user interface 5 Select your Internet connection type i e ADSLor Ethernet Click Next to continue 1 7 ...

Page 8: ... for ADSL connection type only In case of Ethernet click Next after selecting Ethernet as your Internet connection type and NetGenie will automatically connect to the Internet However for Ethernet connection type with a static IP Address you need to configure the Network settings manually through the NetGenie user interface Select your country and ISPfrom the list Enter Username and Password as pr...

Page 9: ...ll not be displayed anymore NetGenie s Internet Controls Once you begin surfing the web you would want to ensure online safety for your office users to give them controlled internet access to websites and applications Since your office users may have different Internet access requirements based on individual roles you might want to setup user specific Internet controls In order to reflect your off...

Page 10: ...to change the picture of an individual simply click the image icon Similarly if you wish to keep logs of Internet activity for that user tick the Enable InternetActivity Reporting checkbox 6 Click SetTime Controls to enable time based Internet access to the user 7 In case of any confusion on how to configure please refer instructions given in the Tips panel on the right hand side of your screen 8 ...

Page 11: ... delete a user click the icon next to username in the left hand panel of the Internet Controls page 2 When prompted confirm your action by clicking the OK button The user will be deleted Deactivating orActivating Users 1 If you wish to deactivate a user click the icon next to the username in the left hand panel of the Internet Controls page To activate the user click against the icon next to the u...

Page 12: ...change without notice USER S LICENSE Use of this product and document is subject to acceptance of the terms and conditions of NetGenie End User License Agreement EULA and Warranty Policy for NetGenie Appliances You will find the copy of the EULA on http www netgenie net documents EULA html and the Warranty Policy for NetGenie Appliances can be found in http kb netgenie net RESTRICTED RIGHTS Copyri...

Reviews: