

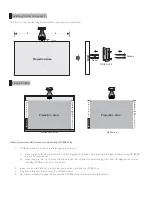

Whiteboard Setup
Wall Setup
Projection area
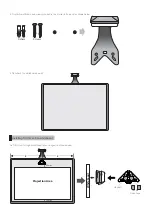
Screws
Fisher
TOUCH v2.0
W
all
x
x
Projection Area
1 inch
TOUCH 2.0
Fix TOUCH unit on the wall using plastic wall fisher and screws as shown below
Installing TOUCH v2.0 on Wall
Fixing OPTIBAR
Projection area
Following points should be taken care while using OPTIBAR Setup:
1)
OPTIBAR stickers to be used only in following projection setup.
a)
When using 6'x4' Board and projection is 78 inch diagonal in 4:3 Aspect Ratio (making total diagonal size including OPTIBAR as
84 inch. As shown above.
b)
When the projection is in 16:9 aspect ratio and vertical size of projection not exceeding 4 feet and total diagonal size of setup
including OPTIBAR is not more than 90 inch.
2)
In any case the width (vertical) of projection should not be more than the OPTIBAR size.
3)
Projected surface should not overlap the OPTIBAR stickers.
4)
The distance between the edge of Projection and OPTIBAR sticker should not be more than 10mm.


