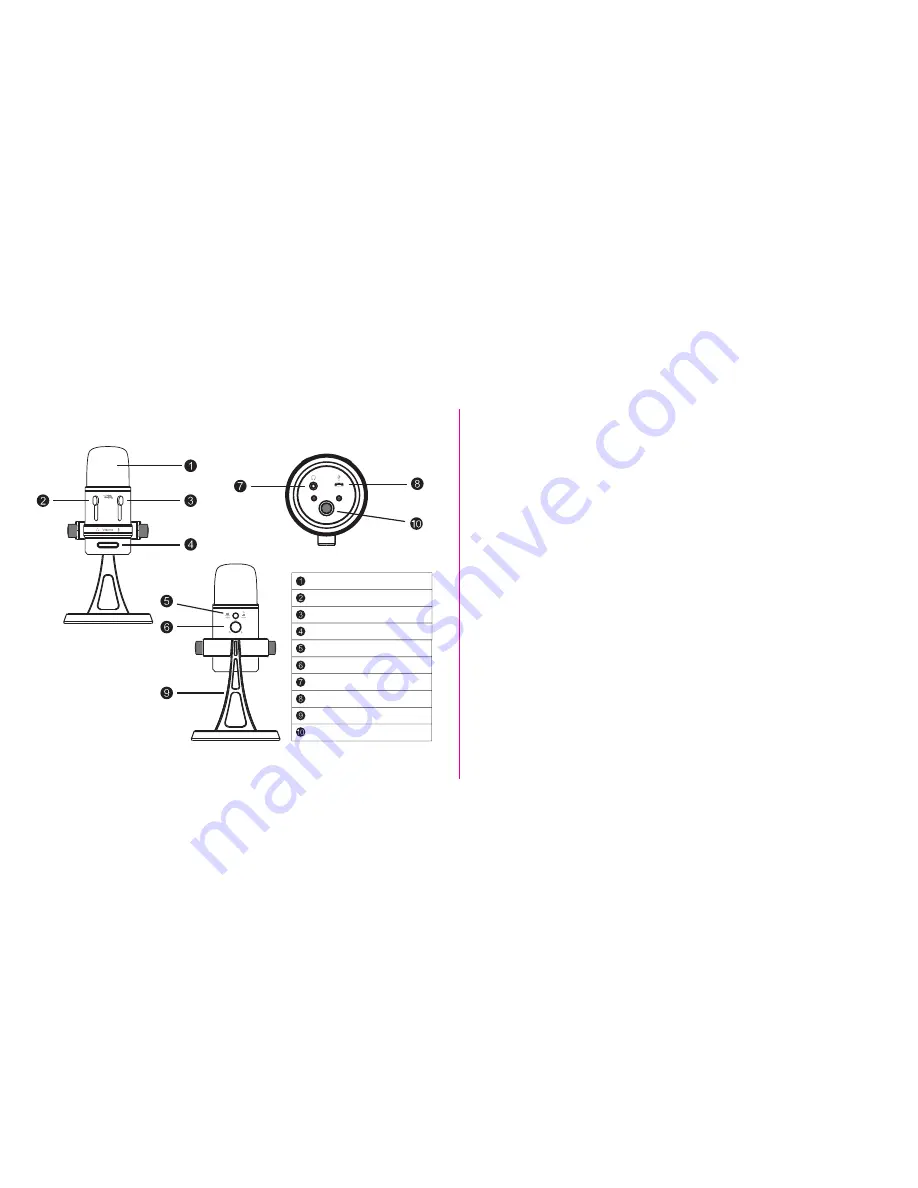
Back view
Bottom view
Front view
MIC capsule
Microphone volume control
Headphone volume control
Power LED
USB connection
Headphone output
Polar patterns selector knob
Stereo recording selector
Mic stand mounting hole
Desktop stand
Controls and features
1)
Mic capsule
– Three microphone elements with different recording characteristics for
different sound environments.
2)
Headphone volume control
– Control headphone volume by sliding up or down.
3)
Microphone volume control
– Slide up and down to adjust the microphone gain. When it
switches to the lowest position, the mic will mute.
4)
Power LED
– Lights up when mic is plugged into USB port and is getting power.
5)
Stereo recording selector
– Press stereo button to override polar pattern knob selection
and engage stereo recording. Pattern is left to right in front, and reverses behind the mic.
Press button again to disengage and return to the polar pattern knob control.
6)
Polar patterns selector knob
– Rotate selector knob to chose between omni-directional,
uni-directional (cardiod), or bi-directional (front to back).
7)
Headphone output
– The microphone includes a 3.5mm headphone output jack for
monitoring and playback. Plug in your own headphones to monitor your microphone
recording in real-time, without latency delays. And you can also enjoy the audio playback
on your computer through the same headphone output jack.
8)
USB connection
– Connect the microphone with your computer using the provided USB
cable. Plug the micro USB into the micro USB port on the bottom of the mic, and other
end into a standard USB port on your PC / Mac. To perform at its best, avoid connecting
through USB hubs or other USB multipliers.
9)
Desktop mic stand
– You can adjust the mic tilt angle to your desired recording position.
10)
Mic stand mounting hole
– You can remove the desktop stand and use professional mic
stands, tripods or other mounting options by connecting with a 3/8” threaded adapter in
the mounting hole on the bottom of the mic.


