background image

9

Instruction Manual

Manual

INSTALLATION (continued)

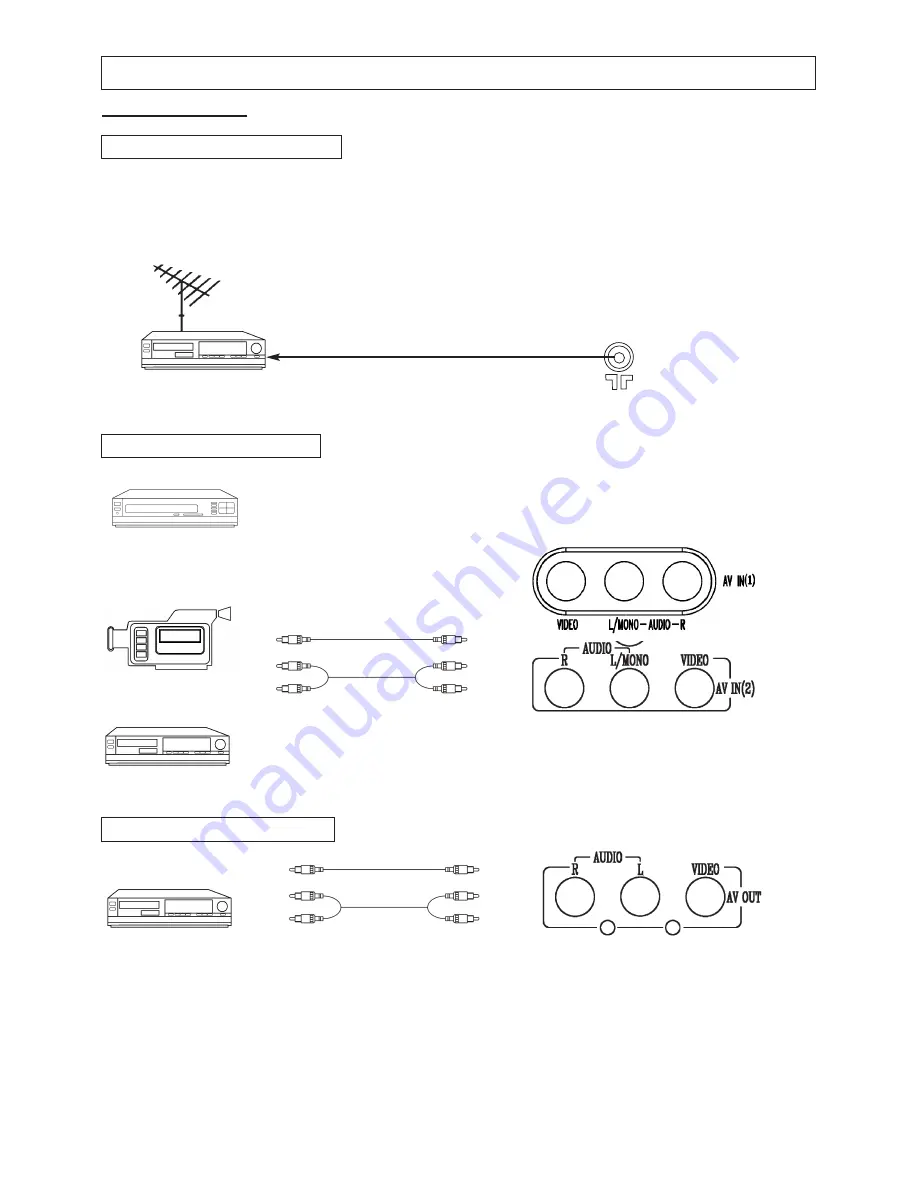
Connecting A/V Equipment

The following are diagrams showing basic instructions for attaching external equipment, like a VCR or
DVD player, to your unit. Please refer to operation manuals of external audio/video equipment that will
be connected to your set for additional instructions. PLEASE TURN OFF ALL POWER BEFORE
CONNECTING DEVICES TOGETHER.

Connect VCR's RF OUT terminal to the RF IN jack located on the rear panel of the TV.

Coaxial Cable

VCR 

AUDIO/VIDEO OUT

DVD Player

Camcorder

VCR

AUDIO/VIDEO IN

VCR

VIDEO

Yellow

White

Yellow

White

Yellow

White

Yellow

White

RF IN

Output from TV to Device

Input from Device to TV

AUDIO

VIDEO

AUDIO

Red

Red

Red

Red

Summary of Contents for TVD2000

Page 1: ...TV DVD COMBO Please read this manual carefully before operation INSTRUCTION MANUAL TVD2000 ...

Page 2: ...n the picture tube or projection TV picture tubes ALSO some network program logos phone numbers etc may cause similar damage This damage is not covered by your warranty Cable TV Installer This reminder is provided to call your attention to Article 820 40 of the National Electrical Code Section 54 of the Canadian Electrical Code Part 1 which provides guidelines for proper grounding and in particula...

Page 3: ...ped 15 Warning This unit should only be serviced by an authorized and properly trained technician Opening the cover or other attempts by the user to service this unit may result in serious injury or death from electrical shock and may increase the risk of fire FCC Warning Class B Computing Device Information to User This equipment has been tested and found to comply with the limits for a Class B D...

Page 4: ...ep the disc clean If you cannot wipe off the dirt off wipe the disc lightly with a slightly moistened soft cloth and finish with a dry cloth Do not use any of solvent such as paint thinner benzine commercially available cleaners or anti static spray for vinyl LP s Storing discs Do not store discs in places subject to direct sunlight or near heat sources Do not store discs in places subject to mois...

Page 5: ...Picture Menu 11 Tuner Menu 12 Timer Menu 12 System Menu 12 Useful Remote Control Features 14 DVD FUNTIONS Playing Back a Disc 15 Using the On Screen Display 16 Locating a Specific Title Chapter or Track 17 Selecting Subtitles 18 Selecting the Camera Angles Language Audio Settings 18 Setting the Parent Lock 19 Customizing the Function Selectings 20 TROUBLESHOOTING GUIDE 21 LIMITED PRODUCT WARRANTY ...

Page 6: ...he TV to turn on or off Parental Control feature that allow parents to block out selected type of programming Screen Size the diagonal size of the TV screen Selectable Picture Modes preset standards for TV display User Normal Movie and Sports Trilingual On Screen Display OSD TV s on screen display can be either English French or Spanish DVD CD KODAK Picture CD Support 5 SPECIFICATIONS MODEL TVD200...

Page 7: ...ol Features Front panel Front and Rear Unit Profiles ANTENNA IN POWER INDICATOR MENU SELECT CHANNEL DOWN UP TV VIDEO SELECT VOLUME DOWN UP OPEN CLOSE DVD TV SELECT PLAY PAUSE STOP INFRARED SENSOR DVD TRAY STANDBY AV IN1 terminals Rear panel ...

Page 8: ...12 13 14 15 16 17 18 19 20 21 22 23 24 25 Function Description TV DVD Standby TV Video select Setup Channel scan Angle select Channel number 0 9 Number 0 9 Picture mode select Used to navigate the menus Accesses the sub menus DVD menu Volume down up Stop To play Play Pause Previous skip Forward skip Slow playback Sub title Decrease Increase volume by 4 levels Child lock Recall Resume CCD Text Audi...

Page 9: ...gnal 3 No key is pressed within 15 minutes Notes 1 It is recommended that a 75 ohm coaxial cable be used in order to eliminate interference and noise which may occur due to nearby radio transmissions 2 The antenna cable should not be tied together with other wiring 3 Set up a lightning rod and check it regularly when an outdoor antennais used 1 Remove the battery compartment lid Insert two AAA bat...

Page 10: ...io video equipment that will be connected to your set for additional instructions PLEASE TURN OFF ALL POWER BEFORE CONNECTING DEVICES TOGETHER Connect VCR s RF OUT terminal to the RF IN jack located on the rear panel of the TV Coaxial Cable VCR AUDIO VIDEO OUT DVD Player Camcorder VCR AUDIO VIDEO IN VCR VIDEO Yellow White Yellow White Yellow White Yellow White RF IN Output from TV to Device Input ...

Page 11: ... authorized by Macrovision Corporation and is intended for home and other limited viewing uses only unless otherwise authorized by Macrovision Corporation Reverse engineering or disassembly is prohibited It is forbidden by law to copy broadcast show play in public or rent copyrighted material without permission DVD video discs are copy protected and any recordings made from these discs will be dis...

Page 12: ...ons Function Selection Menus Features This menu allows you to adjust the various picture settings Press to move between the various settings and to adjust them When finished press the MENU key to return to the main menu Tint 31 more purplish to 31 more greenish Brightness 0 dimmest to 63 brightest Contrast 0 minimum contrast to 63 maximum contrast Color 0 minimum color to 63 maximum color Sharpnes...

Page 13: ...vated Off Time This feature allows you to preset a time when the TV set will turn off Timer Timer can be set to Once or Always Timer Menu Time On Time On Channel Off Time Timer Once Timer Language This feature allows you to pick a language used for the on screen display OSD Press to select the language of your choice English Eng French Fra or Spanish Esp Blue Back This feature gives you the option...

Page 14: ...lease note that blocking a lower rating for example PG will block all higher ratings PG 13 R NC 17 X Pass Code Menu This menu allows you to change the access code for the Parental Guide functions of the TV set Press the MENU key when Pass Code Control is highlighted This will turn on or off the Pass Code function With the Pass Code function ON you can also change the Pass Code Press to highlight P...

Page 15: ... or Text VIDEO This key allows you to toggle between antenna and different video modes Child Lock The Child Lock feature prevents unauthorized viewing of the TV To activate press and hold the F key and then press MUTE You should see a key symbol appear on the screen This will lock out all remote functions except for Standby To unlock the TV press and hold the F key and press MUTE This will unlock ...

Page 16: ...use playback still playback Press the PAUSE key during playback Press the PAUSE key to resume normal playback 5 How to remove the disc Press the OPEN CLOSE key Wait until the disc tray is completely open before removing any discs After removing the discs press the OPEN CLOSE key to close the disc tray 6 How to stop playback Press the STOP key once The DVD player is stopped Press the PLAY or RESUME...

Page 17: ...emorizes the location where you stopped playback 2 Press the RESUME key The DVD player will resume the playback from the location where you stopped playback Notes 1 The following actions will cancel the RESUME function Unplugging the unit after you stop playback Ejecting the disc 2 Depending on the disc you may experience a difference of location where playback resumes 3 Some discs do not utilize ...

Page 18: ...s will not respond to this function 2 If different instructions appear on the TV screen follow those instructions The instructions above are describing the basic procedure where the procedures may vary depending on the contents of the DVD video disc 2 Locating a specific chapter or track This unit allows you to locate consecutive chapters or tracks Press the PREV or NEXT key repeatedly to display ...

Page 19: ...TOP twice during playback 2 Press SETUP The SETUP MENU appears on the TV screen 3 Select Preference page press ENTER 4 Select Parental press direction keys Select Parental press ENTER 5 Enter your password then press ENTER key The preset password is 1225 To change your password 1 Follow step 3 to select password change 2 Enter old password 3 Enter new password 4 Re enter to confirm your new passwo...

Page 20: ...while it is displayed Functions and menu may change without notice You must press STOP twice to set up Preference 20 General Preference Video Dolby Audio General Setup Page Tv Display Ps Angle Mark On Osd Lang Eng Spdif Output Raw Captions Off Screen Saver On Speaker Setup Page Downmix Stereo Normal Ps Normal Lb Wide On Off English French Spanish Spdif Off Spdif Raw Spdif Pcm On Off On Off Lt Rt S...

Page 21: ...Instruction ManualManual 21 TROUBLESHOOTING GUIDE Check the following guide for a possible correction to a problem before contacting customer support ...

Page 22: ...f Goods Act or like legislation or statue is hereby expressly excluded Save as herein provided C I Service Dept Canada or C I Service Dept USA shall not be responsible for any damages to persons or property including the unit itself howsoever caused or any consequential damages arising from the malfunction of the unit and by the purchase of the unit the purchaser does hereby agree to indemnify and...

Page 23: ...Curtis International Ltd 315 Attwell Drive Toronto ON M9W 5C1 ...

Reviews: