


HOW TO USE ANTENNA
May direct connect external movable antenna to RF in, may also connect roof antenna
directly.
For better reception:
Adjust the direction/position of the antenna. The signal strength depends on the area of
reception. If the signal is too weak, poor or no reception is possible. This is not a
malfunction.
ATSC & NTSC TV OPERATIONS
TV SETTING MENU
GET STARTED
SEARCH A PROGRAM
ADJUST THE VOLUME
AUDIO EFFECT OPTIONS
Be sure the TV antenna is connected to the set properly.
Plug the AC adaptor to the power source to power on the TV set.
Slide power on/off switch to on position.
Press the TV/AV button on the remote or MODE button on the main unit to select TV
Mode.
Adjust the monitor according to the angle you would like to watch TV by pushing the TV
set.
Press CH UP/DOWN button once, the channel number changes. A desired channel can
be reached using these two keys.
NUMERIC button on the remote can facilitate you to select a specific channel. If the
channel number exceeds 10, input first digital unit, then another digital unit;
Note: this TV receiver can store the channels from 2~69, and the maximum of each
channel has 8 programs. To select the desired programs by using - button and numeric
buttons.
Do as follows:
To select CH 13 NO. 2
Press 1 and 3, then press - and input 2.
Once the input is done, it will start broadcasting the selected channel immediately.
Too loud the voice will damage your ears, to adjust the volume, use the VOLUME
UP/DOWN buttons on the main unit or on the remote control.
This TV set is with two speakers inside the front panel, which are enabled immediately it is
powered on.
Press TV/AV button on the remote or MODE button on the main unit to select TV mode,
then Press once the MENU button, the screen will pop up a setting menu;
use the NAVIGATION LEFT/RIGHT buttons to select among the setting options, then press
NAVIGATION UP/DOWN button to enter the sub menu, again use NAVIGATION
LEFT/RIGHT button to select the desired option or adjust and press OK/ENTER Button to
confirm the item to be set;
Press MENU button to go to previously menu and press EXIT button to exit the menu
interface.
5
4
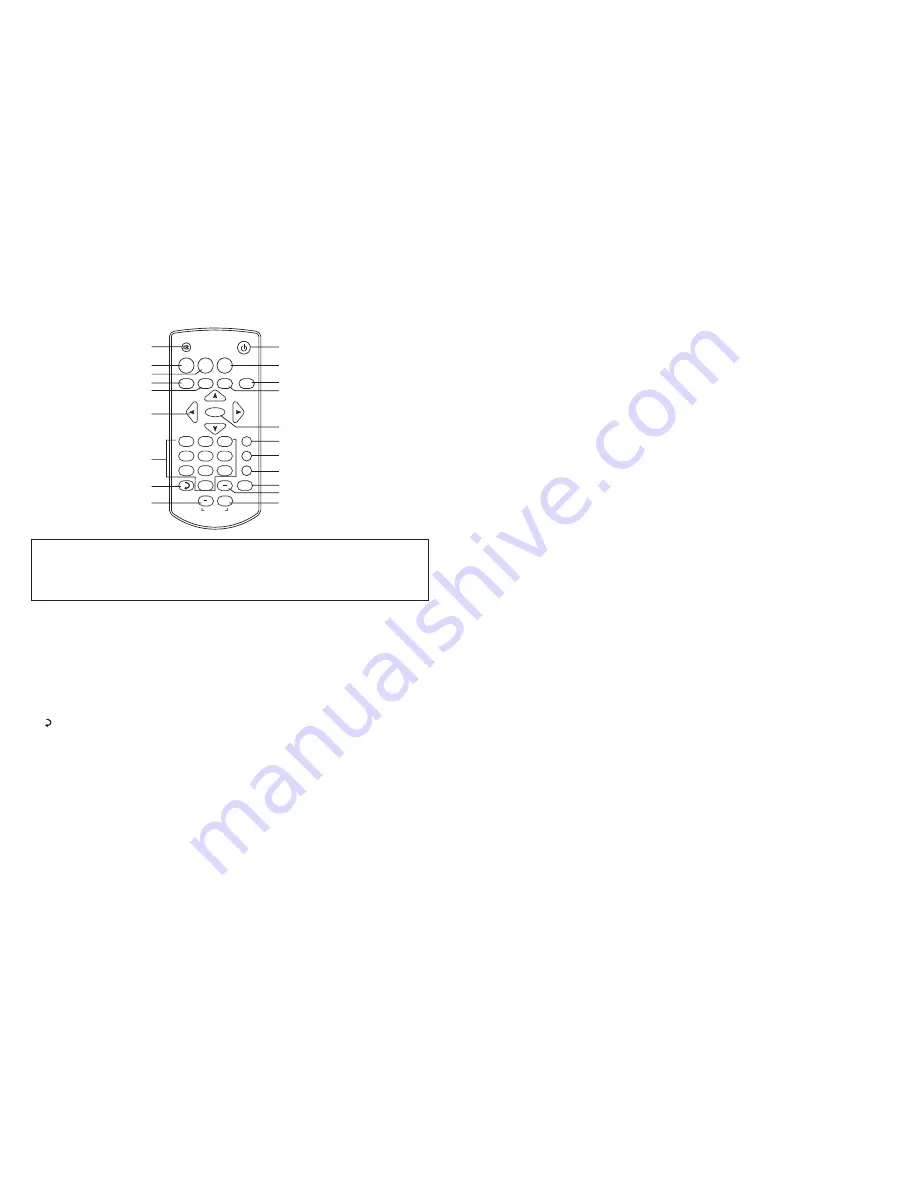
Remote control operation
Note:
a) Point the remote control unit from no more than about 7 m from the remote control
sensor and within about 60 of the front of the TV monitor.
b) Do not press the button too quick. Press the button after the previous operation is
completed.
1. MUTE:
4. MENU: Press this button to access the menu interface.
5. SLEEP:
6: NAVIGATION buttons: Press to select the options under OSD setting interface or alter
the settings in a menu.
7.
8.
: Press to go to previously selected channel.
9.
10. POWER: Press this button to set the player to standby on or off state( If the main power
of the set is on).
11. ZOOM:
18. CH-:
19.
20. : Press this button to increase the speaker volume.
°
(0~9 ):
VOL-: Press this button to decrease the speaker volume.
12. EXIT: Exit the menu interface.
13. EPG: Press this button to skim over TV programs guide.
14. OK/ENTER: Confirm the selection.
15. TV/AV: Select the desired signal input mode.
16. INFO: Press this button to display current program information.
17. CH+: Press this button to increase the channel number.
Press this button to decrease the channel number.
- : Used to directly input TV channels.
Used to toggle between normal & muted audio.
Use to auto power off by setting sleep timer.
Enter numeric values and to select the channel or program directly by entering
its number.
Used to select the desired display mode wide or normal. .
2. PICTURE: Press this button to select the picture display effect between Dynamic, soft,
personal or standard.
3. MTS: Press to select the audio output language.
EPG
MENU
SLEEP
1
2
3
4
5
6
7
10
11
12
13
14
16
MUTE
POWER
PICTURE
MTS
ZOOM
EXIT
ENTER
1
+
2
3
4
5
6
7
8
9
15
CH-
CH+
INFO
TV/AV
VOLUME
0
8
9
18
19
20
17


