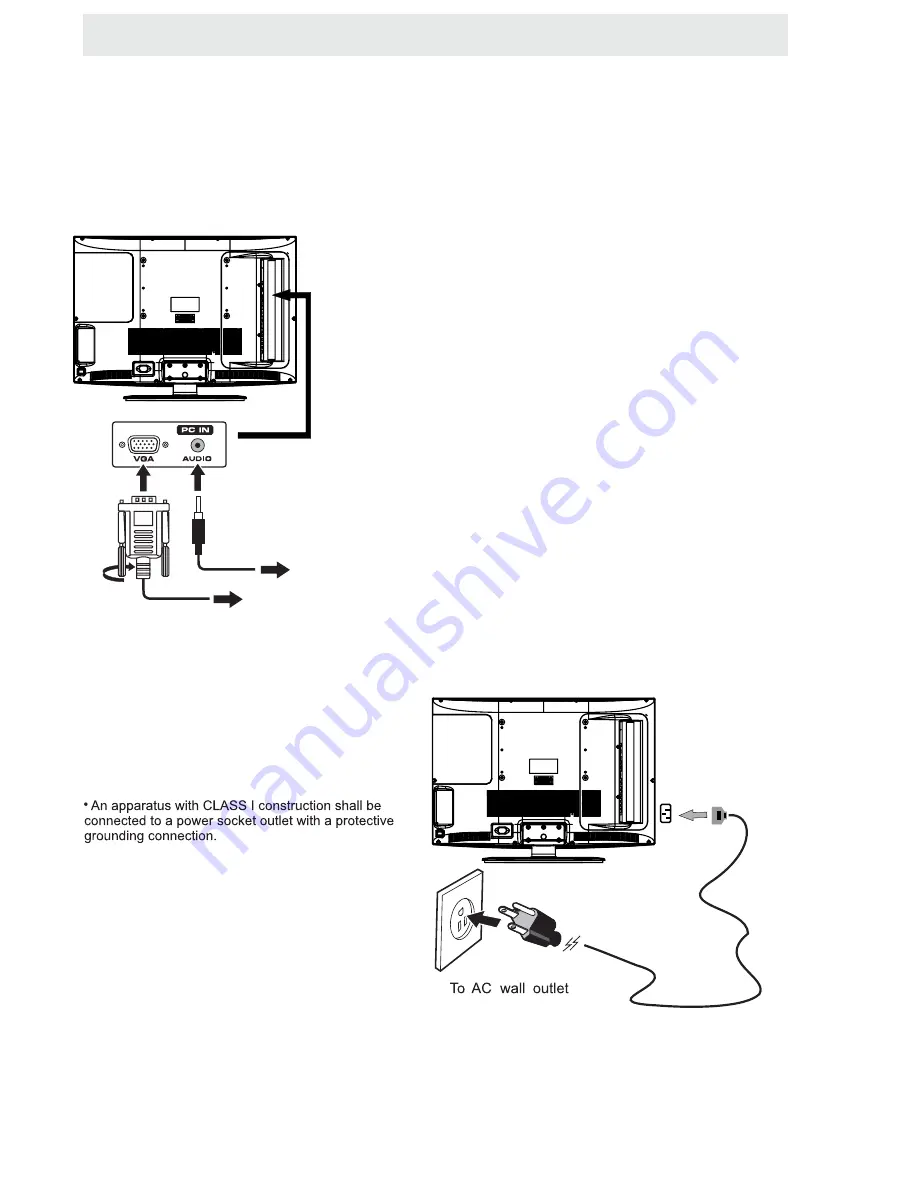
background image

CONNECTIONS

CONNECTING    A

AUDIO

  - 

PC


OUT

VGA

AUDIO

  - 

PC


IN

PC

VGA

Connect

  the  15-pin  D-SUB  PC/V

GA

  connect

or

from

  your  comput

er

  t

o

  the  15-pin  D-SUB  PC/V

GA

input

  on  this  unit  using  a  monit

or

  cable  and  an

audio

  cable  (not  included)  as  shown.

Make


sure


you


connect


the


cable


from


the


computer

(

and

to

  this  unit

(

and

).

CONNECTING THE  POWER  CORD

You

  can  pow

er

  your  T

V

  unit  by  plugging  the  power   cor

d

  int

o

  the  A

C

  sock

et

  on  the  side  o

f

the


unit


and


into


a


wall


AC


power


outlet

Check


that


the


rated


voltage


of


your


unit


matches


your


local

voltage

M

ak

e

  sur

e

  that  the  power    cor

d

  is  fully  inser

ted

  int

o

  the  unit.

TO

  PC  Connector

TO


AUDIO


OUT


jacks

NOTE

• Insert

  the  power  plug  fully  into  the  sock

et

  outlet

If

  the  power  plug  is  loose

it

  could  generate  heat 

and

cause

  fir

e

Do


not


touch


the


power


plug


with


a


wet


hand

This

  may  cause  electrical  shock

Do

  not  use  any  power  cord  other  than  that  pr

ovided

withthis

  T

V This

  may  cause  fir

e

  or  electrical  shock

Do


not


damage


the


power


cord

A


damaged


cord


may


cause


fire


or


electrical


shock

• Do

  not  move  the 

TV

  with  the  cor

d

  plugged  in  the

socket

  outlet.

• Do


not


place


a


heavy


object


on


the


cord


or


place

the

  cor

d

  near  a  high-temperatur

e

  object.

• Do


not


twist


the


cord

bend


it


excessively

or


stretch


it

.

• Do

  not  pull  on 

the

  cor

d

H

old  onto  the  power  plug  body  when  disconnecting cor

d

.

• Do


not


use


a


damaged


power


plug


or


socket


outlet

.

.

(

,

.)

.

(

.)

.  (

.)

.

(

).

connected  to  prevent  electrical  shock.

Ensure  that  the  power  plug  is  easily  accessible.
Ensure  the  earth  pin  on  the  power  plug  is  securely

9

Summary of Contents for LCD3227A

Page 1: ...INSTRUCTION MANUAL Before using the TV please read this manual thoroughly and retain it for future reference Model LCD3227A...

Page 2: ...ATION INITIAL SETUP TV SETUP CONNECTIONS Remote Control Front Frame Back Frame Side Panel Antenna Connection AV Connection Y Pb Pr Connection HDMI Connection VGA Connection Power Cord Connection Coax...

Page 3: ...ONTENTS 26 10 28 11 12 29 DISPLAY MODE SPECIFICATION TROUBLE SHOOTING GUIDE PC Formats Video Formats TV Symptom SAFETY CLASS This is an IEC safety class I product and it must be grounded for safety 27...

Page 4: ...t cold dusty or humid Do not restrict the airflow of this unit by placing it somewhere with poor airflow by covering it with a cloth by placing it on bedding or carpeting When connecting or disconnect...

Page 5: ...acement of the obsolete outlet 10 Protect the power cord from being walked on or pinched particularly at plugs convenience receptacles and the point where they exit from the apparatus 11 Only use atta...

Page 6: ...ing unreliable operation The recommended effective distance for remote operation is about 16 feet 5 meters When the batteries become weak the operating distance of the remote control is greatly reduce...

Page 7: ...e before your TV turns Off automatically 10 VOL VOL Increases Decreases the Volume control 11 CH CH Skips to the next previous channel on TV mode 12 UP DOWN LEFT RIGHT Moves the cursor upward downward...

Page 8: ...ANDBY OFF mode Light in red The unit is in STANDBY Light in blue The unit is turned ON 4 Speakers 3 2 4 4 1 1 2 3 4 5 6 7 11 13 8 9 10 12 1 ON OFF Switch 2 AC100 240V 50 60Hz 3 HDMI IN Jacks 4 VGA IN...

Page 9: ...nels and up highlight selections on the menu screen 6 CH Button Press to change the TV channels and down highlight selections on the menu screen 3 VOL Button Press to adjust the volume up 4 VOL Button...

Page 10: ...antenna reproduce a signal as strongly as a fixed antenna To connect to other equipment such as a VCR camcorder satellite system or cable etc CONNECTING AN A V DEVICE NOTE CONNECTING DEVICES WITH A C...

Page 11: ...for use with DVD players DTV set top boxes and other digital AV devices HDMI was developed to provide the technologies of High Bandwidth Digital Content Protection HDCP as well as Digital Visual Inte...

Page 12: ...e power plug fully into the socket outlet If the power plug is loose it could generate heat and cause fire Do not touch the power plug with a wet hand This may cause electrical shock Do not use any po...

Page 13: ...crete full range channels plus a sixth channel for a subwoofer Enjoy optimal sound reproduction from your system with a Dolby Digital amplifier that incorporates a digital coaxial input Connect an opt...

Page 14: ...sure to place a soft cushioned material such as a pillow or thick piece of foam beneath the screen 3 To remove the base stand loosen screws off the holes then pull downwards to release the base stand...

Page 15: ...le local digital channels It is here where you will select antenna options and run Channels will be stored in the TV tuner Press the button on the remote control Press the button to highlight AIR CABL...

Page 16: ...satellite CABLE How to Navigate Setup 12 6 Tim e Picture Audio Cable System Auto MENU Start to Scan Move Next Exit Setup Move Next Exit MENU Picture Audio 12 6 e m i T RF CH Found 7 4 CHANNEL CHANNEL...

Page 17: ...rences Adjustment options include contrast brightness color tint sharpness and color temperature How to Navigate Press the MENU button on the remote control Navigate using the b uttons to select PICTU...

Page 18: ...references Adjustment options include contrast brightness color tint sharpness and color temperature Press the MENU button on the remote control Navigate using the b uttons to select PICTURE Use the b...

Page 19: ...onal preferences Adjustment options include bass treble balance surround SPDIF Type and audio language Press the b utton to highlight SoundMode then press the b utton to select your sound preference f...

Page 20: ...completed you may select another menu by pressing the Menu button Use the b utton to highlight Balance Navigate using the b uttons to adjust sound towards the right or left speaker Use the b utton to...

Page 21: ...n the remote control Navigate using the b uttons to select TIME How to Navigate The TIME menu includes adjustment of settings for your local time zone and daylight savings time The clock will adjust a...

Page 22: ...Move Select Exit MENU Picture Off Normal Off Setup Audio On 6 Time Menu Language Transparency Zoom Mode Noise Reduction Advance Close Caption XVS Restore Default English Move Select Exit MENU Picture...

Page 23: ...ff Normal Off Setup Audio On 12 6 Time Menu Language Transparency Zoom Mode Noise Reduction Advance Close Caption XVS Restore Default English Move Next Exit MENU Pict ure Off Normal Off Setup Audio On...

Page 24: ...played on screen once you connect an input signal from your PC Recommended resolution is 1366 x 768 If your PC system uses a standard signal mode the screen will adjust automatically Connect an option...

Page 25: ...rds To gain access and select your preferences within the LOCK Parental menu make certain your input is set to TV Press the MENU button on the remote control Navigate using the b uttons to select Pare...

Page 26: ...our preferences within the LOCK Parental menu make certain your input is set to TV How to Navigate Press the MENU button on the remote control Navigate using the b uttons to select LOCK Parental Press...

Page 27: ...ol Navigate using t he b uttons to select Parental Press the button to highlight ENTER PASSWORD Enter your 4 digit code factory default code is 0000 unless previously changed To set parental controls...

Page 28: ...for the setup of your television to receive TV channels store your favorites add or skip channels and label them by their call letters How to Navigate Press the MENU button on the remote control Navi...

Page 29: ...X X X X X NOTE This product does not support the display mode not listed above In order to achieve the best display effect please select the above listed 11 display modes input signal Because of the d...

Page 30: ...20 p 720 p 1080 i e i R solut on X X X X The above listed formats are also related to the AV devices you are about to connect Before you connect this unit with others please read all instructions care...

Page 31: ...B Input D sub 15pin G 0 7Vp p 75ohms B 0 7Vp p 75ohms R 0 7Vp p 75ohms Power Requirement Input Output Jacks Systems Power Sound System M Audio System BTSC L R Speaker 10 W 10W Composite Video Input Co...

Page 32: ...nomenon the product may malfunction and require usertopowerreset Unplug and re plug the AC power cord TROUBLESHOOTING GUIDE Check to make sure the program you are watching is broadcast in Color and no...

Reviews: