background image

INITIAL SETUP

12

NOTE:

 For cable or satellite users with no TV antenna, there no need to run Chan nel Auto Scan. 

Connect your cable or satellite set top box to one of the avail able inputs on the TV for viewing.

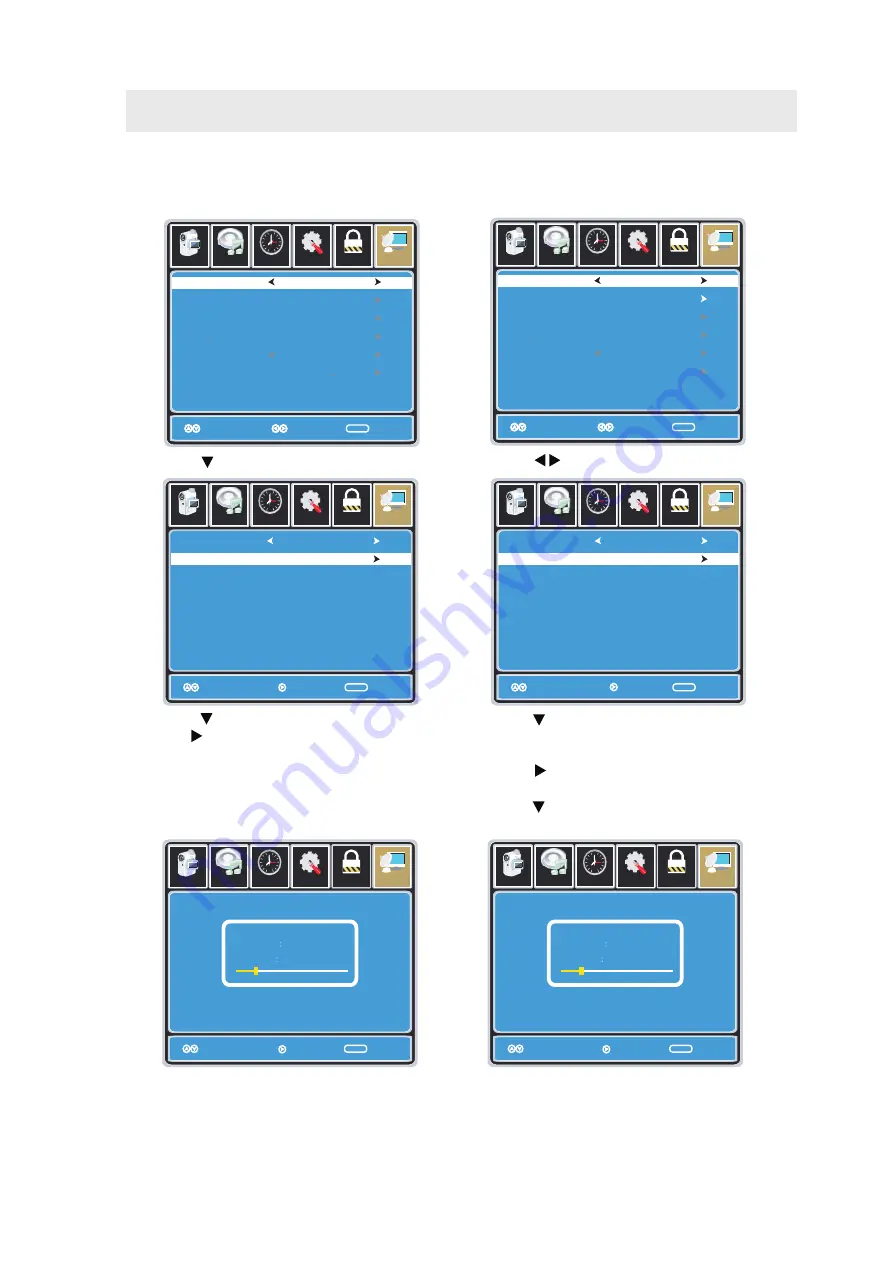
• Press the     button to highlight 

AIR

.

Setup

Parental

12

6

Time

Picture

Audio

TV

Cable System

Auto

MENU

Start to Scan

   Move                           Next                        Exit

Setup

TV

  Move  

Next                          Exit

MENU

Picture

Audio

12

Parental

e

m

i

T

RF CH

Found

7

4

Air Mode: 

Select 

AIR 

when connected to an 

indoor/outdoor antenna.

Setup

Parental

12

6

Time

Picture

Audio

TV

Air

/

Cable

Auto Scan

Favorite

Show Hide

Channel No

Channel label

DTV Signal

Air


Select                       Exit                         

Move

MENU

KOCE

LB


Select                       Exit                         

Move

MENU

Setup

Parental

12

6

Time

Picture

Audio

TV

Air

/

Cable

Auto Scan

Favorite

Show Hide

Channel No

Channel label

DTV Signal

Cable


Select                       Exit                         

Move

MENU


Select                       Exit                         

Move

MENU

Cable Mode: 

Select 

CABLE

 if you subscribe to 

a pay television service includ ing satellite.

• Using the       button to highlight 

CABLE

.

• Channel Auto Scan may take several minutes 
to complete.

• Channel Auto Scan may take several minutes 
to complete.

How to Navigate

• Press the    button to select 

Auto Scan

Press the 

ENTER

 button and the cursor will move 

up and CABLE SYSTEM will be displayed next.
• Press the    button to select STD > IRC > HRC > 
Auto (Auto is recommended).  
• Press the    button to select Auto Scan 
and press

 ENTER

 to start Channel Auto Scan.

• Press the    button to select 

Auto Scan

 then 

press the    button to start Channel Auto Scan.

Setup

Parental

12

6

Time

Picture

Audio

TV

Cable System

Auto

MENU

Start to Scan

   Move                          Next                         Exit

Setup

TV

  Move   

Next                         Exit                         

MENU

Picture

Audio

12

6

Parental

e

m

i

T

RF CH

Found

7

4

All manuals and user guides at all-guides.com

all-guides.com

Summary of Contents for LCD2443A

Page 1: ...Model LCD2443A INSTRUCTION MANUAL Before using the TV please read this manual thoroughly and retain it for future reference All manuals and user guides at all guides com a l l g u i d e s c o m...

Page 2: ...All manuals and user guides at all guides com...

Page 3: ...Source Selection Turning The Unit On For The First Time Picture Menu Audio Menu Time Menu Setup Menu Parental Menu TV Menu Zoom Function 13 15 17 18 21 24 25 1 2 2 1 3 4 7 8 3 3 5 6 9 10 2 7 7 7 8 8 9...

Page 4: ...ASS This is an IEC safety class I product and it must be grounded for safety 11 28 12 13 26 27 29 DISPLAY MODE SPECIFICATION TROUBLE SHOOTING GUIDE PC Formats Video Formats All manuals and user guides...

Page 5: ...However there is no guarantee that interference will not occur in a particular installation If this unit does cause harmful interference to radio or television reception which can be determined by tur...

Page 6: ...ed or objects have fallen A grounding type plug has two blades into the apparatus the apparatus has been and a third grounding prong exposed to rain or moisture does not operate The third prong is pro...

Page 7: ...me weak the operating distance of the remote control is greatly reduced and you will need to replace the batteries CAUTION Danger of explosion if battery is incorrectly replaced NOTES If the remote co...

Page 8: ...on Press to select between MONO sound STEREO sound and Secondary Audio Program SAP 15 ENTER Button Press to confirm selections on a menu screen 16 SLEEP Button Press to set the SLEEP timer The unit wi...

Page 9: ...TANDBY Light in green The unit is turned ON 4 Speakers LEFT SIDE VIEW FRONT VIEW 1 TV ANTENNA Terminal 2 HEADPHONE Jack 3 AUDIO IN Jack RIGHT Red Color 4 AUDIO IN Jack LEFT White Color 5 VIDEO IN Jack...

Page 10: ...on the menu screen 4 P Button Press to change the TV channels and down highlight selections on the menu screen 5 V Button Press to adjust the volume up 6 V Button Press to adjust the volume down 7 PO...

Page 11: ...t the AUDIO and S VIDEO cable not included as shown Make sure you connect the cable from the other equipment AUDIO OUT and S VIDEO OUT to this unit AUDIO IN and S VIDEO IN NOTE Please refer to the use...

Page 12: ...ce supports both video and audio on a single digital connection for use with DVD players DTV set top boxes and other digital AV devices HDMI was developed to provide the technologies of High Bandwidth...

Page 13: ...hable AC power cord into the AC socket on the back of the unit and into a wall AC power outlet Check that the rated voltage of your unit matches your local voltage Make sure that the AC power cord is...

Page 14: ...e make sure to place a soft cushioned material such as a pillow or thick piece of foam beneath the screen 3 To remove the base stand loosen screws off the holes then pull downwards to release the base...

Page 15: ...essary cables and devices are connected Use the or button to select the options The screen will change to your desired s TURNING THE UNIT ON FOR THE FIRST TIME After you have initially connected your...

Page 16: ...nel No Channel label DTV Signal Cable Select Exit Move MENU Select Exit Move MENU Cable Mode Select CABLE if you subscribe to a pay television service including satellite Using the button to highlight...

Page 17: ...DYNAMIC MOIVE PERSONAL The STANDARD setting is recommended for most viewing environments Depending on the ambient light level in the room you may find one of the other options more pleasing To make mo...

Page 18: ...int Sharpness Color Mode Standard Normal Move Adjust Exit MENU 50 50 50 0 50 Use the button to highlight Color Temperature Navigate using the buttons to select COOL more bluish tone NORMAL or WARM The...

Page 19: ...e more critical audio adjustments based on your own preferences in PERSONAL Use the button to highlight Bass Navigate using the buttons to increase or decrease low frequency intensity Audio Surround S...

Page 20: ...ust Exit MENU 50 50 50 Off Picture Audio AVC Off Use the button to highlight Surround Navigate using the button to turn the dimensional surround effect ON or OFF for built in speakers only Surround Se...

Page 21: ...ime Clock Move Select Exit MENU Picture Off Pacific Off 2007 10 31 04 04PM 12 6 Time Audio Setup Parental TV Sleep Timer Time Zone Daylight Saving Time Clock Move Select Exit MENU Picture Off Pacific...

Page 22: ...Time Channel Menu Language Transparency Zoom Mode Noise Reduction Advance Close Caption XVS Restore Default English Move Select Exit MENU Picture Off Normal Off Setup Audio On Parental 12 6 Time TV M...

Page 23: ...vice1 Setup Audio Select Exit Use the button to highlight Advance Selection Navigate using the buttons to select Service 1 6 Parental 12 6 Time TV CC Mode Basic Selection Advanced Selection Option On...

Page 24: ...tup Parental 12 6 Time Picture Audio TV Clock Phase Auto Move Adjust Exit MENU 50 50 50 0 H pos V pos Use the button to highlight Phase Navigate using the buttons to improve focus and image stability...

Page 25: ...ock US Canada Reset RRT RRT Setting Select Exit MENU On Move Press the button to highlight ENTER PASSWORD Enter your 4 digit code factory default code is 0000 unless previously changed To change the p...

Page 26: ...to enter the TV Ratings menu to select your preference Setup Parental 12 6 Time Picture Audio TV TV MPAA Move Exit MENU N A Select Setup Parental 12 6 Time Picture Audio TV TV MPAA Move Exit MENU N A...

Page 27: ...ecommended for children age 8 and older GENERAL AUDIENCES Suitable for all ages Description C G PG 14 Rating PARENTAL GUIDANCE SUGGESTED Some material may not be suitable for children Viewers 14 years...

Page 28: ...ATSC 2 ATSC 3 KOCE HD KOCE SD KOCE LB 2 0 14 1 14 2 14 3 50 1 50 2 50 3 Highlight FAVORITE to add channels to your Favorites List Navigate using the buttons to select channels to be added or deleted...

Page 29: ...hes certain 4 3 content and may reduce the black bars 3 ZOOM Stretches the image both vertically and horizontally to fill the screen when viewing widescreen content The zoom effect will crop images so...

Page 30: ...bove In order to achieve the best display effect please select the above listed 11 display modes input signal Because of the difference of display drivers output signal especially non standard signal...

Page 31: ...720 p 1080 p The above listed formats are also related to the AV devices you are about to connect Before you connect this unit with others please read all instructions carefully and make sure all nec...

Page 32: ...ent Power Consumption 90W Standby Consumption 3W Dimension with stand Approx 585 L 210 W 438 H mm Weight Supplied Accessory Others Input Output Jacks Systems Power Sound System M Audio System BTSC L R...

Page 33: ...require user to power reset Unplug and re plug the AC power cord Check to make sure the program you are watching is broadcast in Color and not Black White Check whether the mute function has been acti...

Reviews: