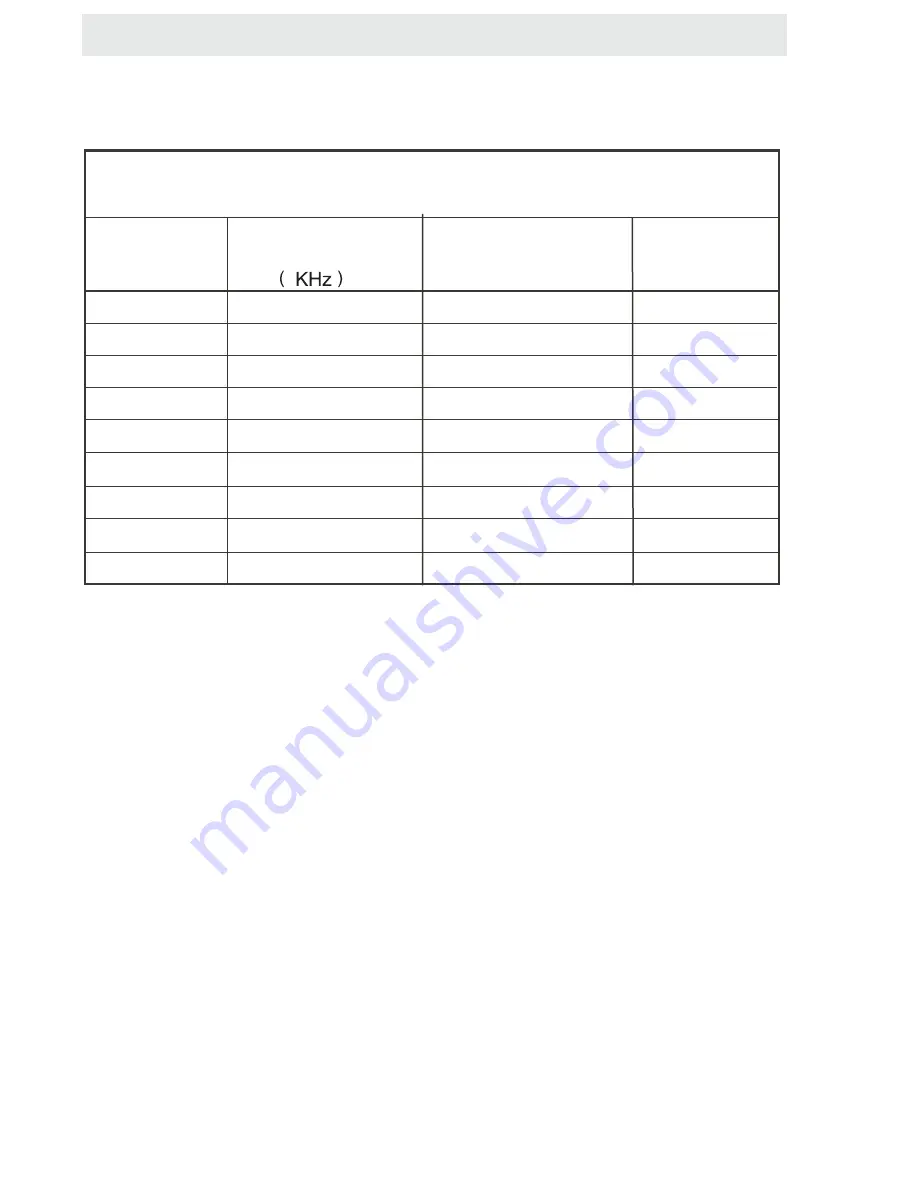
background image

DISPLAY

  MODE

VIDEO

  F

ORMATS

SUPPORTED  COMPONENT

HDMI  INPUT MODE

Horizontal

Scanning

  Frequency

Vertical

Scanning

  Frequency

Format

(

Hz

)

720

480

720

480

1280

720

1280

720

1920

1080

31

.

47

15

.

734

37

.

5

45

31

.

25

33

.

75

59

.

94

59

.

94

50

60

50

60

480  p

480  i

1080  i

720  p

720  p

1080  i

e

i

R solut on

X

X

X

X

The  above  listed  formats  are  also  related  to  the  AV  devices  you  are  about  to  connect.
Before  you  connect  this  unit  with  others  please  read  all  instructions  carefully  and
make  sure  all  necessary  cables  are  connected.
.
This  unit  may  be  incompatible  with  some  other  formats  which  are  not  meet  the
above  conditions.

NOTE:

1920

1080

X

X

1920

1080

X

1920

1080

X

1080  p

1080  p

1920

1080

X

1080  p

50

60

24

27

56

.

25

67

.

50

26

Summary of Contents for LCD2425A

Page 1: ...INSTRUCTION MANUAL Before using the TV please read this manual thoroughly and retain it for future reference Model LCD2425A...

Page 2: ...LATION INITIAL SETUP TV SETUP CONNECTIONS Remote Control Front Frame Back Frame Side Panel Antenna Connection S Video Connection AV Connection Y Pb Pr Connection HDMI Connection VGA Connection Headpho...

Page 3: ...CONTENTS 10 27 11 12 25 26 28 DISPLAY MODE SPECIFICATION TROUBLE SHOOTING GUIDE PC Formats Video Formats SAFETY CLASS This is an IEC safety class I product and it must be grounded for safety...

Page 4: ...cold dusty or humid Do not restrict the airflow of this unit by placing it somewhere with poor airflow by covering it with a cloth by placing it on bedding or carpeting When connecting or disconnectin...

Page 5: ...acement of the obsolete outlet 10 Protect the power cord from being walked on or pinched particularly at plugs convenience receptacles and the point where they exit from the apparatus 11 Only use atta...

Page 6: ...ble operation The recommended effective distance for remote operation is about 16 feet 5 meters When the batteries become weak the operating distance of the remote control is greatly reduced and you w...

Page 7: ...t of time before your TV turns Off automatically 10 VOL VOL Increases Decreases the Volume control 11 CH CH Skips to the next previous channel on TV mode 12 UP DOWN LEFT RIGHT Moves the cursor upward...

Page 8: ...ates whether the unit is ON or in STANDBY OFF mode Light in red The unit is in STANDBY Light in green The unit is turned ON 4 Speakers 1 TV ANTENNA Terminal 2 HEAD PHONE Jack 3 AUDIO IN Jack Right 4 A...

Page 9: ...nnels and up highlight selections on the menu screen 5 CH Button Press to change the TV channels and down highlight selections on the menu screen Press to adjust the volume up Press to adjust the volu...

Page 10: ...order Satellite System Cable AUDIO OUT S VIDEO OUT AUDIO IN S VIDEO IN NOTE CONNECTING DEVICES WITH A COMPOSITE YELLOW RCA TYPE VIDEO OUTPUT Connecting to a VCR Video Game System Camcorder AUDIO VIDEO...

Page 11: ...High Definition Multimedia Interface supports both video and audio on a single digital connection for use with DVD players DTV set top boxes and other digital AV devices HDMI was developed to provide...

Page 12: ...cause fire or electrical shock Do not damage the power cord A damaged cord may cause fire or electrical shock Do not move the TV with the cord plugged in the socket outlet Do not place a heavy object...

Page 13: ...ease make sure to place a soft cushioned material such as a pillow or thick piece of foam beneath the screen 3 To remove the base stand loosen screws off the holes then pull downwards to release the b...

Page 14: ...sary cables and devices are connected SOUR CE ENTER Component Use or button to select the options the The screen will change to your desired s INPUT SOURCE TV AV S Video Component HDMI VGA TURNING THE...

Page 15: ...satellite CABLE How to Navigate Setup 12 6 Tim e Picture Audio Cable System Auto MENU Start to Scan Move Next Exit Setup Move Next Exit MENU Picture Audio 12 6 e m i T RF CH Found 7 4 CHANNEL CHANNEL...

Page 16: ...ferences Adjustment options include contrast brightness color sharpness and color temperature How to Navigate Press the MENU button on the remote control Navigate using the b uttons to select PICTURE...

Page 17: ...preferences Adjustment options include contrast brightness color sharpness and color temperature Press the MENU button on the remote control Navigate using the b uttons to select PICTURE Use the b ut...

Page 18: ...sound enhancements while listening through the built in speakers and personal preferences Adjustment options include bass treble balance surround and audio language Press the b utton to highlight Sou...

Page 19: ...ptions to make sound enhancements while listening through the built in speakers and personal preferences Adjustment options include bass treble balance surround and audio language Note When adjustment...

Page 20: ...n the remote control Navigate using the b uttons to select Time How to Navigate The TIME menu includes adjustment of settings for your local time zone and daylight savings time The clock will adjust a...

Page 21: ...h Move Select Exit MENU Picture Off Normal Off Setup Audio On 6 Time Menu Language Transparency Zoom Mode Noise Reduction Advance Close Caption XVS Restore Default English Move Select Exit MENU Pictur...

Page 22: ...ff Normal Off Setup Audio On 12 6 Time Menu Language Transparency Zoom Mode Noise Reduction Advance Close Caption XVS Restore Default English Move Next Exit MENU Pict ure Off Normal Off Setup Audio On...

Page 23: ...played on screen once you connect an input signal from your PC Recommended resolution is 1366 x 768 If your PC system uses a standard signal mode the screen will adjust automatically Connect an option...

Page 24: ...To gain access and select your preferences within the Parental menu make certain your input is set to TV Press the MENU button on the remote control Navigate using the b uttons to select Parental How...

Page 25: ...our preferences within the Parental menu make certain your input is set to TV How to Navigate Press the MENU button on the remote control Navigate using the b uttons to select Parental Press the b utt...

Page 26: ...gate using t he b uttons to select Parental Press the button to highlight ENTER PASSWORD Enter your 4 digit code factory default code is 0000 unless previously changed To set parental controls for tel...

Page 27: ...T The TV menu provides for the setup of your television to receive TV channels store your favorites add or skip channels and label them by their call letters How to Navigate Press the MENU button on...

Page 28: ...X NOTE This product does not support the display mode not listed above In order to achieve the best display effect please select the above listed 11 display modes input signal Because of the differenc...

Page 29: ...20 p 720 p 1080 i e i R solut on X X X X The above listed formats are also related to the AV devices you are about to connect Before you connect this unit with others please read all instructions care...

Page 30: ...0 7Vp p 75ohms B 0 7Vp p 75ohms R 0 7Vp p 75ohms Power Requirement Input Output Jacks Systems Power Sound System M Audio System BTSC L R Speaker 3 W 3 W Composite Video Input Component Y Pb Pr Input...

Page 31: ...nomenon the product may malfunction and require usertopowerreset Unplug and re plug the AC power cord TROUBLESHOOTING GUIDE Check to make sure the program you are watching is broadcast in Color and no...

Reviews: