4
Features Defined
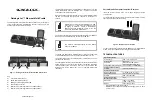
4 POWER
Press the POWER button to turn the radio off or on.
6 MEM/CLK SET
Press the MEM/CLK SET button to program a radio station into the presets, or to
adjust the clock.
AM Antenna is built into the player.
2 VOLUME
Press the up arrow to increase the volume, and the down arrow to decrease volume.
10 Tuning/NEXT/PREV.
Press the Tuning/NEXT/PREV. button to increase/decrease the radio frequency, or
to increase/decrease the clock time when adjusting the clock. When iPod playing, press this button to skip to
previous/next track or press & hold the button to backwards/forwards through a song.
12 Line-Out
Use the Line-Out jack to connect the player to external speakers.
11 PLAY/PAUSE/M-UP
Press the PLAY/PAUSE/M-UP button to play or pause an iPod, or to cycle up
through the preset radio stations.
3 LCD Display
View the Time, AM Indicator, iPod Indicator, and Radio Frequency through this Liquid
Crystal Display.
17 AC Connector
Plug in the detechable AC cord here.
13 Aux-In
Use the Aux-in jack to connect an iPod shuffle or other audio device to the player.
15 FM ST
Toggle the FM ST switch between FM ST & FM MONO.
14 Video Out
Plug the yellow connector of an AV Cord in the Video Output to send a video signal from a
Video iPod to a source (TV) with a Video Input.
9 BAND/STOP
Press the BAND button to switch between AM or FM radio stations, or stop iPod playing.
1 iPod Docking Station
Connect your iPod, iPod mini, or iPod nano.
5 RADIO/AUX
Press the FUNCTION button to switch between radio and Aux-in control.
8 IPOD
Press the IPOD button to power on an iPod and enable control through the player.
7 FM Antenna
The FM Rod Antenna provides flexibility and range when adjusting the FM reception. An
16 DBBS
Press the DBBS button to switch BBS modes between On/Off.
18 Battery Compartment (8-C Batteries)
The Battery Compartment allows the unit to run DC power.
19 AC Cord (230V / 50 Hz)
The attached AC (Alternating Current) Cord provides power to the player.