background image

OPERATING INSTRUCTIONS 

OI4

Brewing Instructions

G4TB/G4STB, OPERATING INSTRUCTIONS 

080416NC

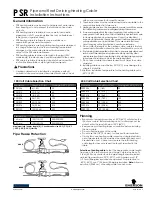
2  Remove/open the lid from 

an empty tea dispenser and 
position it on the brew deck. 
Center it under the brew 
basket.

TEA

DISPENSER

*OTFSUBDMFBOQBQFSmMUFSJOUP

the brew basket. Fill with the 
proper amount of leaf tea. 

-FWFMUIFUFBJOUIFmMUFS

4MJEFUIFmMMFECSFXCBTLFU

into the brew rails under the 
control panel. Slide it all the 
way back until it stops.

)PMEZPVSmOHFSPOUIF

appropriate brew icon. As 
soon as you hear the click 
of the brew valve, lift your 

mOHFS#SFXJOHXJMMCFHJO

5IFCSFXFSXJMMCSFXDPGGFFPSUFBCBTFEPOUIFTFUUJOHTQSPHSBNNFEJOUPUIFVOJWFSTBMDPOUSPMNPEVMF 6$.5P
DIBOHFUIFTFUUJOHTTFFUIF

PROGRAMMING GUIDE

.

1  The brewer should be ON. 

$POmSNUIJTBUUIFSFBSUPHHMF

switch. “

Ready to brew”


should be on the display. 

6  If a keypad appears on 

the display, the brew code 

GFBUVSFJTFOBCMFE EFGBVMU
JTPGG

Brewing will start 

immediately after you enter 
the brew code

. See the 

PROGRAMMING GUIDE 

to set 

up/disable the brew code.

WARNING 

- TO AVOID SCALDING, AVOID SPLASHING. 

,FFQ CPEZ QBSUT DMFBS PG UIF CSFXFS EVSJOH

CSFXJOH%POPUSFNPWFUIFCSFXCBTLFUXIJMFi#SFXJOHwBQQFBSTPOUIFEJTQMBZ

WARNING 

-  

%0/05SFGSJHFSBUFVOVTFEUFBPWFSOJHIUGPSMBUFSDPOTVNQUJPO

The G4 Tea Brewer is factory preset for optimal performance.

Summary of Contents for G4TBS

Page 1: ...G4 Digital Iced Tea Brewing System Short Version USER GUIDE READ AND SAVE THESE INSTRUCTIONS NOTICE TO INSTALLER Please leave this booklet with the machine 5 4 30 5 07 3 SFW...

Page 2: ...1 OHFWULFDO 6FKHPDWLF ES11 7URXEOHVKRRWLQJ XLGH 7 7URXEOHVKRRWLQJ XLGH 7 7URXEOHVKRRWLQJ XLGH 7 UURU RGHV EC1 3URGXFW DUUDQW 3 Contact Information Wilbur Curtis Co Inc 6913 Acco Street Montebello CA 9...

Page 3: ...BWJOH NPEF OEVTUSZ T NPTU FGGFDUJWF NJOFSBM UPMFSBOU EFTJHO ODBQTVMBUFE DPOUSPM CPBSET o 1SPUFDU BHBJOTU TUFBN XBUFS BOE JNQBDU 6SHFL FDWLRQV OHFWULFDO 6XSSO 5HTXLUHPHQWV MODEL DESCRIPTION PHASE VOLTS...

Page 4: ...ve maintenance should be performed by an authorized Wilbur Curtis service technician 5P SFEVDF UIF SJTL PG mSF PS FMFDUSJD TIPDL 0 05 PQFO UIF TFSWJDF QBOFMT 5IFSF BSF OP VTFS serviceable parts inside...

Page 5: ...ST QQMJBODFT DBO CF VTFE CZ QFSTPOT ZFBST BOE BCPWF XJUI SFEVDFE QIZTJDBM TFOTPSZ PS NFOUBM DBQBCJMJUJFT or lack of experience and knowledge if they have been given supervision or instruction concerni...

Page 6: ...4FF UIF SPECIFICATIONS section for the correct size The water line should also be capable of being controlled by a shut off valve Do not connect the water line to a saddle valve or needle valve SFRVJS...

Page 7: ...9C WARNING Use the leveling legs to level the brewer only Do not use them to adjust brewer height Do not extend them higher than necessary Front panel or Style varies Brewers With a Strain Relief Moun...

Page 8: ...and size electrical outlet If it is not compatible either have the cord replaced or have the electrical outlet upgraded by a licensed electrician Do not use an extension cord Do not use a power cord p...

Page 9: ...he water has heated Ready to brew will be displayed on the LCD screen 19 Perform a brew cycle of a least 12 oz 350 ml to purge any remaining air from the system See OPERATING INSTRUCTIONS During the i...

Page 10: ...XJOH XJMM CFHJO 5IF CSFXFS XJMM CSFX DPGGFF PS UFB CBTFE PO UIF TFUUJOHT QSPHSBNNFE JOUP UIF VOJWFSTBM DPOUSPM NPEVMF 6 5P DIBOHF UIF TFUUJOHT TFF UIF PROGRAMMING GUIDE 1 The brewer should be ON POmSN...

Page 11: ...brush for hard to clean areas Rinse with clean water then dry 3 Wipe the spray head area with a cloth soaked in a mild detergent solution Rinse with a cloth soaked with clean water removing any resid...

Page 12: ...UIFO ESBJO JMM UIF DPOUBJOFS UP UIF UPQ XJUI XBSN DMFBO XBUFS UIFO ESBJO JMM XJUI XBUFS BOE ESBJO B TFDPOE UJNF Disassemble the faucet Unscrew the faucet assembly GSPN UIF EJTQFOTFS 5IFO VOTDSFX UIF...

Page 13: ...JEF PG UIF NBDIJOF 5 130 3 6 NC Status lights Brew Button Curtis logo Home Undo Scroll left right Return to previous Control symbols all symbols may not be present at the same time Display view varies...

Page 14: ...Display Settings Preventative Maintenance Brew Counter Passwords Master Reset Regional Settings Recipe Default Brew Settings All Full Batch except Tea Sweet and Dual Sweet Temperature Tea by Volume Te...

Page 15: ...TQMBZ 5IF GBDUPSZ EFGBVMU TFUUJOH is blank Screen saver UVSOT UIF EJTQMBZ TDSFFO TBWFS PO BOE PGG 5IF GBDUPSZ EFGBVMU TFUUJOH JT 0GG continued Recipe Default Brew Settings Tea Sweet and Dual Sweet Hal...

Page 16: ...T UP UIF 64 QSPHSBNNJOH TDSFFOT 8IFO OBCMFE BO BDDFTT DPEF LFZQBE BQQFBST PO UIF TDSFFO XIFO UIF VTFS BUUFNQUT UP BDDFTT UIF 64 NFOVT Master Reset SFTFUT UIF CSFXFS VOJWFSTBM DPOUSPM NPEVMF 6 UP UIF G...

Page 17: ...ditional time for tea to drain from the brew CBTLFU CFGPSF i SFXJOHw EJTBQQFBST GSPN UIF EJTQMBZ 5IF TFUUJOH SBOHF JT TFDPOET UP NJOVUFT 5IF GBDUPSZ EFGBVMU TFUUJOH JT TFDPOET Sweetener Time units equ...

Page 18: ...XJMM MJHIU JOEJDBUJOH UIBU EBUB JT USBOTGFSSJOH 5IJT QSPDFTT XJMM POMZ UBLF B TFDPOE UP DPNQMFUF Downloading the Software to the Brewer from the Flash Drive 1 4FMFDU UIF JEFOUJDBM CSFXFS ZPV XJTI UP...

Page 19: ...11 in 23 1 cm 10 11 in 25 7 cm 0 49 1 2 cm 15 41 in 39 1 cm 15 73 in 39 9 cm 22 82 in 58 0 cm 16 61 in 42 2 cm 17 02 in 43 2 cm 13 41 in 34 1 cm 20 84 in 52 9 cm 1 29 in 3 3 cm 18 39 in 46 7 cm 5 73 i...

Page 20: ...nd Accessories All Models CAB 1 Cleaning Brush WC 29025 Spray Head 3 5 6 8 9 10 11 31 32 12 25 9 31 26 13 14 17 18 33 19 20 21 22 1 G4TBS Main Chassis Exploded View Sold by the case 15 29 32 30 30 2 3...

Page 21: ...ecommended Parts to Stock ITEM PART DESCRIPTION 18 WC 10008 UNIVERSAL HOST ADAPTER USB 19 WC 37255 KIT DUAL VALVE WATER INLET 20 WC 1200 CORD 14 3 SJTO 6 BLK W PLUG 21 WC 14045 101 CURRENT SENSOR ASSY...

Page 22: ...3 WC 917 ELEMENT HEATING 1 45KW 120V W JAM NUTS 6 WC 1438 101 SENSOR TEMPERATURE TANK 7 WC 4394 GUARD SHOCK HEATING ELEMENT FOR SINGLE HEATING ELEMENT 8 WC 523 THERMOSTAT MANUAL RESET 120 240 VAC 25A...

Page 23: ...Valve Right 14 Dilution Valve Left 15 Sweetner Pump 16 Sweetner Pump 17 120VacNeutral Internal Use Only 18 Not Used 19 Current Sensor 20 Current Sensor 1 12 Vac Input Back Light 2 Vdd 5Vdc 3 Vss Logic...

Page 24: ...UIF WBMWF VTJOH UIF EJBHOPTUJDT JO TFDUJPO 5 Water Not Hot Enough G UIF XBUFS IFBUT CVU JT OPU IPU FOPVHI mSTU DIFDL GPS UIF DPSSFDU UFNQFSBUVSF TFUUJOH PO UIF DPOUSPM QBOFM 3FQSPHSBN BT OFDFTTBSZ 2 G...

Page 25: ...QQFBST PO UIF EJTQMBZ DIFDL GPS GBVMUZ XJSJOH BOE DPOOFDUJPOT CFUXFFO UIF VOJWFSTBM QPXFS NPEVMF 61 BOE UIF WBMWFT 2 G Brewing EPFT OPU BQQFBS PO UIF EJTQMBZ DIFDL GPS B GBVMUZ VOJWFSTBM DPOUSPM NPEVM...

Page 26: ...JPO PVUMFU QPJOUT 3VO B CSFX DZDMF BOE DPOmSN UIBU UIF EVNQ CSFX WBMWF CZQBTT WBMWF BOE EJMVUJPO WBMWF PQFO EVSJOH UIF CSFX DZDMF IFDL GPS nPX UISPVHI BOZ FYJU QPJOU UIBU JT TMPX PS OPO FYJTUFOU PU BM...

Page 27: ...PTJUJPO GPS TFDPOET UIFO CBDL 0 IFDL UP NBLF TVSF UIBU UIF nPX SBUF GSPN UIF XBUFS TVQQMZ MJOF NFFUT UIF NJOJNVN nPX SBUF TQFDJmDBUJPOT GPS UIF CSFXFS MTP DIFDL UIF XBUFS QSFTTVSF 4FF UIF 41 5 0 4 TFD...

Page 28: ...VSF TFOTPS JT BUUBDIFE UJHIUMZ to the tank and that heat sink compound was used A properly mounted sensor should have a resistance of BSPVOE L XIFO UIF XBUFS JT IPU G OPU SFQMBDF UIF TFOTPS 3 IFDL UP...

Page 29: ...IFO QSPNQUFE QMBDF BO FNQUZ DPOUBJOFS VOEFS UIF CSFX CBTLFU UIFO QSFTT OK 1SFTT B CVUUPO UP UFTU UIF EFTJSFE DJSDVJU PS Auto Test to test all circuits If a button is highlighted green the DJSDVJU IBT...

Page 30: ...Water Level Error LOO UXQ HUURU 2YHU RZ 7KH ZDWHU LQOHW YDOYH KDV HLWKHU EHHQ RSHQ IRU PRUH WKDQ PLQXWHV RQ WKH LQLWLDO WDQN OO RU KDV EHHQ RSHQ IRU VHFRQGV RQ ODUJH EUHZHUV DQG VHFRQGV RQ Seraphim W...

Page 31: ...ical and plumbing codes Improper voltage Equipment must be installed at the voltage stated on the serial plate supplied with this equipment Improper water supply 7KLV LQFOXGHV EXW LV QRW OLPLWHG WR H...

Reviews: