background image

P - 7

Connections

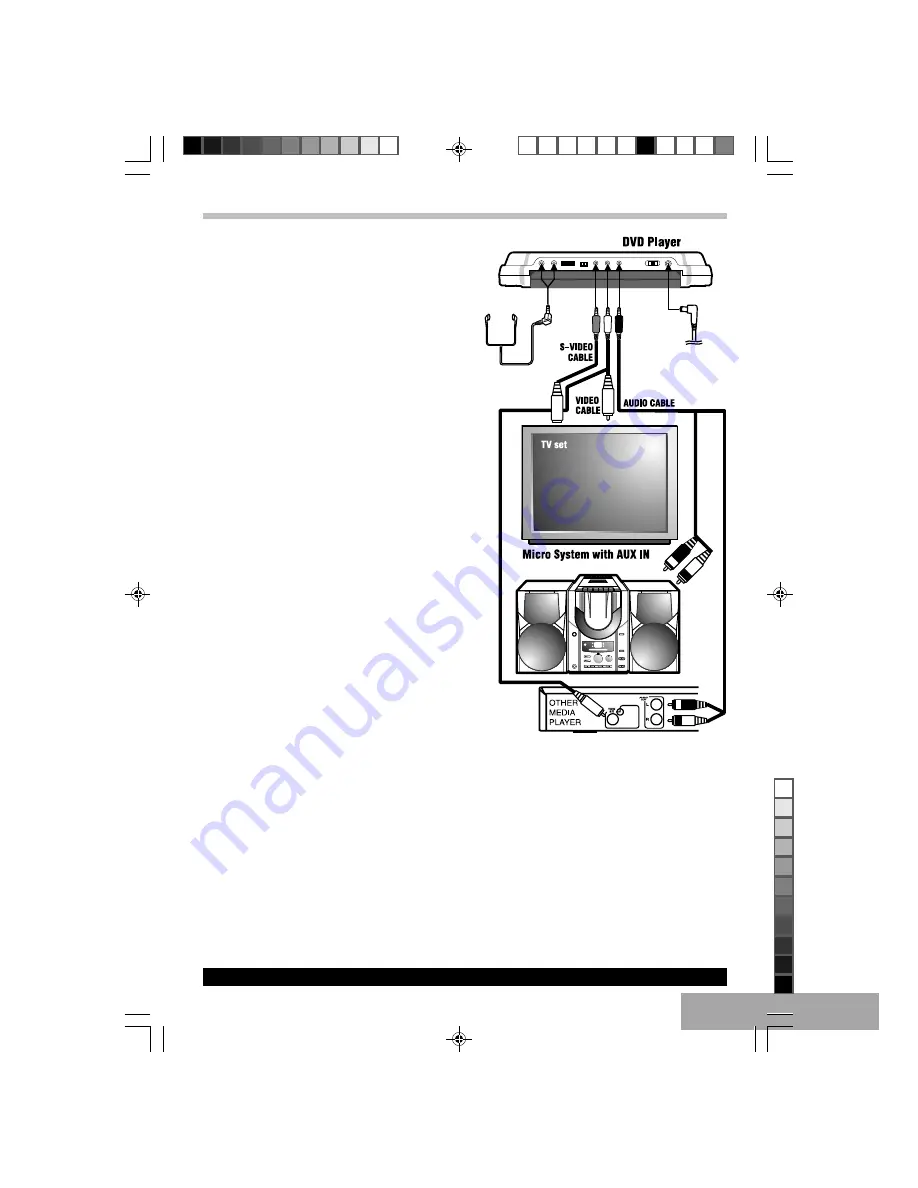
Notes for cable connections:

Audio cable (one end with small plug, and two end with Red / White RCA plug.)

Video cable ( one end with small plug, and one end with Yellow RCA plug).

S-Video cable ( one end with small plug, and one end with S-Video plug).

Turn off the power and keep DC cord pulled out from the adapter when connecting the system

Connect headphones to player

headphone jack.

CAUTION: Listening at high power for a long moment could
damage user’s ears.

Connect the DC plug

Connect the DC plug at the end of the adapter cord, or
connect the Car Adapter (optional) into the DC IN jack,
then plug the other end into the car cigarette lighter socket.

SYSTEM CONNECTION

Use audio cable (Red / White), video cable (Yellow) to
connect from player to TV set and amplifier.

CONNECT THE PLAYER TO TV SET

BY AUDIO / AV CABLE

Use audio cable (Red / White), video cable (Yellow) to
connect the player and TV set.

CONNECT THE PLAYER TO TV SET BY

S –CABLE

Use S-Video cable to connect the player and TV set.

CONNECT OTHER MEDIA TO THE

PLAYER

Use audio cable (Red / White), video cable (Yellow) to
connect from other media to player.
Notes:

Slide the Line Select switch to “IN”

T580_Curtis_A5_size_UK_Eng_ib.p65

12/20/2006, 10:47 AM

7

Black

Summary of Contents for DVD8723UK

Page 1: ... be sure to disconnect the power converter from the wall outlet To disconnect the AC power cord main leads grasp the plug itself never pull the cord Caution Warning The apparatus shall not be exposed to dripping or splashing and that no objects filled with liquids such as vases shall be placed on the apparatus Minimum distances around the apparatus for sufficient ventilation The ventilation should...

Page 2: ... laundry tub in a wet basement or near a swimming pool etc 10 Vibration Avoid placing the unit on an unstable place such as a shelf or in a place subject to vibrations 11 Magnetic fields keep the unit away from sources of magnetic fields such as TV sets speaker systems radio motorized toys or magnetized objects 12 Nonuse periods The power cord of the unit should be unplugged from the outlet when l...

Page 3: ... 4 TITLE MENU BUTTON 5 PBC BUTTON 6 DISPLAY BUTTON 7 NAVIGATION 5 6 3 4 BUTTON 8 RETURN BUTTON 9 BOOKMARK BUTTON 10 SLOW R BUTTON 11 PAUSE STEP BUTTON 12 RANDOM BUTTON 13 MUTE BUTTON 14 REPEAT REPEATA B BUTTON 15 SEARCH FORWARD BUTTON 16 SEARCH REVERSE BUTTON 17 SKIP FORWARD BUTTON 18 SKIP REVERSE BUTTON 19 SLOW F BUTTON 20 STOP BUTTON 21 PROGRAM BUTTON 22 SEARCH BUTTON 23 ENTER BUTTON 24 PLAY BUT...

Page 4: ... 3 VOLUME KNOB 4 INPUT OUTPUT LINE SELECTOR 5 S VIDEO JACK 6 VIDEO JACK 7 AUDIO JACK 8 DC OUT JACK 9 POWER SLIDE KNOB 10 DC IN JACK Top View 11 TITLE MENU BUTTON 12 DVD MENU BUTTON 13 DISPLAY BUTTON 14 SETUP BUTTON 15 REMOTE SENSOR 16 PAUSE BUTTON 17 SKIP REVERSE BUTTON 18 SKIP FORWARD BUTTON 19 POWER INDICATOR 20 STANDBY INDICATOR 21 FULL INDICATOR 22 NETVIGATION 5 6 3 4 BUTTONS 23 ENTER BUTTON 2...

Page 5: ...ator will light on GREEN Notes Disconnect the AC adapter plugs from both the battery and the AC outlet when charging is completed or not necessary Battery recharge circuit operates in OFF mode and STANDBY mode But Switch off the unit for battery recharge is recommended When battery is fully charged and released from unit the CHARGE indicator will light on RED it means the charge circuit is ON Batt...

Page 6: ...s on the TV screen Press the 5 6 3or4 Arrow buttons to select the desired item then press the ENTER button Playback of the selected item will start Note For more details please refer to the jacket or case of the disc If the password is set and the inserted disc is within the Parental Ratings set then the Password screen will appear prompting you to enter the password If playing MP3 disc please ref...

Page 7: ...plug at the end of the adapter cord or connect the Car Adapter optional into the DC IN jack then plug the other end into the car cigarette lighter socket SYSTEM CONNECTION Use audio cable Red White video cable Yellow to connect from player to TV set and amplifier CONNECT THE PLAYER TO TV SET BY AUDIO AV CABLE Use audio cable Red White video cable Yellow to connect the player and TV set CONNECT THE...

Page 8: ... x8 4th press x16 Noted Press the PLAY u button to resume normal playback Title Chapter Search Use this feature to directly go to a specific title and or chapter Press the SEARCH button once Press the 3 4 buttons to select the TITLE then use the numeric buttons to select the desired title number Press the 3 4 buttons to select the CHAPTER then use the numeric buttons to select the desired chapter ...

Page 9: ... by operating as following To press this button once to define the portion head To press this button again to define the portion toe Then the portion will be played repeatedly To press this button again to return to normal playback CD VCD disc While playing back a CD this unit can repeatedly play back a specific section While in the Playback mode press the Repeat A B button to define where you wan...

Page 10: ... desired title chapters have been programmed up to 20 You can repeat a title chapter more than once if desired 4 Press the 5 6 3 4 button to select START position 5 Press the PLAY u button to begin programmed playback Playback will begin on the first title chapter that you programmed and the player will continue to play all of the tracks that you programmed in the order in which you programmed the...

Page 11: ...ton to cycle through the audio modes The audio modes vary depending on the disc inserted but include MONO LEFT MONO RIGHT MIX MONO STEREO etc DISC NOT SUPPORT will appear if the disc does not support audio mode changing 3D Sound 3D audio post processing will give a multichannel effect when using only 2 speakers This only works with discs encoded with Dolby Pro Logic Dolby Digital and DTS multi cha...

Page 12: ... may not work Bookmark function Storing playing and clearing a bookmark in the memory up to 12 points can be memorized for each disc Zoom Function Note MP3 discs does not support this function Press ZOOM button Zoom x2 x3 x4 during normal slow or still playback mode This player can magnify a picture and use Navigation Arrow buttons 5 6 3 4 to select desired part of the zoomed picture Viewing from ...

Page 13: ...Title digest Chapter digest The screen shows the starting picture of all the tracks on the screen simultaneously Input your desired track by Number buttons and press ENTER to confirm to play from that track onwards If the tracks are more than 6 choose to look at the next page Choose EXIT to leave the track digest screen Choose MENU to return to Select Digest Type Menu Playing for Disc Interval Tit...

Page 14: ... Operation Playback of MP3 Disc After disc LOADING or read memory card dialog box will appear on the screen The Root Folder menu and STOP Mode on screen button will appear on the screen e g T580_Curtis_A5_size_UK_Eng_ib p65 12 20 2006 10 47 AM 14 Black ...

Page 15: ...elect your de sired track then press PLAY u or ENTER button to playback the PLAY u indicator show on screen The player will continous playback until finish all tracks in such folder the player will stop automatically e g Selecting Folder Tracks Using the Number Buttons During playback press the Numeric buttons corresponding to the track numbers to select your desired track The unit will jump to th...

Page 16: ...e functions are also available in PLAY mode REPEAT PLAY To Repeat play a track file simply select the track file as described on the previous page then press the REPEAT button once REPEAT ONE will appear on the TV screen and the unit will repeat the selected track file continuously until the STOP button is pressed To Repeat play all tracks on an MP3 CD press the REPEAT button a second time REPEAT ...

Page 17: ... Wide Screen images are shown on the screen but with some parts cut automatically 2 Normal LB Note LB stand for Letter Box This is selected when the unit is connected with a normal TV Wide screen images are shown on the screen with black belt on the top and bottom 3 Wide This is selected when the unit is connected with a wide screen TV TV TYPE You may select according to the color system of the TV...

Page 18: ...d press ENTER to confirm Subtitle To change the subtitle language choose the language using the 6 5 buttons and press ENTER to confirm Disc menu To change the language of menu choose the language using the 6 5 buttons and press ENTER to confirm Parental You can control access to the player and the type of discs your family can watch with the rating function There are eight levels of parental conro...

Page 19: ... layer 12cm single sided dual layer 12cm double sided single layer 8 cm single sided single layer 8 cm single sided dual layer 8 cm double sided single layer 2 Compact disc 12cm disc 8 cm disc Video output level 1 Vp p Audio output level 1 Vrms 1 KHz 0dB Audio signal output characteristics Frequency responses DVD linear audio 20Hz 20KHz 48KHz sampling 20Hz 20KHz 96KHz sampling CD audio 20Hz 20KHz ...

Page 20: ...t and or the remote control unit is effective Press POWER to set the player to the standby mode and then back to ON Alternatively press POWER to set the player to the standby mode disconnect the power plug and then reconnect it The player may not be operating properly due to lightning static electricity or some other external factor Play does not start even when title is selected Confirm the RATIN...

Page 21: ...tion of features Connection Plug at the end of the DC cable into the DC OUT jack then plug the other end into the DC IN jack Use audio cable to connect from DVD PLAYER to LCD MONITOR Use Video cable to connect from DVD PLAYER to LCD MONITOR Turn on the DVD PLAYER by switch the LINE SELECT switch to OUT position Turn on the DVD PLAYER and LCD MONITOR by switch the Power switch to ON position T580_C...

Page 22: ... from down below Press UP DOWN to select the corresponding number Press the ENTER button to select the CONTRAST option and the corresponding number 1 99 will show from down below Press UP DOWN to select the corresponding number Press the ENTER button to select the SHARPNESS option and the corresponding number 1 7 will show from down below Press UP DOWN to select the corresponding number Press the ...

Page 23: ... periods of time Discs should be returned to their cases after use Do not apply paper or write anything on the disc surface Handle the disc by its edge Do not touch the playing surface glossy side Fingerprints and dust should be carefully wiped off the playing surface of the disc with a soft cloth Disc Cleaning Never use chemicals such as aerosol cleaners benzene anti static liquids or any other s...

Page 24: ...P 24 User s Guide 7 DUAL MONITOR PORTABLE DVD PLAYER MODEL DVD8723UK T580_Curtis_A5_size_UK_Eng_ib p65 12 20 2006 10 47 AM 24 Black ...

Reviews: