background image

38

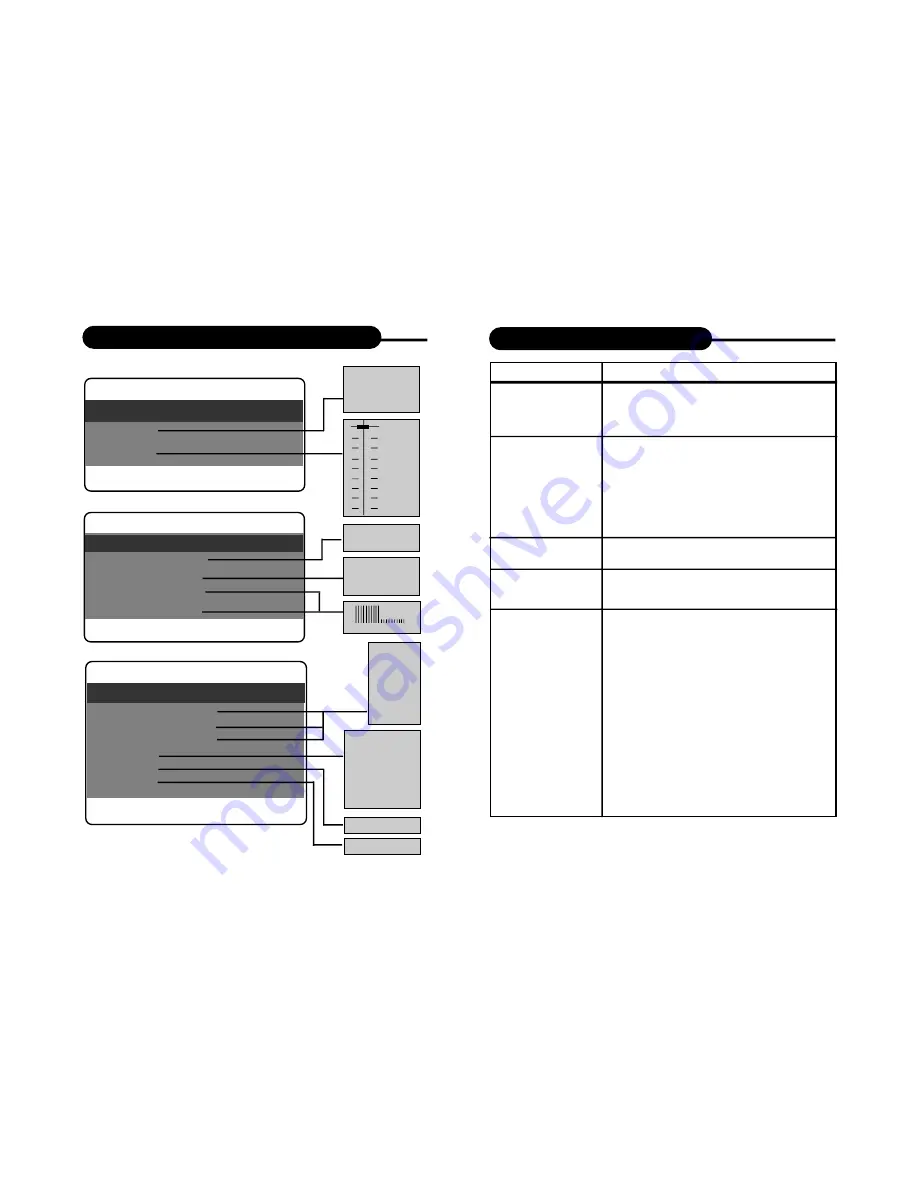
Trouble Shooting Guide

Symptom

No power

No picture/sound

Interference or
scrolling 

Black & White
picture    

The player does not
start playback

Correction

• Check if the AC adapter of power plug is
connected securely.
• If powered with the battery, check if it is
exhausted.           

• Make sure the connection is in good
condition; volume is not too low; audio
receiver or TV work normally; audio setting is
proper.

• Check if TV Type is correct PAL or NTSC by
the button P/N on the remote.

• Due to the effect of copy protection. Avoid
connecting to a VCR or TV/VCR combination. 

• Adjust the vertical hold on your TV.

• The DVD+-RW you played should be
finalized, and not be an empty disc.
• Place the disc with the graphics side up and
make sure it's inside the guide.
• Make sure the disc is free from scratches &
fingerprints.
• Insert a playable disc. (Check the disc type
and color system).
• Do not playback a disc which region code is
different from that of of your player.
• Clean the disc.
• Cancel the parental lock function or change
the parental lock level. 

(The Pre-set password

is 3308.)

• Reset the player.

37

Customizing the Function Settings

-- Dolby Digital Setup --

Dual Mono

Dynamic

Go To Dolby Digital Setup

Stereo
L-Mono
R-Mono
MIX-Mono

FULL

3 / 4

1 / 2

1 / 4

OFF

0

-- Video Setup Page--

Component    LCD
Sharpness     Low
Brightness     00
Contrast        00

Go To Video Setup Page

-- Preference Page --

Audio             ENG
Subtitle          E N G
Disc Menu      ENG
Parental
Password
Default

Go To Preference Page

English

German

French

Spanish

Chinese

Japanese

Korean

Russian

Change

RESET

1  KID SAFE
2  G
3  PG
4  PG 13
5  PGR
6  R
7  NC17
8 ADULT
9  OFF

General  Audio  Dolby Video  Preference

General  Audio  Dolby   Video Preference

General  Audio  Dolby  Video  Preference

High
Medium
Low

TV
LCD

DVD8007B.qxd  2005.5.8 10:41  页面37 (1,1)

Summary of Contents for DVD8007

Page 1: ......

Page 2: ...nance contact an authorized service location or contact us Only qualified service personnel should remove the cover FCC NOTICE This equipment has been tested and found to comply with the limits for a Class B digital device Pursuant with the FCC Rules Part 15 These limits are designed to provide reasonable protection against harmful interference in a residential installation This equipment generate...

Page 3: ...provided for ventilation and to ensure reliable operation of the product and to protect it from overheating and these openings must not be blocked or covered The openings should never be blocked by placing the product on a bed sofa rug or other similar surface This product should not be placed in a built in installation such as a bookcase or rack unless proper ventilation is provided or the manufa...

Page 4: ...ey may touch dangerous voltage points or short out parts that could result in a fire or elec tric shock Never spill liquid of any kind on the product Safety Information 20 Servicing Do not attempt to service this product yourself as opening or removing covers may expose you to dangerous voltage or other hazards Refer all servicing to qualified service personnel 21 Damage Requiring Service Unplug t...

Page 5: ...ture CD compatibility so you can show photos on your TV This is a truly multimedia machine designed for the multimedia world to enjoy Introduction UNPACKING First inventory the contents of your Portable DVD player package If any item should be damaged or missing please contact your dealer without delay Keep the packaging materials you may need them to transport your player in the future WARNING Ch...

Page 6: ...en close the disc cover 5 Press and hold the ON button on the right corner to power on the unit 9 Table of Contents Safety Precautions 1 6 Introduction 7 8 Table of Contents 9 Quick Starting Guide 10 11 Connecting to a TV 12 13 Connecting to Optional Equipment 14 17 Playing Back a Disc 18 21 Playing Back a KODAK Picture CD JPEG 22 Locating a Specific Title Chapter or Track 23 Playing Repeatedly 24...

Page 7: ...FF button and hold on for about 2 seconds The DVD player will automatically power off in three minutes after entering screen saver mode Quick Starting Guide SETTING UP YOUR PLAYER Step 1 connect the audio cables to AUDIO OUT of the DVD player Step 2 connect the yellow cable to the VIDEO on the side of your player For TVs that support S Video Output please follow the diagram BETTER bellow When conn...

Page 8: ...able and you should set the video output to TV TV S Video input CONNECTING HEADPHONES Avoid listening to sound at levels which may be harmful to your ears TV Audio Input Red White Your player allows two people enjoy music at the same time with Y adapter for headphone 1 Connect the Y adapter with the headphone jack of the player and then the headphones with the jacks on the oposite site of the adap...

Page 9: ...ht protection technology must be authorized by Macrovision Corporation and is intended for home and other limited viewing uses only unless otherwise authorized by Macrovision Corporation Reverse engineering or disassembly is prohibited It is forbidden by law to copy broadcast show play in public and rent copyrighted material without permission DVD video discs are copy protected and any recordings ...

Page 10: ...rection Keys Up Down Right Left 7 Previous 8 Reverse 9 Forward 10 Next 11 ON Play Combined function 12 OFF Stop Combined function Set SPDIF Output to SPDIF PCM in General Setup from the Setup Menu 1 2 3 4 5 6 7 8 9 10 12 11 1 STANDBY 2 MENU 3 NUMBERS 4 GOTO 5 PROGRAM 6 AUDIO 7 CURSOR UP DOWN RIGHT LEFT 8 PLAY 9 SETUP 10 SLOW 11 STEP 12 PREVIOUS 13 NEXT 14 PBC Playback Control 2 3 4 5 6 8 9 1 7 15 ...

Page 11: ...eatedly during playback the picture will advance one frame each time then press PLAY button to resume normal playback During the still playback the sound is muted Playing Back a Disc HOW TO START PLAYBACK FROM THE MENU SCREEN Title 1 Title 3 Title 2 Title 4 HOW TO PAUSE PLAYBACK STILL PLAYBACK 1 Press TITLE MENU to access the menu screen 2 Press or the number buttons to select the title 3 Press th...

Page 12: ...tomatically 2 Select a folder or a picture song contained on the JPEG or other data disc a menu will appear on the screen Press UP or DOWN to select a folder and press ENTER or PLAY to view folder contents shown in right column 3 Select one play mode You can use the button 1 ALL to select one playback mode repeat one or all Press UP or DOWN to choose the picture or song the you want to enjoy 4 Sta...

Page 13: ...le menu 1 Press the TITLE button On the LCD or TV screen the title menu will appear 2 Press the button to select the title you want You can also directly locate a specific title by pressing its assigned number with the number buttons 3 Press the PLAY button This will cause the DVD video player to start playback from chapter 1 of the title selected You also can use skip buttons to select a title or...

Page 14: ...CH 1 TT 01 CH 03 6 TT CH 2 TT CH 7 TT CH 3 TT CH 8 TT CH 4 TT CH 9 TT CH 5 TT CH 10 TT CH EXIT START NEXT 25 HOW TO REPEAT A SPECIFIC SEGMENT 1 Press the A B button at the beginning of the segment in which you want to repeat playback point A 2 Press the A B button again at the end of the segment point B The DVD video player will automatically return to point A and start to repeat playback of the s...

Page 15: ...playback the zoom point shifts To cancel the zoom function press ZOOM again 2x 3x 4x Normal Playback 27 3 Highlight START and press ENTER or PLAY to start program playback 4 To clear the programmed move the cursor to STOP and then press ENTER or PLAY to confirm it Playing in Favorite Order PROGRAM TT 01 CH 1 TT 01 CH 03 6 TT CH 2 TT CH 7 TT CH 3 TT CH 8 TT CH 4 TT CH 9 TT CH 5 TT CH 10 TT CH EXIT ...

Page 16: ...s function you can view on your TV the following Current title Track number Total playing time Playing time Press the DISPLAY during playback to turn on the ON SCREEN DISPLAY Press it again to turn it off 29 Selecting Subtitles HOW TO DISPLAY SUBTITLES You have the option to select a preferred subtitle from those included on the DVD video disc Press the SUBTITLE button during playback 1 03 2 03 SU...

Page 17: ...e press ENTER or PLAY Preference Page Audio Eng Subtitle Eng Disc Menu Eng Parental Password Default Go To Preference Page 31 If the DVD video disc was recorded with multiple angles you have the option to change the camera angle of the scene you are watching Press the ANGLE button while playing back a scene recorded with multiple angles You may only press the ANGLE button when the angle icon is fl...

Page 18: ...Y AND LOW LEVEL OF DEGRADATION THE LATTER MEANS THAT THE BATTERY CAN ALSO BE RECHARGED WHEN ONLY PARTLY SPENT Plug the AC adapter into the battery Please fully charge the battery prior to first use USE AND MAINTENANCE 1 Make sure the unit is powered off and unplugged 2 Attach the battery pack to the outlet of the unit as the arrowhead 1 and push it forward as arrowhead 2 to align them with each ot...

Page 19: ... idicator turns green Afully charged battery can power the unit for about 2 hours Power consumption depends on the operations of the player such as brightness of the screen volume level etc Recharge the battery timely when fully spent in order to maximize its life Never recharge the battery which is already fully charged Under no circumstance should you short out the battery store it in a metal co...

Page 20: ...free from scratches fingerprints Insert a playable disc Check the disc type and color system Do not playback a disc which region code is different from that of of your player Clean the disc Cancel the parental lock function or change the parental lock level The Pre set password is 3308 Reset the player 37 Customizing the Function Settings Dolby Digital Setup Dual Mono Dynamic Go To Dolby Digital S...

Page 21: ...d by a passenger in your vehicle be sure that it is secured or held safely and does not obstruct any safety device i e airbag seat belt etc that is fitted 1 Insert the unit into bag as shown 2 Insert the straps on carrying bag as shown 3 Take straps and hook up the neck headrest of the driver s seat as shown 4 Adjust the straps tightly so that the unit is secured 007B qxd 2005 5 8 10 41 页面39 1 1 ...

Reviews: