8
9
ASSEMBLY AND MOUNTING
THE SMART WAND
™
POWER UP
Included in your package are six
(6) 1.5v Alkaline AA BATTERIES
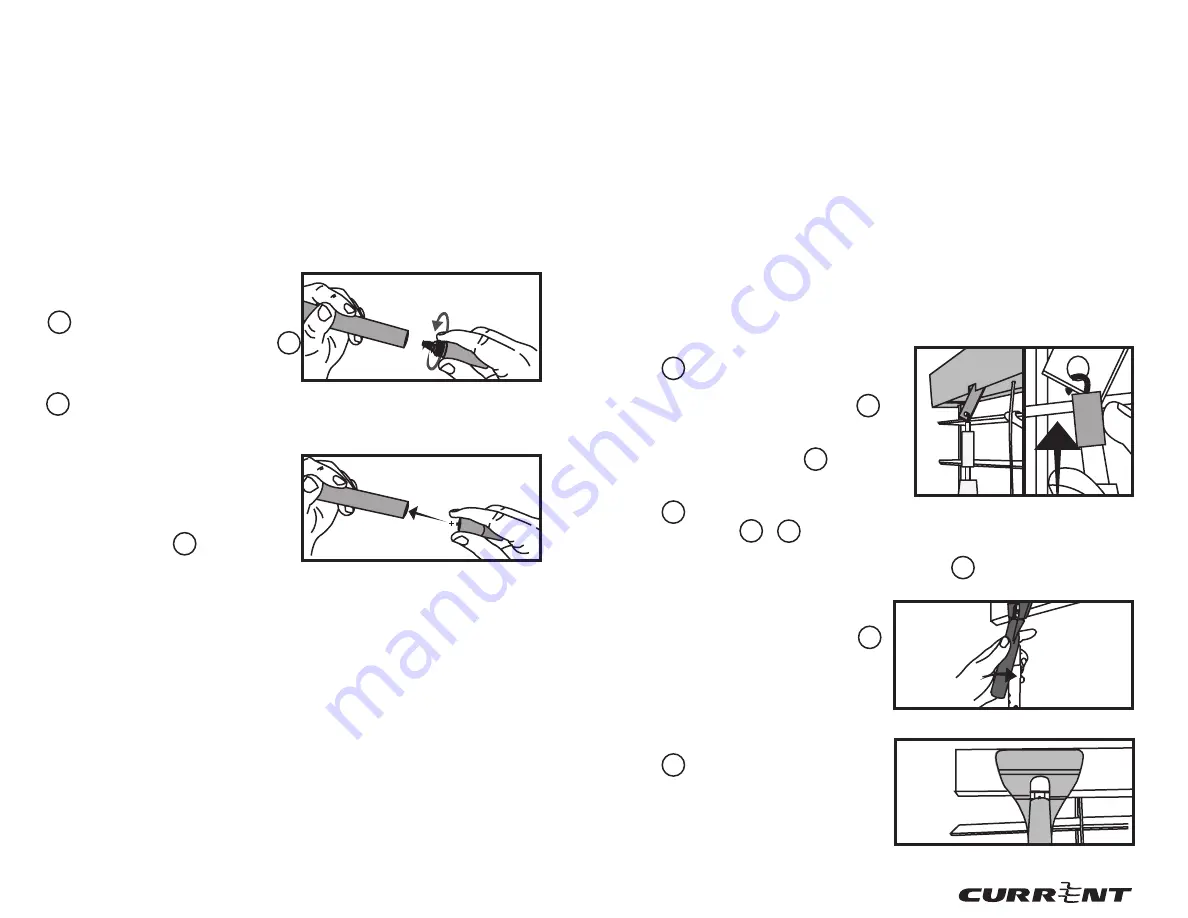
D . To install the batteries,
unscrew the BATTERY CAP g
located at the bottom of the
SMART WAND™ TWIST HANDLE
f [Fig. 1].
Insert the batteries one after the
other with the positive (+) side
in first [Fig. 2]. Once the batteries
have been inserted, screw the
BATTERY CAP g back on to
secure.
If batteries are properly installed, the SMART WAND™ will play a
confirmation tune.
Figure 1; Unscrew Battery Cap
Figure 2, Insert Batteries
HORIZONTAL BLINDS INSTALLATION GUIDE
Before installing the SMART WAND™, make sure you are able to freely
tilt your blinds in both directions by turning the twist wand which
came with your blinds. If there is significant resistance, you may need
to contact your blind manufacturer.
If your blinds utilize a cord to
tilt the slats, first proceed to the “Converting a Corded Tilt Blind”
section in the User Guide & Installation Manual [Pg. 21].
Make sure the blind slats are in the horizontal or fully opened positon
and the header is free of dirt, grime, and grease. If not, use a household
cleaner to clean the header before installation.
Detach the original manual tilt wand and attach the SMART
WAND
™ to the blind’s wand hook.
Mount your SMART WAND™
A [Fig. 3] by connecting or
inserting the SMART WAND’S™
slat ATTACHMENT HOOK a
to your blind’s tilt gear stem.
Carefully push up the plastic
RETAINING SLEEVE c , [Fig.
3.1] to secure the connection.
Now rotate the SMART WAND™
A until the two SENSOR
SWITCHES d & e are in front
or facing into the room.
Figure 3; Hook
Wand onto Tilt
Stem
Figure 3.1; Push up
Retaining Sleeve
Attach the HORIZONTAL BLIND MOUNT B perpendicular to the
blind’s header.
Figure 4; Snap on Blind Mount
For further assistance during the assembly and mounting process, please
view our online instructional videos.
Figure 5; Proper Positioning
Perform a test fit of the
HORIZONTAL BLIND MOUNT B
by snapping the mount onto the
SMART WAND™. Slide the mount
up or down along the SMART
WAND™ until your blind’s
tilt gear stem and the SMART
WAND™’s ATTACHMENT HOOK
a are adjacent to the cutout in
the blind mount. Be sure the
bottom of the horizontal blind
mount is resting above the two
sensor switches.


