


CUNO ScaleGard LP SGLP-RO
Pictures and Additional
Information: Corresponding
chapter of Equipment Manual
When
Yearly
Tools
Piece of 3/8” tubing OR
Bucket
Bicycle or tire pressure
gauge
Bicycle tire pump
Reverse Osmosis
CUNO: Model SGLP-RO
Check Tank Pressure
2.
Unscrew the blue cap on the side of the tank to expose the Schrader Air Valve.
3.
Using a standard bicycle or automobile tire pressure gauge that is capable of
reading pressure accurately from 0-10 psi. Connect the air pressure gauge to
the Schrader Air Valve on the water tank.
4.
Read the tank's air pressure.
5.
The air pressure should be between 8 and 10 psi.
6.
If the air pressure is below 8 psi or above 10 psi complete the following steps.
a.
Using a standard bicycle pump add or release air pressure
in the tank.
b.
Repeat Steps 4-5 until the pressure is 8-10 psi.
c.
Make sure the blue cap is replaced on the air pressure port.
7.
Close the water sample valve.
8.
Turn on the inlet water valve and/or booster system (if applicable).
9.
Allow 60 minutes for tank to fill before operating equipment.
1.
Drain water from the storage tank.
a.
Shut off the inlet water valve or water booster system if applicable.
b.
Make sure the tank shut-off valve located at the top of the water tank is open.
c.
Attach a piece of tubing from the water sample valve to drain
OR use a bucket to catch water from the water sample valve.
d.
Open the water sample valve and drain the tank until empty. Leave water
sample valve open.
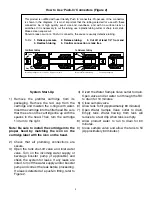
Tank Shut-Off Valve
Inlet Water Valve
Schrader Air Valve
8
Summary of Contents for SCALEGARD SGLP-RO
Page 11: ...7 000 450 750 ...


